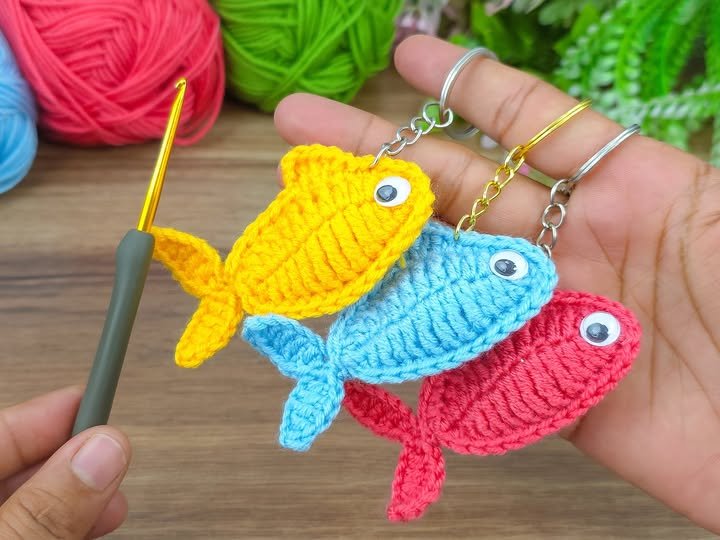
The Beautiful crochet fish keychain – pattern is a delightful project that brings a playful and colorful touch to your accessories.
Whether you’re new to crochet or an experienced enthusiast, creating a fish keychain can be an enjoyable and satisfying experience.
The charm of a crochet fish keychain lies not only in its adorable design but also in its versatility—it can be used as a keychain, a zipper pull, or even as a decorative piece on your bag or purse.
Crocheting a fish keychain is an excellent project for anyone looking to practice basic crochet techniques while creating something practical and fun. This project allows you to explore different color combinations and textures, making it a great way to showcase your creativity. In this guide, we will walk you through all the steps needed to complete your Beautiful crochet fish keychain – pattern, from selecting materials to the final touches.
A Beautiful crochet fish keychain – pattern is simple yet charming. The small size of the fish makes it perfect for crocheting in a short amount of time, and you can customize it to match your personal style. Plus, it’s an excellent gift idea for friends and family. Let’s dive into how you can make this fish keychain from scratch, and turn a simple idea into a beautiful accessory.
1. Materials You Need for the Beautiful Crochet Fish Keychain – Pattern
Before you begin working on your Beautiful crochet fish keychain – pattern, gathering the right materials is crucial for ensuring that your project turns out beautifully. Below is a list of essential supplies you will need:
- Yarn: Choose a yarn that is lightweight and easy to work with, such as sport weight or worsted weight yarn. You can use different colors for the fish’s body, fins, and tail to add vibrancy. Cotton yarn is a great option for its smooth texture and durability.
- Crochet Hook: A suitable crochet hook size will depend on the thickness of your yarn. For sport weight yarn, a 3.5mm (E) or 4mm (G) crochet hook works well. If you’re using thicker yarn, you may want to use a larger hook.
- Keychain Ring: To turn your crochet fish into a keychain, you’ll need a small keychain ring. These are usually available in craft stores or online and come in various sizes.
- Stuffing: To give the fish some dimension and softness, a small amount of stuffing will be required. You can use fiberfill or any other soft material suitable for crocheting.
- Tapestry Needle: A tapestry needle will help you weave in the ends of your yarn and sew pieces of your fish together neatly.
- Scissors: You’ll need a pair of sharp scissors to cut your yarn once you’re finished crocheting.
Having these materials on hand ensures that you won’t have to stop midway through your project to gather more supplies, which will make the process smoother and more enjoyable.
2. Step-by-Step Instructions for the Beautiful Crochet Fish Keychain – Pattern
Now that you have gathered your materials, it’s time to start crocheting your Beautiful crochet fish keychain – pattern. Follow these detailed steps to make your own fish keychain:
1. Start with a Magic Ring
To begin, create a magic ring to start your fish’s body. A magic ring allows you to crochet tightly around the center, ensuring that there are no gaps in your piece. If you are unfamiliar with how to make a magic ring, there are plenty of online tutorials that can guide you through the process. Once the magic ring is made, crochet a few single crochet stitches into it, increasing as necessary to form the round shape of the fish’s body.
2. Crochet the Fish’s Body
Continue working in the round, gradually increasing stitches to make the fish’s body grow larger. You will be working with single crochet stitches (sc) for most of the body. Be sure to check your stitch count to ensure that the fish’s shape remains even. You may choose to use a different color for the body of the fish, which adds an interesting contrast to the final design.
3. Create the Fish’s Fins and Tail
Once the body of your fish is the desired size, it’s time to work on the fins and tail. For the fins, you will crochet small pieces, attaching them to the sides of the body as you go. These fins are generally made with a few chain stitches and double crochet stitches (dc) to create a subtle wave-like effect. The tail is worked in a similar way, but it should be slightly larger than the fins to stand out.
4. Stuff the Fish
After finishing the body and tail, take some fiberfill or stuffing material and gently stuff the fish to give it a three-dimensional look. Be careful not to overstuff, as this can cause the stitches to stretch and distort the shape of the fish. The fish should feel firm but not too bulky.
5. Attach the Keychain Ring
To complete the Beautiful crochet fish keychain – pattern, attach the keychain ring to the top of the fish. You can either crochet a small loop and attach the ring to the loop or use a tapestry needle to securely sew the ring to the fish’s top. Make sure it is tightly attached so that it can hold up to regular use as a keychain.
6. Finish Off and Weave in Ends
Once everything is assembled and attached, it’s time to finish your project. Use the tapestry needle to weave in any loose ends of yarn and ensure that all parts are securely fastened. Take a moment to check your fish keychain for any loose stitches or imbalances and make any necessary adjustments. Then, trim the excess yarn and give your fish keychain a final inspection before using it.
3. Tips for Creating the Perfect Beautiful Crochet Fish Keychain
To ensure your Beautiful crochet fish keychain – pattern turns out just the way you envision it, here are some helpful tips:
- Choose the right yarn: Opt for yarn that is not too bulky, as you want your fish to remain small and light enough for a keychain. Cotton yarn is a popular choice because it holds its shape well.
- Use stitch markers: When working in the round, stitch markers can help you keep track of the beginning and end of each round, preventing any confusion.
- Play with colors: Get creative with the colors of your fish. You can use vibrant colors for a fun look or subtle shades for a more natural effect. Experiment with combinations like blue, green, and yellow for a more sea-inspired vibe.
- Be mindful of stuffing: Don’t overstuff the fish; instead, add a small amount of stuffing to achieve a soft and slightly puffy look. This will also help the fish hold its shape without becoming too rigid.
- Tighten your stitches: To avoid gaps between the stitches, make sure to crochet tightly, especially in the first few rounds when working with a magic ring.
- Add decorative touches: Once your fish is completed, consider adding small embellishments, like tiny beads for eyes or a small piece of ribbon for extra detail.
4. Common Mistakes to Avoid While Crocheting the Beautiful Crochet Fish Keychain
Even experienced crocheters make mistakes from time to time. Here are some common pitfalls to watch out for when creating the Beautiful crochet fish keychain – pattern:
- Forgetting to join rounds: When crocheting in the round, it’s important to join the rounds properly to avoid creating an irregular shape. Always check that the ends of your rounds are connected before moving on.
- Not changing colors correctly: If you’re changing colors during your fish’s body or fins, make sure you switch colors cleanly and securely to avoid visible gaps.
- Under or overstuffing: Too much stuffing can make your fish too bulky, while too little stuffing can make it flat. Aim for a balanced, lightly stuffed fish.
- Crocheting too loosely: If your stitches are too loose, the fish may become misshapen, and gaps will appear between the stitches. Keep your tension consistent throughout the project.
- Not checking for symmetry: When attaching the fins and tail, be sure that they are positioned symmetrically on the fish’s body to ensure it looks well-proportioned.
- Skipping the finishing touches: Weaving in the ends and trimming excess yarn is essential for creating a polished look. Don’t skip this step, as it can leave your fish looking unfinished.
FAQ
1. How long does it take to make a crochet fish keychain?
The time it takes to make a Beautiful crochet fish keychain – pattern depends on your experience and the complexity of your design. Generally, it should take between 1 to 2 hours.
2. Can I make a crochet fish keychain without using a keychain ring?
Yes, you can make the fish keychain without the ring and use it as a decorative piece or attach it to something else, like a bag zipper or backpack.
3. What type of yarn is best for a crochet fish keychain?
A lightweight yarn, such as sport weight or worsted weight cotton yarn, is ideal for making a crochet fish keychain because it provides structure without being too bulky.
4. How can I customize the crochet fish keychain?
You can customize the keychain by experimenting with different colors, adding embellishments like beads for eyes, or using various stitch techniques for texture.
5. What is the best way to attach the keychain ring?
The best way to attach the keychain ring is by either crocheting a small loop or sewing the ring securely to the top of the fish using a tapestry needle.
Conclusion
The Beautiful crochet fish keychain – pattern is a fun and creative project that allows you to experiment with color, texture, and design. Whether you’re making it for yourself or as a gift, this keychain adds a cute and personal touch to any set of keys, bags, or accessories. With the right materials, patience, and attention to detail, you’ll soon have your very own charming crochet fish keychain to enjoy.
We
hope this guide has helped you create your own Beautiful crochet fish keychain – pattern. Please share your thoughts, suggestions, and any tips you have in the comments below! Happy crocheting!