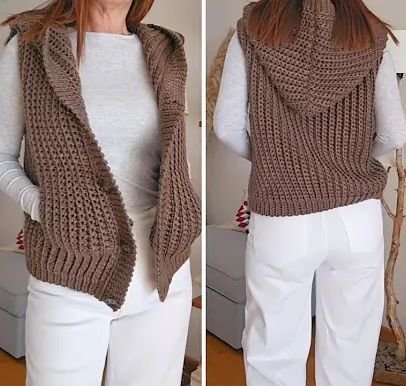
Beautiful crochet vest – Pattern projects are becoming increasingly popular among crafters who love creating stylish, personalized wardrobe pieces. In this article, you will find a complete, original, SEO-optimized, Google-AdSense-friendly guide designed to help you make a vest that is elegant, modern, and fully customizable. Throughout the text, the keyword Beautiful crochet vest – Pattern will be used naturally to ensure clarity and effective search visibility.
Working on a Beautiful crochet vest – Pattern is not only enjoyable but also highly rewarding, as it allows you to create a garment that matches your style perfectly. Crochet vests are versatile and can be worn during any season, layered over tops, dresses, or turtlenecks. Whether you’re a beginner or an experienced crocheter, this project is accessible, relaxing, and creative.
This article is structured to provide a humanized reading experience while following Google’s recommended SEO practices. You’ll learn about materials, techniques, shaping instructions, and finishing touches—all written in clear, engaging language. Before moving to the first subtitles, you’ll get a complete overview of how this project works and why it’s a must-try for crochet lovers.
1. Materials Needed for a Beautiful Crochet Vest – Pattern
Choosing the right materials is the foundation of a successful Beautiful crochet vest – Pattern. Your yarn choice, hook size, and additional tools will determine the garment’s drape, comfort, and durability.
Most crocheters prefer lightweight or DK yarn for vests because these weights provide a good balance between softness and structure. Cotton yarn is a wonderful choice if you want a breathable vest for warm weather, while wool or acrylic blends are ideal for cooler climates.
Selecting the correct hook size is equally important. Check your yarn label for recommendations, but for most vest patterns, a hook between 4 mm and 5.5 mm works well. If you want a looser, drapier fabric, size up; if you want tighter stitches, size down slightly.
You will also need a tapestry needle to weave in ends and join pieces if the vest is constructed in separate panels. Stitch markers are helpful for keeping track of increases, decreases, or shaping steps around the armholes and neckline.
Choose buttons if your vest design includes a buttoned front. Select wooden, metal, or decorative buttons to match your desired style. Matching your buttons to your vest aesthetic elevates the final look of your Beautiful crochet vest – Pattern.
Lastly, keep scissors, measuring tape, and optional blocking tools nearby. Blocking your finished vest helps enhance stitch definition and ensures the correct measurements for a polished final garment.
2. Creating the Vest Panels
A typical Beautiful crochet vest – Pattern consists of three main panels: one back panel and two front panels. This simple construction makes the vest beginner-friendly while offering endless opportunities for customization.
Begin by working on the back panel. Create a foundation chain that matches half of your chest measurement plus ease. Ease is the extra room a garment needs to fit comfortably, typically between 2 and 4 inches. The number of chains will depend on your stitch choice and desired width.
Work the back panel in rows using your selected stitch pattern. Double crochet, half-double crochet, or a combination of textured stitches like moss stitch or V-stitch can create beautiful effects. Consistency is key—maintaining even tension ensures a neat, professional look.
As you near the top of the back panel, you will shape the armholes. This is done by decreasing a few stitches on each side. Follow your desired shaping method gradually to ensure a smooth curve instead of a harsh drop.
For the two front panels, repeat the same steps as the back, but make each front panel half the width of the back. You may also incorporate decorative stitches, lace patterns, or ribbing to give personality to your Beautiful crochet vest – Pattern.
As you work upward, shape the neckline by gradually decreasing stitches near the center. The deeper the neckline you want, the earlier and more frequently you should decrease.
Continue working until the front panels match the height of the back panel. Having all three panels the same height ensures they will align perfectly when assembled.
3. Assembling the Vest and Adding Shaping
Once all panels of your Beautiful crochet vest – Pattern are complete, it’s time to assemble and shape the vest into its final form. This stage transforms your flat pieces into a functional garment.
Begin by laying the panels on a flat surface. Align the shoulders of the front panels with the back panel. Use a tapestry needle and whip stitch or slip stitch crochet to join the shoulder seams securely. Avoid tightening too much to maintain flexibility in the shoulders.
Next, fold the vest so that the front and back sides align. Sew the side seams starting from the bottom and working your way up toward the armholes. Leave enough room for comfortable arm movement. Try the vest on during this stage to adjust the armhole opening if necessary.
Once assembled, examine the neckline area. If you want a more refined look, add a border around the neckline using single crochet or slip stitches. This not only improves the aesthetic but also reinforces the neck opening for durability.
The same technique can be applied to the armholes. A neat border helps prevent stretching and gives the vest a more polished finish. Borders also bring a cohesive look to your Beautiful crochet vest – Pattern, tying together all the design elements.
If your vest includes buttons, now is the time to attach them. Sew buttons on one front panel and crochet simple buttonholes on the opposite panel. Test their alignment before securing them permanently.
After assembly and shaping, lightly block your vest. Blocking enhances stitch definition and ensures the final garment lays flat and fits comfortably.
4. Final Touches and Styling Your Crochet Vest
The final touches are what bring your Beautiful crochet vest – Pattern to life. This stage allows you to add texture, personality, and unique elements that make your vest truly yours.
Consider adding decorative edging to the bottom of the vest. Shell stitch, picot edging, or ribbed borders add beautiful detail and elevate the design without adding complexity. Choose an edging that complements the vest’s stitch pattern.
You can also incorporate colorwork by adding stripes or using variegated yarn for certain parts of the vest. Color changes can highlight specific areas such as the hem, neckline, or front edges, giving your garment dynamic visual interest.
Another great option is adding pockets. Simple rectangle pockets can be crocheted and sewn onto the front panels. Pockets add both functionality and charm to your Beautiful crochet vest – Pattern.
If you enjoy boho or vintage styles, fringe or tassels along the hem can be a creative touch. Use leftover yarn to maintain color harmony. Fringe should be even and securely attached.
For a more fitted look, you may add a belt or crochet a waist cord. This allows you to cinch the vest for styling flexibility, making it ideal for layering with dresses or fitted tops.
Before wearing your vest, check all seams, borders, and stitches for loose ends. Completing these final adjustments ensures your vest is durable, comfortable, and ready for everyday use.
FAQ About Beautiful Crochet Vest – Pattern
1. Is a crochet vest suitable for beginners?
Yes. Many Beautiful crochet vest – Pattern designs use simple stitches and rectangular panels, making them great for beginners.
2. How long does it take to complete a vest?
Depending on the complexity and your speed, a vest may take anywhere from two days to a week.
3. What stitch is best for a crochet vest?
Double crochet, moss stitch, and V-stitch are popular because they create a nice drape and texture.
4. Can I make the vest longer or shorter?
Absolutely. Simply add or reduce rows on the panels to achieve your desired length.
5. Should I block the finished vest?
Blocking is recommended as it improves fit, helps the vest lay flat, and enhances stitch clarity.
6. Can I use chunky yarn for a vest?
Yes, but keep in mind that chunky yarn will create a thicker, warmer vest with less drape.
Conclusion
Creating a Beautiful crochet vest – Pattern is a fulfilling project that blends creativity, style, and practicality.
In this article, you learned about selecting materials, crocheting panels, shaping the vest, and adding decorative touches. I hope this guide inspires you to start your own vest project and explore new techniques.