The Bee Bracelet in Crochet – Tutorial is a delightful project that combines the charm of nature-inspired jewelry with the soothing rhythm of textile artistry. In this detailed guide, you will learn how to create a whimsical accessory that captures the essence of a garden in springtime, perfect for gifting or adding a pop of color to your own wardrobe. By following this Bee Bracelet in Crochet – Tutorial, you are not just making a piece of jewelry; you are mastering the art of miniature amigurumi techniques applied to wearable fashion, ensuring a result that is both sturdy and adorable.
Creating handmade accessories is a fantastic way to express your personality, and this Bee Bracelet in Crochet – Tutorial focuses on the tiny details that make a big impact. We will explore how to work with fine threads and small hooks to achieve the delicate definition required for a tiny bumblebee and its surrounding elements. Throughout this Bee Bracelet in Crochet – Tutorial, we emphasize the importance of tension control and stitch definition, which are the secrets to making your crochet work look professional and polished, even at a very small scale.
As you embark on this creative journey with our Bee Bracelet in Crochet – Tutorial, you will find that the materials needed are minimal, making it an excellent upcycling project for those leftover scraps of yellow, black, and white yarn. This SEO-optimized guide is designed to walk you through every loop and pull, providing a clear path for beginners and seasoned enthusiasts alike. Let’s prepare our mercerized cotton yarn, sharpen our focus, and dive into the wonderful world of micro-crochet as we begin this comprehensive Bee Bracelet in Crochet – Tutorial.
1. Essential Materials and Preparation for Your Bee Bracelet
The foundation of a successful Bee Bracelet in Crochet – Tutorial begins with selecting the right yarn. For jewelry, mercerized cotton is the gold standard because it has a beautiful sheen, doesn’t pill, and holds its shape exceptionally well over time. Since we are creating a miniature bee, a weight category of Lace or Fingering weight is ideal to ensure the bracelet remains delicate and lightweight on the wrist.
In this Bee Bracelet in Crochet – Tutorial, your crochet hook size is paramount to achieving the right scale. A steel hook ranging from 1.25mm to 1.75mm is typically recommended for these fine threads. Using a hook that is slightly smaller than what the yarn label suggests will create a dense fabric, which is necessary to prevent any poly-fill stuffing from peeking through the stitches of your tiny bee.
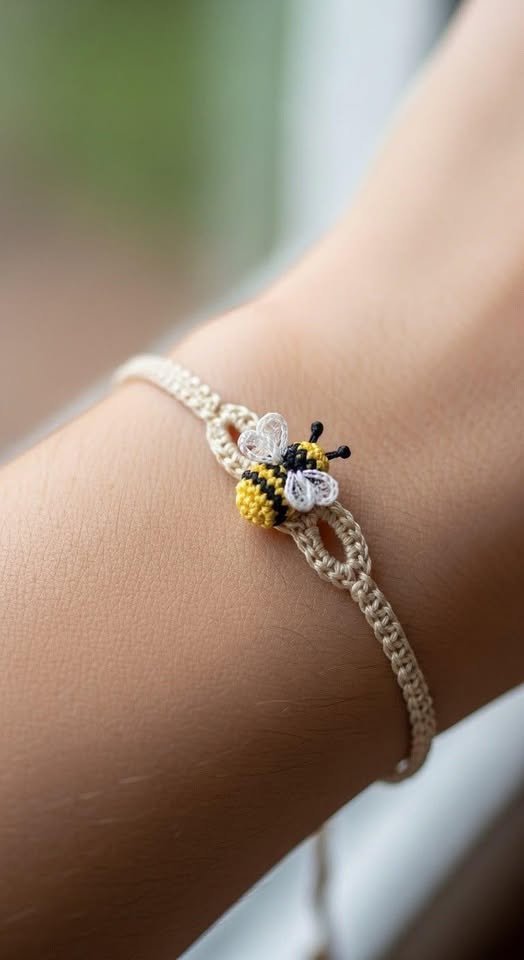
Color selection is where your Bee Bracelet in Crochet – Tutorial truly comes to life. You will need a vibrant mustard or sun-yellow, a deep charcoal black, and a translucent white or light blue for the wings. High-contrast colors are essential in micro-crochet because they help define the stripes of the bee, making the character recognizable even from a distance or in a small photo.
Beyond the yarn, this Bee Bracelet in Crochet – Tutorial requires a few specialized notions. You will need a very fine tapestry needle for weaving in ends and embroidering the face, as well as small jewelry findings such as lobster claws or jump rings. If you prefer an all-crochet approach, we will also show you how to create a crocheted button loop for a completely metal-free accessory.
Preparation also involves setting up a well-lit workspace, which is a tip often overlooked in a Bee Bracelet in Crochet – Tutorial. Working with dark threads like black can be straining on the eyes, so a good desk lamp or natural sunlight is your best friend. Having a small pair of embroidery scissors nearby will also help you make the precise cuts needed for finishing your miniature masterpiece.
Finally, before starting the stitches in this Bee Bracelet in Crochet – Tutorial, take a moment to practice a few increase and decrease stitches with your chosen thread. Micro-crochet requires a slightly different hand position than bulky yarn projects, and a quick “warm-up” will help you maintain a consistent gauge throughout the length of the bracelet and the body of the bee.
2. Crocheting the Bumblebee Body and Wings
The centerpiece of our Bee Bracelet in Crochet – Tutorial is the tiny bumblebee itself. We begin with a magic ring (or magic circle) using yellow yarn, which allows for a perfectly closed start without a hole in the center. In the first few rounds, you will work simple single crochet (sc) stitches, gradually increasing to create a rounded, oval shape that serves as the bee’s plump body.
Color changes are a vital skill highlighted in this Bee Bracelet in Crochet – Tutorial. To get those crisp, clean stripes, you should change from yellow to black on the last pull-through of the final stitch of the round. This technique ensures that the colors don’t bleed into each other, maintaining the iconic look of the honeybee. We will alternate these colors every two rounds to create a balanced striped pattern.
The wings in this Bee Bracelet in Crochet – Tutorial are made separately using a very simple chain and slip stitch combination. By working into both sides of a foundation chain, you can create a small, leaf-like shape that mimics the delicate structure of an insect’s wing. Using a thinner thread or even a single ply of yarn for the wings can add a touch of realism and lightness to the design.
As you assemble the bee for your Bee Bracelet in Crochet – Tutorial, stuffing becomes a delicate task. You only need a tiny amount of premium polyester fiberfill—about the size of a marble—to give the bee its 3D form. Over-stuffing can stretch the stitches and distort the shape, so use the blunt end of your crochet hook to gently push the stuffing into place before closing the final round.
Attaching the wings is a crucial step in the Bee Bracelet in Crochet – Tutorial that requires a steady hand. Use the long tails left over from your wing pieces to sew them onto the second black stripe of the body. Centering them correctly is important for the balance of the bracelet; you want the bee to sit flat against the wrist rather than tipping over to one side when worn.
To finish the bee portion of the Bee Bracelet in Crochet – Tutorial, you can add tiny eyes using black embroidery floss or very small seed beads. A simple French knot or a single small stitch is usually enough to give your bee a friendly expression. This attention to detail is what transforms a simple crochet project into a piece of boutique-style handmade jewelry.
3. Crafting the Bracelet Band and Floral Accents
Now that the character is ready, the next phase of the Bee Bracelet in Crochet – Tutorial is creating the band. A foundation cord or a simple chain and single crochet row works well, but for extra durability, a Romanian Point Lace cord is highly recommended. This type of cord is sturdy, doesn’t stretch much over time, and provides a beautiful texture that complements the bee.
The length of the band in this Bee Bracelet in Crochet – Tutorial should be tailored to the wearer’s wrist. Standard adult bracelets are usually between 6.5 to 7.5 inches. Keep in mind that crochet fabric can have a slight “give,” so it is often better to make the band a quarter-inch shorter than the actual wrist measurement to ensure a snug and comfortable fit.
To enhance the garden theme of the Bee Bracelet in Crochet – Tutorial, we can add small crocheted flowers along the band. Using a soft pink or white yarn, you can create a simple five-petal flower by working into a small ring. These tiny blooms act as anchors for the bee and add a layer of visual interest and femininity to the overall jewelry design.
Integration is key in the Bee Bracelet in Crochet – Tutorial. Instead of just sewing the bee onto the band, try crocheting the band through the base of the bee’s body. This creates a much stronger bond and ensures that the bee doesn’t wiggle or fall off with daily wear. If you are adding flowers, space them evenly to maintain the aesthetic balance of the piece.
In this part of the Bee Bracelet in Crochet – Tutorial, you may also choose to incorporate green leaf accents. A few small chains and slip stitches in a leaf-green thread can fill the gaps between the flowers and the bee, creating a miniature “vining” effect. This makes the bracelet look like a cohesive scene rather than just a collection of random parts.
The final structural element of the Bee Bracelet in Crochet – Tutorial is the closure. You can create a simple buttonhole at one end and sew a small pearl or a matching yellow bead at the other. Alternatively, attaching metal lobster clasps gives the bracelet a more commercial finish. Whichever you choose, ensure the attachment is reinforced with extra stitches for longevity.
4. Finishing Techniques and Professional Care
The final subtitled section of our Bee Bracelet in Crochet – Tutorial focuses on the “finishing touches” that elevate your work. Blocking your finished bracelet is a step you shouldn’t skip. By lightly dampening the band and pinning it straight to a foam board to dry, you settle the stitches and ensure the bracelet won’t curl or twist when it is on the wrist.
Weaving in ends is a meticulous part of the Bee Bracelet in Crochet – Tutorial. Because jewelry is viewed from both sides and is in constant contact with the skin, ends must be woven in deeply and securely. Use a sharp needle to split the yarn fibers as you weave; this “locks” the thread in place so it won’t pop out after a few hours of wear.
Stiffening the bee’s wings is a professional secret we share in this Bee Bracelet in Crochet – Tutorial. You can use a tiny drop of fabric stiffener or even clear nail polish on the tips of the wings to help them hold their shape. This prevents the wings from becoming floppy or losing their definition, keeping your bee looking fresh and “flight-ready” at all times.
Care and maintenance are essential topics for any Bee Bracelet in Crochet – Tutorial. Since this is a textile item, it can collect dust or oils from the skin. Advise users to gently hand wash the bracelet in cool water with a drop of mild soap. Avoid wringing the piece; instead, pat it dry with a towel and reshape the bee while it is still damp.
For those looking to sell their creations from this Bee Bracelet in Crochet – Tutorial, presentation is everything. Pinning the bracelet to a custom cardstock backing with your brand logo makes it ready for a craft fair or an online shop. The story of a “hand-crocheted bee” is a great selling point for customers who value sustainable and artisanal fashion.
As we conclude the technical portion of this Bee Bracelet in Crochet – Tutorial, remember that practice makes perfect. Your first bee might be a bit wonky, but by your third or fourth, you will be creating perfectly uniform insects. Crochet is a journey of patience, and this Bee Bracelet in Crochet – Tutorial is the perfect small-scale project to refine your skills and express your creativity.
FAQ – Frequently Asked Questions
1. What is the best yarn for a Bee Bracelet in Crochet – Tutorial?
The best choice is mercerized cotton in a Lace or Fingering weight. It provides the necessary durability, stitch definition, and “jewelry-like” finish that you won’t get with standard acrylic or wool yarns.
2. How long does it take to complete this Bee Bracelet in Crochet – Tutorial?
Depending on your skill level, a single bracelet can take anywhere from 1 to 3 hours. It is a perfect “one-session” project that provides instant gratification for crocheters.
3. Can I make this Bee Bracelet in Crochet – Tutorial without jewelry hardware?
Yes! You can create a crocheted loop and button closure using a small bead or even a crocheted ball, making the entire bracelet soft and metal-free, which is great for people with sensitive skin.
4. Is this project suitable for children?
While the stitches are basic, the small scale can be challenging for young children. It is best suited for teenagers or adults, or as a gift made for a child (under supervision due to small parts).
5. How do I make the bee stripes look perfect?
The key is the seamless color change. Always change colors on the last loop of the stitch before the new color starts. This tip is essential in our Bee Bracelet in Crochet – Tutorial for a professional look.
6. Can I add beads to the Bee Bracelet in Crochet – Tutorial?
Absolutely! Threading yellow or black seed beads onto your yarn before you start crocheting can add a beautiful sparkle to the bee’s body or the bracelet band itself.
Conclusion
This Bee Bracelet in Crochet – Tutorial has guided you through the intricate process of creating a miniature, wearable work of art. We have covered everything from selecting high-quality mercerized cotton and fine steel hooks to the specific amigurumi techniques needed to shape a tiny bumblebee.
By learning to create the band, the floral accents, and the professional finishing touches, you now have the skills to produce a unique accessory that stands out for its detail and craftsmanship. Whether you are making this for a friend, a child, or your own collection, the joy of micro-crochet is found in every tiny stitch.