
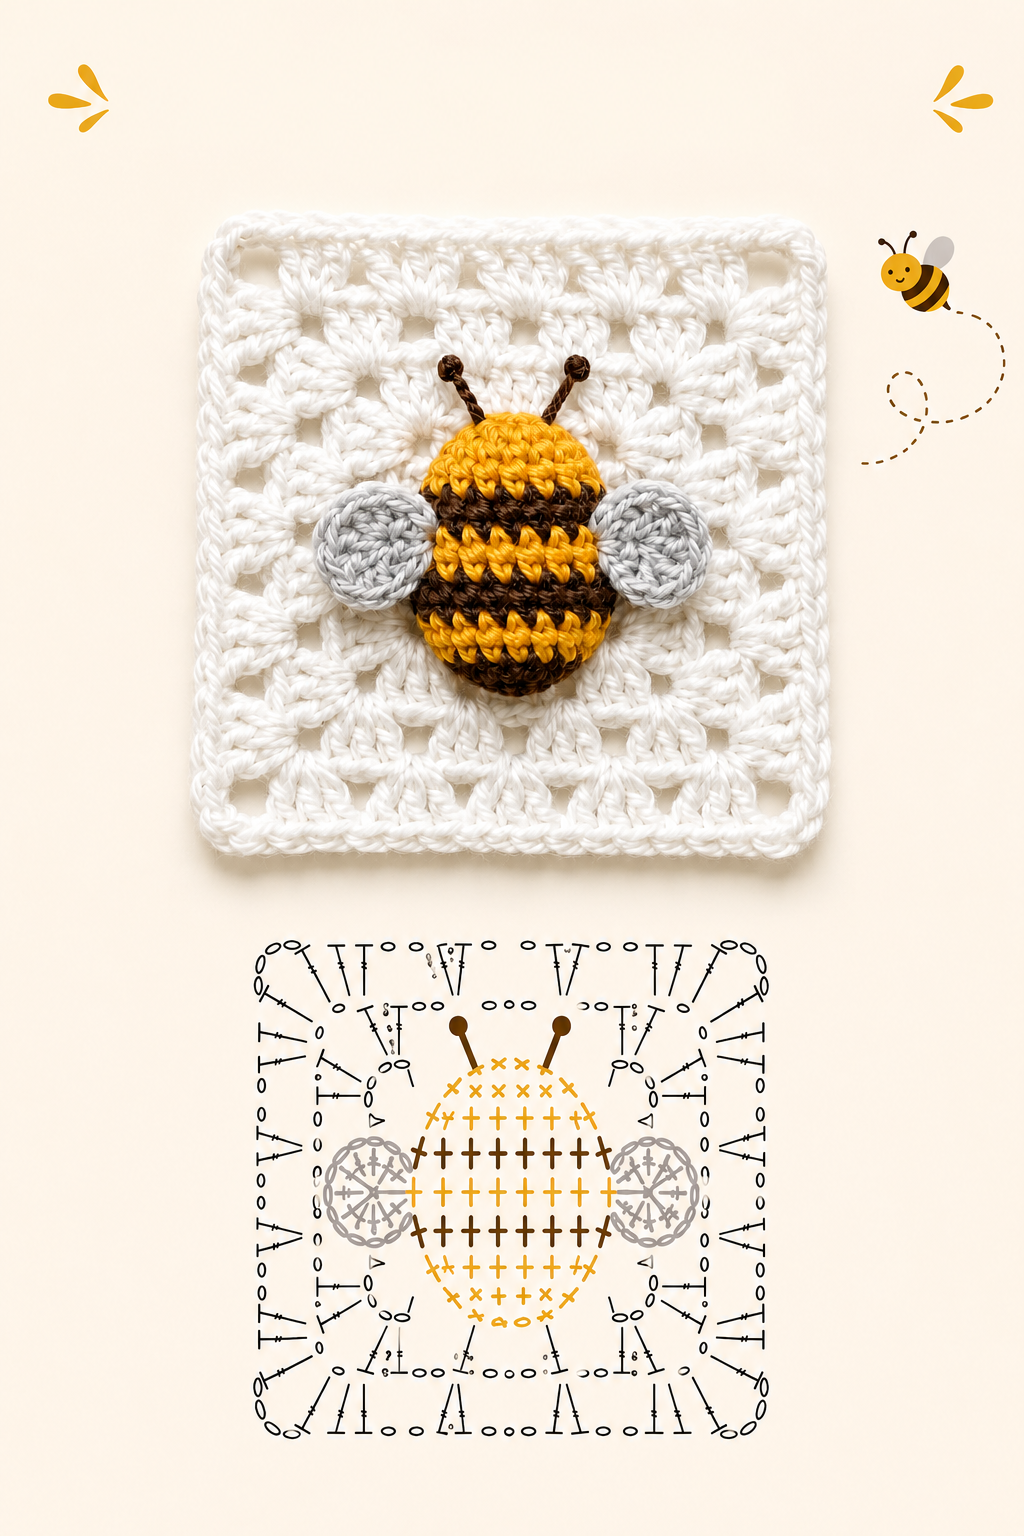
Bee Granny Square Pattern is a cheerful crochet project that combines the timeless structure of a granny-style square with an adorable three-dimensional bee appliqué. The design shown in the inspiration image uses a light neutral square as the background, while the bee stands out in golden yellow, dark brown, and soft gray. This contrast makes the motif easy to recognize and gives the finished square a handmade character that can work beautifully in blankets, tote bags, cushions, wall decorations, and other creative projects. The Bee Granny Square Pattern is also a useful project for practicing several fundamental crochet techniques while creating something decorative and practical.
One of the most appealing features of this crochet bee granny square is the combination of texture and dimension. Instead of relying only on color changes inside a flat square, the bee is crocheted as a separate element and attached to the center. Its striped body creates a bold focal point, while the rounded wings and small antennae add personality without making the design unnecessarily complicated. The surrounding square can be worked with classic granny clusters or a similar openwork construction, allowing beginners who already understand basic crochet stitches to gradually develop their skills. More experienced crocheters can also customize the project with different yarn weights, square dimensions, or decorative finishing techniques.
Throughout this tutorial, the term Bee Granny Square Pattern refers to the complete construction: the background square, striped bee body, crochet wings, antennae, assembly, and finishing. The instructions use U.S. crochet terminology and are intended as a practical interpretation of the pictured design rather than an exact stitch-for-stitch reproduction of a commercial pattern. You will learn how chains create spaces and foundations, how single crochet provides dense areas, how double crochet builds the open square efficiently, and how increases shape the bee and wings. Read through the entire pattern before beginning, especially if you plan to make several identical squares for a larger project.
Materials, Crochet Abbreviations, and Preparing the Granny Square
For this Bee Granny Square Pattern, choose smooth yarn with enough stitch definition to make the square and bee details visible. Medium-weight cotton or a cotton blend is particularly suitable because it creates defined stitches and a stable finished motif. You will need white or cream for the background, golden yellow and dark brown or black for the bee, and light gray or white for the wings. A small amount of dark yarn can also be used for the antennae. A 4 mm to 5 mm crochet hook is generally suitable for medium-weight yarn, although your yarn label and personal tension should guide the final choice.
The main abbreviations used are ch = chain, sl st = slip stitch, sc = single crochet, hdc = half double crochet, dc = double crochet, st = stitch, sp = space, inc = increase, and rep = repeat. A chain is created by pulling the working yarn through the loop already on the hook. Single crochet produces compact fabric, while half double crochet provides moderate height. Double crochet is taller and works particularly well for the airy clusters visible in a traditional granny-style background.
Begin the background with white or cream yarn. Rnd 1: Ch 4 and join with a sl st in the first ch to create a ring. Ch 3, which may count as the first dc, then work 2 dc into the center ring. Ch 2 for the first corner. Work 3 dc, ch 2 three more times into the ring. Join with a sl st to the top of the beginning ch-3. You should now see four groups separated by four corner spaces, establishing the basic geometry of the crochet granny square.
For Rnd 2, sl st across until your hook reaches the nearest corner space. Ch 3, work 2 dc, ch 2, and 3 dc into that same corner. Ch 1. In the next corner work (3 dc, ch 2, 3 dc). Continue around, adding ch-1 spaces between the corner groups. Join at the end of the round. The square should already begin developing four clear sides and four distinct corners.
Continue expanding the square using the same principle. In each new round, place (3 dc, ch 2, 3 dc) into every corner space and work 3 dc into each ch-1 space along the sides, separating neighboring clusters with ch 1. Depending on your yarn thickness, approximately five to seven rounds can create a square around 6 to 8 inches (15 to 20 cm) wide. Exact dimensions are flexible because the important goal is creating enough room for the central bee.
Before adding the bee, check that the background lies reasonably flat. If the corners pull inward, your tension may be too tight; if the square becomes noticeably wavy, your chains or stitches may be too loose. Finish the final round with a sl st, fasten off, and weave the yarn tail through several stitches on the wrong side. Light blocking can help create straight edges and symmetrical corners, giving the Bee Granny Square Pattern a cleaner foundation.
Crocheting the Striped Bee Body Step by Step
The body is the defining feature of the Bee Granny Square Pattern, and working it separately makes assembly much easier. With golden yellow yarn, begin with a small foundation that will become the rounded lower portion of the bee. Row 1: Ch 5. Starting in the second ch from the hook, work 3 sc, then work 3 sc into the final ch. Continue along the opposite side of the foundation chain with 2 sc, and work 2 sc into the last stitch. This creates a small oval rather than a straight strip.
For Rnd 2, continue around the oval using increases at both curved ends. A useful sequence is to work sc across the straight sections and 2 sc in each of the stitches positioned around the ends. The exact stitch count can be adjusted slightly according to yarn thickness because the goal is a smooth oval approximately 2½ to 3½ inches (6.5 to 9 cm) tall once completed. Mark the beginning of each round so you can easily identify the color-change position.
Continue in yellow for another round, making increases only where necessary to prevent the body from curling. Then change to dark brown. Work one or two rounds of sc in each st around without increasing. This forms the first dark stripe. When changing colors, complete the final yarn-over of the last stitch using the new color. This simple technique produces a much cleaner transition between the yellow and brown sections.
Change back to yellow and work another stripe using sc. Repeat the process with dark brown, followed by another yellow section. The body in the inspiration design contains several alternating horizontal bands, so aim for a balanced sequence such as yellow, brown, yellow, brown, yellow, with a darker lower edge if desired. Keeping each stripe approximately the same depth gives your crochet bee motif a neat and recognizable appearance.
As you approach the top of the body, begin shaping the head by decreasing gradually. A single crochet decrease (sc2tog) is made by inserting the hook into the next stitch and pulling up a loop, inserting the hook into the following stitch and pulling up another loop, then yarn over and pull through all loops. Place a few evenly distributed decreases around the upper portion until the oval narrows gently. Avoid decreasing too aggressively because the body should remain broad enough to display the striped pattern.
Fasten off while leaving a long yarn tail for sewing. Place the body in the center of your granny square before attaching anything permanently. The bee should occupy the middle without covering too much of the beautiful white cluster pattern. If you are making several squares, record the number of rounds and stitches used for this first bee. Consistent notes will make it much easier to reproduce identical Bee Granny Square Pattern motifs for a blanket.
Making the Crochet Wings, Antennae, and Assembling the Bee
The wings add dimension and soften the strong yellow-and-brown contrast of the bee. With light gray, pale cream, or white yarn, make a magic ring or ch 4 and join to form a small ring. Wing Rnd 1: Ch 2, then work approximately 10 to 12 hdc into the center. Join with a sl st. This creates a compact circular foundation that can be transformed into an oval wing.
For Wing Rnd 2, work a combination of sc, hdc, and increases. For example: sc in the first two stitches, hdc in the next stitch, 2 dc in each of the next three stitches, hdc in the next stitch, and sc around the remaining section. Adjust the placement slightly if necessary so one side becomes fuller than the other. Fasten off with a long tail. Make a second wing using exactly the same sequence.
If you prefer flatter wings, use mostly single crochet and half double crochet rather than tall stitches. If you want a more pronounced wing, add a final round of sc around the edge. The wings should be proportional to the bee rather than oversized. Position them on both sides of the upper-middle section of the body, allowing roughly half of each wing to extend beyond the bee.
For the antennae, use dark brown yarn. Attach the yarn near the top of the bee, ch 5 to 7, and sl st back along the chain before fastening off. Repeat on the opposite side. Another option is to crochet two short chains separately and sew them behind the head. Small knots at the ends can create rounded antenna tips. Keep these pieces firmly attached, particularly when the finished square will be frequently handled.
Now arrange all components before sewing. Place the bee vertically in the center of the square and position one wing on either side. Sew the wings to the background first using their yarn tails and a tapestry needle. Stitch around the inner section of each wing while leaving the outer edge slightly free if you want a subtle three-dimensional effect. Next, position the bee body over the inner edges of the wings and sew securely around its perimeter.
Use small, discreet stitches that pass through the bee and the upper layers of the granny square without distorting the background. Once everything is attached, turn the crochet bee granny square over and weave each yarn tail through several nearby stitches. Trim only after the tails are secure. The finished motif should remain centered, balanced, and comfortable to touch, with no excessively loose threads on the reverse side.
Finishing, Customizing, and Using Your Bee Granny Square
Blocking is one of the simplest ways to improve the final appearance of a Bee Granny Square Pattern. Gently shape the square to the desired measurements and straighten all four corners. For fibers that tolerate wet blocking, lightly dampen the piece, shape it on a suitable blocking surface, and allow it to dry completely. Always follow the care recommendations appropriate for the yarn fiber you selected.
If your square will become part of a blanket, make several pieces with the same yarn, hook, and number of background rounds. Even small differences in tension can accumulate when dozens of motifs are joined. Measure the first completed square and use it as your reference. Keeping the bee body, wings, and background dimensions consistent will make the finished blanket look intentionally designed rather than uneven.
Color customization is another advantage of this pattern. Traditional golden yellow and dark brown immediately suggest a honeybee, but softer mustard, cream, charcoal, or warm caramel can produce a more rustic appearance. The background does not have to remain white either. Pale blue can suggest the sky, soft green can create a garden theme, and neutral beige provides a warm farmhouse-inspired effect. Maintaining enough contrast between the bee and background is more important than following one exact palette.
You can also modify the size of the bee crochet appliqué. For a smaller motif, choose lighter yarn and a smaller hook or reduce the number of body rounds. For a larger bee, use thicker yarn or add additional increase rounds before working the striped sections. Remember that changing the bee size may require changing the granny square size as well so the overall composition remains balanced.
Finished squares can be joined into baby blankets, lap blankets, decorative throws, tote-bag panels, cushion covers, table decorations, or cheerful wall hangings. Individual squares can also become pockets or decorative panels. If you intend to join multiple motifs, consider adding one plain border round around every completed square. A consistent border provides uniform stitches for joining and can make assembly considerably easier.
Finally, examine the reverse side and secure every yarn end. This step matters because a decorative appliqué naturally creates more yarn tails than an ordinary granny square. A well-finished reverse side makes the project more durable and professional. Once everything is secured and blocked, your Bee Granny Square Pattern is complete and ready either to stand alone or become part of a larger crochet project.
Frequently Asked Questions About the Bee Granny Square Pattern
Is the Bee Granny Square Pattern suitable for beginners?
Yes, especially for beginners who already know basic chain, slip stitch, single crochet, half double crochet, and double crochet stitches. The project introduces shaping and appliqué assembly without requiring extremely advanced techniques. Beginners may find it helpful to make the background square first and practice the bee separately before sewing the pieces together.
What yarn is best for a crochet bee granny square?
Cotton and cotton-blend yarns are excellent choices because they provide good stitch definition and help the appliqué maintain its shape. Acrylic yarn can also work well, particularly for blankets. Using yarns of approximately the same weight throughout the project helps maintain consistent proportions.
How large should the finished granny square be?
There is no mandatory size. A square approximately 6 to 8 inches (15 to 20 cm) wide provides enough room for a clearly visible bee appliqué. You can make the square larger by continuing the granny rounds or smaller by stopping earlier.
Why is my granny square becoming wavy?
Waviness often occurs when there are too many stitches, the chain spaces are too loose, or your tension changes from round to round. Check that you are adding clusters only in the appropriate spaces and maintaining consistent tension. Gentle blocking may correct minor waviness.
Why is my granny square curling inward?
Curling can indicate tight tension, a hook that is too small for the yarn, or insufficient space around the corners. Try relaxing your stitches or moving up one hook size. Make sure every corner receives the complete corner sequence.
Can I crochet the bee directly into the granny square?
You can design an integrated colorwork version, but the appliqué method is generally easier for achieving the raised appearance shown in this Bee Granny Square Pattern. Making the bee separately also allows you to reposition it before sewing, which helps with centering.
How do I keep the bee centered?
Fold the square lightly from corner to corner in both directions to identify the center. Position the bee over that point and use removable stitch markers to hold it temporarily. Check the placement from a short distance before beginning to sew.
Can the wings be made in another color?
Absolutely. Gray creates gentle contrast against a white background, while cream, pale blue, silver-gray, or even very light yellow can work beautifully. Choose a shade that remains visible against both the background and bee body.
How many Bee Granny Squares are needed for a blanket?
That depends on the size of each square and the desired blanket dimensions. For example, squares measuring 8 inches will require fewer motifs than squares measuring 6 inches. Arrange finished squares on a flat surface before joining so you can evaluate the overall size and layout.
Can I alternate bee squares with plain granny squares?
Yes. In fact, alternating bee granny squares with plain or floral squares can prevent the final project from becoming visually crowded. You might use one bee motif every second or third square and coordinate the remaining motifs with yellow, cream, brown, or garden-inspired colors.
How can I make the bee look more three-dimensional?
Use slightly thicker yarn for the body, leave the outer portions of the wings unstitched, or lightly shape the body while attaching it. The goal should be gentle dimension rather than excessive bulk, especially if the square will become part of a blanket.
Can I wash projects made with this pattern?
Usually yes, provided the chosen yarn is washable. Follow the care instructions for the most delicate yarn used in the project. Secure all appliqué pieces and yarn ends carefully before washing, and reshape the granny squares while drying when necessary.
What is the difference between a granny square and the bee appliqué?
The granny square is the main background motif constructed from repeated crochet rounds and clusters. The bee appliqué is a separately crocheted decorative element consisting of the striped body, wings, and antennae. Combining these two techniques creates the complete Bee Granny Square Pattern.
Conclusion
The Bee Granny Square Pattern combines classic granny-square construction with an appealing crochet appliqué, making it a versatile project for crocheters who enjoy adding personality and dimension to traditional motifs. Starting with the light-colored granny background gives the project a stable foundation, while alternating yellow and dark stitches creates the recognizable striped bee body. Separate crochet wings and antennae complete the character before all of the components are carefully assembled.Along the way, this project provides useful practice with chains, slip stitches, single crochet, half double crochet, double crochet, increases, decreases, color changes, appliqué construction, sewing, weaving in ends, and blocking. These techniques can be applied to many future crochet projects, so the square is not only decorative but also a practical skill-building exercise.
The finished motif can become part of a blanket, pillow, bag, wall decoration, or a collection of garden-inspired granny squares. You can follow traditional honeybee colors or experiment with your own palette while preserving the recognizable shape and contrast of the design. Most importantly, take your time with the placement and finishing because those small details can make a handmade square look beautifully polished.If you make your own Bee Granny Square Pattern, leave your sincere opinion about the project and share any suggestions you have for improving or customizing it. Your ideas about colors, yarn combinations, alternative wings, borders, and creative ways to use the finished squares can inspire even more variations of this charming crochet bee design.