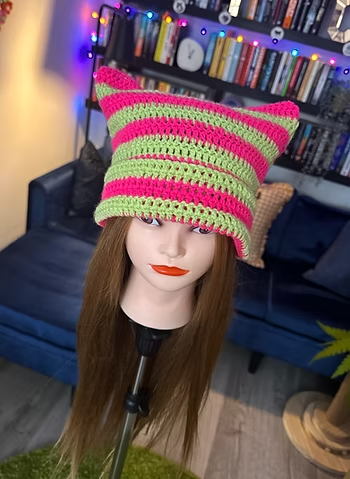
The Cat Ear Beanie Hat Crochet – Pattern is one of the most popular and delightful projects in the modern fiber arts community, blending functional warmth with a touch of playful aesthetic. Whether you are a seasoned crafter or a complete beginner looking for your first “cool” project, creating a cat ear beanie is a rewarding way to express your personality through handmade fashion. This specific crochet style has taken social media by storm, often associated with “cottagecore” and “soft girl” aesthetics, making it a highly searched DIY crochet project for those who want to stand out.
Understanding the construction of a Cat Ear Beanie Hat Crochet – Pattern is surprisingly simple because it relies on basic geometric shapes rather than complex anatomical shaping. Unlike traditional hats that require decreasing stitches to round out the crown, this beanie pattern utilizes a rectangular construction that naturally forms “ears” once the top seam is joined and the hat is placed on the head. This accessibility makes the cat ear crochet hat a perfect entry point for learning how to read crochet patterns and master the half double crochet or ribbing techniques.
Choosing the right materials for your Cat Ear Beanie Hat Crochet – Pattern is the first step toward a professional-looking finish. To achieve that iconic chunky crochet look, many crafters opt for worsted weight yarn or even bulky velvet yarn to give the ears more structure and “stand-up” appeal. In this guide, we will break down the essential steps, from selecting your crochet hook size to finishing the invisible seam, ensuring your final piece looks like a high-end boutique accessory.
1. Choosing the Best Yarn and Tools for Your Cat Ear Beanie Hat Crochet – Pattern
When embarking on your Cat Ear Beanie Hat Crochet – Pattern, the yarn choice determines both the drape and the “cuteness” factor of the ears. For a classic look, a medium weight (4) acrylic yarn is highly recommended because it holds its shape well and is easy to wash, which is vital for an everyday crochet accessory.
The crochet hook size is equally important; generally, a 5.0mm (H) or 5.5mm (I) hook works best to create a fabric that is dense enough to be warm but flexible enough to be comfortable. If your stitches are too loose, the cat ears might flop over, so maintaining a consistent tension throughout your work is a key SEO-friendly crochet tip.
Don’t forget the small but essential tools like stitch markers, a tapestry needle for weaving in ends, and a sharp pair of scissors. Using stitch markers helps you keep track of your rows, especially if you are working with a ribbed stitch pattern that requires counting to ensure both sides of the hat are symmetrical.
The texture of the yarn also plays a role in the visual appeal of the Cat Ear Beanie Hat Crochet – Pattern. Some enthusiasts prefer mohair blends for a fuzzy, realistic kitten look, while others stick to cotton yarn for a breathable, year-round version of the stylish cat beanie.
If you are looking for a sustainable crochet option, consider using recycled wool or organic cotton. These materials not only feel great against the skin but also add an eco-friendly value to your handmade wardrobe, which is a growing trend in the crochet community.
Lastly, always check your gauge swatch before starting the full Cat Ear Beanie Hat Crochet – Pattern. Spending ten minutes ensuring your stitch count matches the pattern will save you hours of frustration later, ensuring the beanie fits perfectly on the first try without needing to “frog” (rip out) your work.
2. Mastering the Basic Stitches for a Professional Beanie Finish
To successfully complete the Cat Ear Beanie Hat Crochet – Pattern, you only need to know a few fundamental crochet stitches. The most common base is the half double crochet (HDC), which provides a beautiful height and texture that is faster to work up than a single crochet but denser than a double crochet.
For those who want a more “store-bought” look, working in the back loops only (BLO) is a game-changer. This technique creates a ribbed crochet texture that mimics knitting, allowing the cat ear beanie to stretch and contour to different head sizes while maintaining its original shape.
The foundation chain is where it all begins; for a standard adult-sized Cat Ear Beanie Hat Crochet – Pattern, you will typically start with a chain that matches the desired height of the hat (from the forehead to the crown, plus a few inches for a fold-over brim). This vertical construction is the secret to the rectangular shape.
Learning the slip stitch join is also crucial for finishing. When you reach the end of your rectangular panel, you will fold the piece in half and use slip stitches or a whip stitch to close the sides. This creates the “tube” that eventually becomes your cat ear hat.
If you are a beginner, practicing your turning chains will ensure the edges of your crochet project stay straight. A messy edge can make the cat ears look lopsided, so take your time to identify the last stitch of every row before turning your work to start the next sequence.
Advanced crafters might incorporate color pooling or striped yarn into their Cat Ear Beanie Hat Crochet – Pattern. Using multi-colored yarn creates a unique, variegated effect that makes each crochet cat hat a one-of-a-kind piece of art, perfect for gifting or selling in an Etsy shop.
3. Step-by-Step Assembly to Create the Perfect Cat Ear Shape
The magic of the Cat Ear Beanie Hat Crochet – Pattern happens during the assembly phase. Once you have finished your crochet rectangle, you will have a flat piece of fabric. The goal is to turn this into a hat where the top corners naturally “poke out” like pointed cat ears.
Start by folding your rectangle in half with the “right sides” facing each other. Using your tapestry needle and a length of matching yarn, seam the top edge and the open side. This seaming technique is what transforms a simple piece of fabric into a functional crochet headwear item.
The “ears” are formed automatically because a human head is round. When the round head is inserted into the square top of the beanie, the excess fabric at the corners is pushed upward. This is the hallmark of the Cat Ear Beanie Hat Crochet – Pattern, requiring no extra stuffing or wire to maintain the shape.
To make the ears more prominent, some crafters use a running stitch across the top corners. By slightly cinching the fabric at an angle, you can define the triangle shape of the ears, making the cat-like features even more obvious even when the hat is not being worn.
Ensure your seams are secure by double-stitching at the beginning and end of each row. Since beanies are frequently pulled on and off, the stress on the top corners can be high. A reinforced seam ensures your Cat Ear Beanie Hat Crochet – Pattern lasts through many winters and washes.
Once the sewing is complete, turn the hat right-side out. This is the most satisfying part of the crochet process, as you finally see the cat ear silhouette take form. You can then add a folded brim to adjust the height and add an extra layer of warmth around the ears.
4. Customizing Your Crochet Project and Adding Personal Touches
The beauty of the Cat Ear Beanie Hat Crochet – Pattern is its versatility. You can easily modify the size to create a baby cat beanie or an oversized, slouchy version for adults. Simply adjust the number of foundation chains and the number of rows you work to change the dimensions.
Adding embellishments is a great way to personalize your work. Some people like to add a small crochet bow near one ear or even use a different color of yarn for the inside of the ears to create a 3D effect. These creative crochet ideas make your project stand out in the sea of standard patterns.
If you prefer a more “punk” or “alt” aesthetic, you can add safety pins, chains, or even piercings to the ears of your Cat Ear Beanie Hat Crochet – Pattern. This customization is very popular in the alternative fashion scene and adds a modern twist to a traditional craft.
For those making this for children, adding braided earflaps or chin straps can help keep the crochet hat in place during play. You can also use reflective yarn for safety, which makes the cat beanie glow when hit by car headlights—a practical and cool feature for nighttime walks.
Consider the texture of the brim as well. You can switch from a ribbed stitch to a scalloped edge or a crab stitch (reverse single crochet) to give the bottom of the Cat Ear Beanie Hat Crochet – Pattern a unique decorative border that frames the face beautifully.
Finally, don’t forget to block your finished hat. Blocking involves lightly steaming or wetting the hat and letting it dry in shape. This relaxes the fibers and ensures the cat ears sit perfectly symmetrical, giving your handmade crochet hat a high-quality, professional appearance.
FAQ – Frequently Asked Questions
1. Is the Cat Ear Beanie Hat Crochet – Pattern suitable for beginners?
Yes! Because it is based on a simple rectangle, it is one of the easiest patterns for beginners to master. There are no complex increases or decreases involved.
2. How long does it take to crochet a cat ear beanie?
Depending on your speed and the yarn weight, most crafters can finish a Cat Ear Beanie Hat Crochet – Pattern in 2 to 4 hours. Using bulky yarn makes the process even faster.
3. What yarn is best for ears that stay upright?
A stiffer yarn like acrylic or a wool blend works best. If you use a very soft yarn like bamboo, the ears might be more “slouchy” rather than “pointy.”
4. How do I calculate the size for a child or a man?
Measure the circumference of the head. Your crochet rectangle should be about 1-2 inches smaller than the head circumference to allow for “negative ease” so it stays snug.
5. Can I use this pattern to make other animal ears?
Absolutely! By changing the colors or slightly rounding the corners during the seaming process, you can adapt the Cat Ear Beanie Hat Crochet – Pattern to look like a bear, a wolf, or even a fox.
Conclusion
In this guide, we have explored everything you need to successfully create a Cat Ear Beanie Hat Crochet – Pattern, from selecting the right worsted yarn to the final assembly of the cat ears. We covered the importance of ribbed stitches for fit and how a simple rectangle can transform into a trendy fashion accessory.
This project is not only a great way to practice basic crochet techniques but also a fun way to create a personalized gift that is both practical and stylish. We hope this tutorial empowers you to pick up your hook and start your next DIY craft journey.