Centerpiece base Crochet – Pattern is one of the most versatile projects a crafter can undertake, offering a perfect blend of functionality and artistic expression for any home. Whether you are looking to protect your wooden surfaces or simply want to add a touch of handmade elegance to your dining room, mastering a solid Centerpiece base Crochet – Pattern allows you to create heirlooms that last for generations. The beauty of this specific craft lies in its repetitive, meditative nature, which makes it a favorite for both beginners looking to practice their tension and experts seeking a canvas for complex embellishments.
In the world of interior design, custom textile elements are seeing a massive resurgence, and starting with a Centerpiece base Crochet – Pattern is the most effective way to jump into this trend. By choosing your own yarn weights and fiber contents, you can transition a simple pattern from a rustic, farmhouse aesthetic using natural cotton to a high-end, modern look using metallic-infused synthetic blends. This article will guide you through the technical nuances and the creative joy of building a foundation that serves as the heart of your table decor.
Before we dive into the step-by-step instructions, it is essential to understand that a high-quality Centerpiece base Crochet – Pattern relies heavily on the “flat circle” principle to ensure your work doesn’t ripple or bowl. Achieving a perfectly flat crochet surface requires a specific ratio of increases per round, a skill that once learned, can be applied to rugs, hats, and mandalas. Prepare your hooks and your favorite skeins as we explore the essential techniques needed to master this timeless Centerpiece base Crochet – Pattern.
1. Selecting Materials for Your Centerpiece base Crochet – Pattern
Choosing the right yarn is the first critical step in ensuring your Centerpiece base Crochet – Pattern remains durable and easy to clean. For a functional centerpiece, mercerized cotton is often the gold standard because it offers a beautiful sheen, superb stitch definition, and minimal stretching over time. You should also consider the heat resistance of the fiber if you plan on placing warm serving dishes directly onto your finished crochet work.
The hook size you select must complement your yarn choice to achieve the desired density for your Centerpiece base Crochet – Pattern. If your stitches are too loose, the base may lack the structural integrity to hold decor items upright; if they are too tight, the fabric may become stiff and curl at the edges. Always check the yarn label for the recommended hook size, but don’t be afraid to drop down a half-millimeter to create a firmer, more professional-looking pattern.
Color theory plays a massive role in how your Centerpiece base Crochet – Pattern interacts with your existing room decor. Neutral tones like ecru, beige, or slate grey provide a sophisticated base that allows your floral arrangements or candles to stand out. On the other hand, using vibrant, variegated yarns can turn the crochet piece itself into the primary focal point of the table, showcasing the intricate shifts in the pattern.
In addition to yarn and hooks, you will need a few essential notions to complete your Centerpiece base Crochet – Pattern with precision. Stitch markers are indispensable for keeping track of your increases in continuous rounds, preventing the lopsided look that occurs when a count is missed. A sharp pair of yarn snips and a sturdy tapestry needle are also required for weaving in ends securely so that your pattern remains seamless and polished.
Stitch definition is a hallmark of a well-executed Centerpiece base Crochet – Pattern, so consider the ply of your yarn carefully. A multi-ply yarn with a tight twist will highlight the geometry of your crochet stitches, making the “base” look intricate even if the design is simple. Avoid overly fuzzy or “eyelash” yarns for this specific project, as they can obscure the beautiful structural work that defines a classic table pattern.
Finally, always consider the washability of your materials before starting your Centerpiece base Crochet – Pattern. Since table surfaces are prone to spills, using a machine-washable cotton or a high-quality acrylic blend ensures that your crochet masterpiece can be refreshed easily. Taking the time to select premium materials at the start will guarantee that your Centerpiece base Crochet – Pattern remains a staple of your home for years to come.
2. Essential Stitches and the Magic Ring Foundation
Every successful Centerpiece base Crochet – Pattern begins with a solid foundation, and for circular items, the magic ring is the preferred method. Unlike a standard chain loop, the magic ring allows you to pull the center tight, leaving no visible hole in the middle of your centerpiece. This creates a professional, high-end finish that is essential for a clean Centerpiece base Crochet – Pattern look that mimics boutique home decor.
Once your ring is formed, the most common stitch used in a Centerpiece base Crochet – Pattern is the double crochet (US terms). This stitch provides enough height to make the project grow quickly while maintaining a flexible yet sturdy fabric. When working on your base, ensuring that each double crochet is uniform in height is the key to preventing an uneven surface that could cause items on the table to wobble.
The “increase” is the most important technical element of the Centerpiece base Crochet – Pattern. To keep the circle flat, you must perform two stitches into a single stitch from the previous row at regular intervals. In a standard crochet circle, you typically add 12 stitches per round for double crochet, which keeps the math simple and the pattern expanding at a consistent rate without curving.
Slanting or “spiraling” seams can sometimes ruin the aesthetic of a Centerpiece base Crochet – Pattern. To avoid this, many crafters use the “invisible join” technique or the “standing stitch” method to start new rounds. These advanced crochet tricks ensure that the transition between rows is nearly impossible to spot, giving your pattern a flawless, continuous appearance that is highly sought after in handmade gifts.
Tension control is something that develops with practice, but it is vital for a Centerpiece base Crochet – Pattern. If you find that your center is bulging, your tension might be too loose in the initial rounds of the pattern. Conversely, if the edges are pulling inward like a bowl, your tension is likely too tight, or you have missed an increase in your crochet sequence, requiring a quick count-back.
Understanding the anatomy of the stitch helps you manipulate the Centerpiece base Crochet – Pattern for different textures. By working only in the back loops (BLO), you can create decorative ridges that add a modern, architectural feel to your base. These small variations in the crochet technique can transform a basic circular pattern into a complex-looking work of art without changing the fundamental math of the piece.
3. Step-by-Step Execution of the Centerpiece base Crochet – Pattern
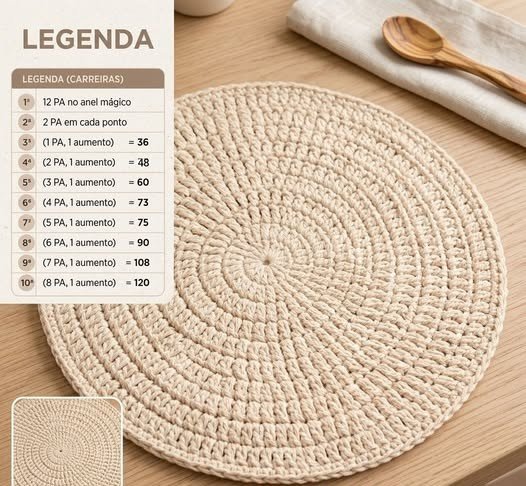
To begin your Centerpiece base Crochet – Pattern, start by creating a magic ring and chaining two (this usually counts as your first stitch). Work 11 more double crochet stitches into the ring for a total of 12. Pull the tail of the magic ring firmly to close the center hole completely, securing the starting point of your base and ensuring the pattern is tight and professional from the very first row.
In the second round of your Centerpiece base Crochet – Pattern, you will work two double stitches into every stitch from the first round. This doubling of the stitch count (to 24) is the mathematical requirement for maintaining a flat crochet circle. Consistency is key here; make sure you don’t skip any stitches, as an error in round two will amplify as the pattern grows larger and more complex.
For the third round of the Centerpiece base Crochet – Pattern, the increase sequence changes to “one double crochet, then an increase in the next stitch.” Repeat this all the way around to reach 36 stitches. By spacing out the increases, you are slowly expanding the circumference of your crochet work, allowing the base to lie perfectly flat on your dining or coffee table.
As you progress to the fourth and fifth rounds of your Centerpiece base Crochet – Pattern, you will continue to add one plain stitch between increases. For example, in round four, you work two plain stitches then an increase; in round five, three plain stitches then an increase. This systematic growth is the “secret sauce” of a perfect crochet circle, ensuring your pattern stays balanced and symmetrical throughout the process.
Midway through your Centerpiece base Crochet – Pattern, it is a good idea to lay your work on a flat surface to check for any distortions. If you notice the edges starting to wave, you may need to reduce the frequency of your increases for one round. Adjusting your crochet on the fly is a sign of an experienced crafter and will lead to a much better finished pattern that sits flush against the table.
Continue this increase logic until your Centerpiece base Crochet – Pattern reaches your desired diameter. Most standard table centerpieces are between 10 and 15 inches wide, but the beauty of this pattern is that you can stop at any time. Once satisfied, finish your crochet work with a round of slip stitches or a decorative crab stitch (reverse single crochet) to give the base a sturdy and beautiful edge.
4. Blocking and Finishing Touches for Your Pattern
Blocking is the final, often overlooked step that separates an amateur Centerpiece base Crochet – Pattern from a professional one. This process involves wetting your finished crochet piece and pinning it out to its exact dimensions on a foam board. Blocking relaxes the fibers and sets the stitches, ensuring your base stays perfectly flat and the pattern geometry is emphasized.
To block your Centerpiece base Crochet – Pattern, use stainless steel pins that won’t rust and a spray bottle filled with room-temperature water. Gently stretch the crochet circle from the center outward, pinning the edges in a perfect circle. Let the pattern dry completely—usually for 24 hours—before removing the pins; you will be amazed at how much more refined your base looks after this step.
Weaving in ends is a chore, but doing it correctly ensures the longevity of your Centerpiece base Crochet – Pattern. Use a tapestry needle to thread the yarn tails through the bulk of the crochet stitches in multiple directions. This “zig-zag” method prevents the ends from popping out during use or washing, keeping your pattern looking pristine even after years of display on your table.
If you want to add a touch of luxury to your Centerpiece base Crochet – Pattern, consider adding a border of “picot” stitches or a simple lace edge. These small additions don’t change the structural integrity of the base but elevate the overall design of the pattern. A contrasting color for the final round can also provide a “pop” that highlights the intricate crochet work you have performed.
For those using their Centerpiece base Crochet – Pattern under heavy vases, you might consider applying a non-slip backing or a fabric stiffener. A light spray of starch during the blocking phase can give the crochet fabric extra body, helping the base maintain its shape under the weight of decor. This ensures your pattern remains functional as well as decorative in a busy household environment.
Finally, take a moment to admire your completed Centerpiece base Crochet – Pattern. Photographing your work from a top-down perspective can help you see the symmetry of your crochet stitches and provide inspiration for your next project. Whether you keep it or gift it, this base is a testament to your skill and a beautiful application of a classic pattern that brings warmth and texture to any setting.
Frequently Asked Questions (FAQ)
What is the best yarn for a Centerpiece base Crochet – Pattern?
The best yarn is usually 100% mercerized cotton. It provides the necessary stiffness to lay flat, has a beautiful sheen, and is heat-resistant, making it perfect for a table base.
How do I stop my crochet centerpiece from curling?
Curling usually happens due to incorrect increase math or tight tension. Ensure you are adding the correct number of stitches per round (usually 12 for double crochet) and consider using a slightly larger hook for the pattern.
Can I make this Centerpiece base Crochet – Pattern in different sizes?
Absolutely! The pattern is infinitely scalable. You simply continue the mathematical increase sequence (adding one more plain stitch between increases each round) until the crochet piece reaches your desired size.
How do I clean my handmade crochet centerpiece?
If you used cotton or acrylic, you can usually hand wash the piece in cool water with a mild detergent. Lay it flat to dry and re-block it if necessary to maintain the shape of the Centerpiece base Crochet – Pattern.
Why is my circle turning into a hexagon?
This happens when increases are placed directly on top of the increases from the previous round. To keep the Centerpiece base Crochet – Pattern perfectly round, stagger your increases so they don’t align in a straight line.
Is this pattern suitable for beginners?
Yes, a Centerpiece base Crochet – Pattern is an excellent project for beginners. it teaches the fundamentals of working in the round, managing increases, and maintaining consistent stitch tension.
Conclusion
In this article, we have explored the comprehensive journey of creating a Centerpiece base Crochet – Pattern, from the initial selection of high-quality mercerized cotton to the final, professional blocking stages.
We learned that the secret to a perfectly flat base lies in the mathematical precision of increases and the use of the magic ring to ensure a seamless start. By following this step-by-step crochet guide, you now have the tools to create a variety of table decor pieces that are both durable and aesthetically pleasing. The versatility of this pattern allows for endless customization in color, texture, and size, making it a staple in any crafter’s repertoire.