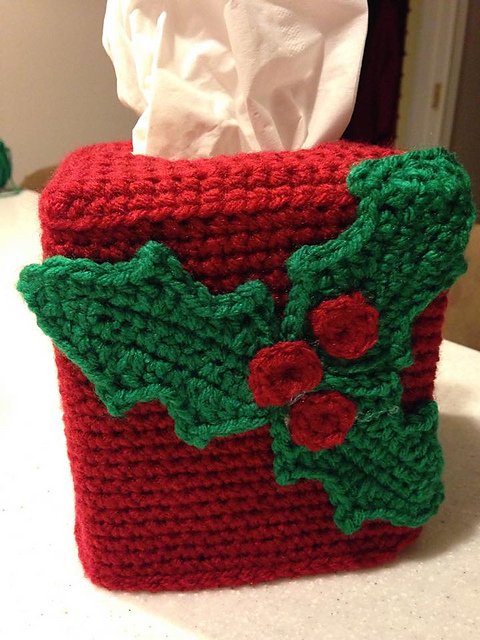
Christmas Holly Tissue Box Cover – Pattern is a delightful and festive way to add holiday charm to your home décor. This creative sewing project turns an ordinary tissue box into a beautiful seasonal decoration, perfect for your living room, bathroom, or bedroom during Christmas time. With just a few materials, some basic sewing skills, and a touch of creativity, you can craft a handmade Christmas Holly Tissue Box Cover – Pattern that captures the spirit of the holidays. It’s a fun, practical, and beginner-friendly project that also makes a wonderful handmade gift for family and friends.
The design typically features holly leaves, red berries, and classic Christmas colors like red, green, and white. These timeless motifs bring warmth and joy to any space, making your tissues not just a necessity but also a festive accessory. What makes the Christmas Holly Tissue Box Cover – Pattern special is its versatility—you can customize it with different fabrics, embroidery, or appliqué details to match your personal holiday décor style.
In this article, we’ll explore everything you need to know to make your own Christmas Holly Tissue Box Cover – Pattern, including materials, cutting instructions, sewing techniques, and creative design ideas. You’ll also find a detailed FAQ section to answer common questions about crafting, materials, and customization. Let’s get started by understanding the pattern and structure of this festive project.
1. Understanding the Christmas Holly Tissue Box Cover – Pattern
The Christmas Holly Tissue Box Cover – Pattern is designed to fit over standard square or rectangular tissue boxes, adding a decorative outer layer that transforms a simple item into a Christmas-themed accent. The pattern is typically made with four side panels and one top panel, all sewn together to create a snug, removable cover. The top panel includes an opening that allows tissues to be pulled through easily.
The holly motif is the centerpiece of this pattern. Traditionally, holly leaves are represented with dark green fabric or appliqué pieces, while red felt or embroidered circles represent the berries. These festive embellishments can be hand-stitched, machine-embroidered, or even glued for a no-sew alternative. The Christmas Holly Tissue Box Cover – Pattern often combines textured fabrics like felt, cotton, or linen to achieve a warm, handcrafted feel.
This project can be as simple or as detailed as you like. Beginners can stick to basic straight seams and minimal decoration, while advanced sewists can add quilting, piping, or even hand embroidery for an elevated look. Regardless of your skill level, the pattern is forgiving and fun to make.
Another great feature of this pattern is that it’s reusable year after year. Unlike disposable decorations, your handmade Christmas Holly Tissue Box Cover – Pattern can be part of your annual holiday décor, saving money while adding a personal touch to your home.
You can also adjust the dimensions to fit different tissue box shapes. Measure your box carefully, adding seam allowances to each panel. Once you understand the measurements, the assembly process becomes straightforward and enjoyable.
Lastly, the project doesn’t require expensive materials or tools. Most of what you need can be found in your sewing supplies or purchased inexpensively at a craft store. This makes it an ideal holiday project for anyone looking to create a festive and affordable decoration.
2. Gathering Materials and Preparing Your Design
Before starting your Christmas Holly Tissue Box Cover – Pattern, gather all your materials and tools. For the main structure, you’ll need festive fabric, such as cotton or felt, in holiday colors like red, green, or cream. Choose sturdy fabric so the cover holds its shape. You’ll also need interfacing or light batting to give the cover structure and stability.
For the holly decorations, use small scraps of green fabric for the leaves and red felt or buttons for the berries. If you enjoy embroidery, you can also stitch the holly design directly onto the panels using green and red embroidery thread. This adds a delicate, handmade touch to your Christmas Holly Tissue Box Cover – Pattern.
Essential tools include a sewing machine, scissors or rotary cutter, pins or clips, measuring tape, and fabric marker. If you’re hand-sewing, make sure to use a strong thread that matches your fabric color. For a more professional finish, consider using a bias binding or ribbon trim along the edges.
Before cutting your fabric, measure your tissue box carefully—length, width, and height. Add about ½ inch seam allowance to each side. Then cut one top panel and four side panels according to your measurements. Iron your fabric to remove wrinkles and ensure smooth stitching.
Next, prepare your holly decorations. You can draw leaf shapes on green fabric, cut them out, and arrange them on your panels before sewing. Play around with the layout to decide where you want the holly clusters to appear—many people place them on the corners or around the tissue opening.
Once your design is planned, it’s a good idea to test your layout by pinning all the panels together around your tissue box. This step ensures that your Christmas Holly Tissue Box Cover – Pattern fits perfectly and looks balanced before you begin sewing.
3. Sewing and Assembling the Tissue Box Cover
With your fabric pieces and decorations ready, it’s time to assemble your Christmas Holly Tissue Box Cover – Pattern. Start by attaching the holly leaves and berries to your side and top panels. Sew or glue them in place, depending on your chosen method. If you’re sewing, use small, tight stitches or a zigzag stitch to secure the appliqué pieces neatly.
Once your decorations are in place, sew the side panels together. Place them right sides facing each other, and stitch along the vertical edges to form a rectangular sleeve. Press the seams open to keep them flat and even. Then, attach the top panel by sewing it to the upper edges of the side panels, right sides together. Be careful when turning corners—sew slowly to ensure accuracy.
After sewing all the panels, turn the cover right side out and slip it over your tissue box to test the fit. It should sit snugly without being too tight. If necessary, adjust the seams slightly to achieve the perfect shape.
For added structure, you can insert lightweight interfacing or batting between the fabric layers before sewing the final seams. This helps your Christmas Holly Tissue Box Cover – Pattern maintain its shape and gives it a soft, quilted appearance.
Finish the raw edges of the bottom opening with bias tape, ribbon, or a simple hem. This will keep the fabric from fraying and give your project a polished, finished look.
Finally, press the entire piece with a warm iron, being careful not to melt any synthetic decorations. Once finished, you’ll have a beautiful, handmade Christmas Holly Tissue Box Cover – Pattern ready to bring festive cheer to your home.
4. Decorating and Personalizing Your Holiday Tissue Box Cover
The beauty of the Christmas Holly Tissue Box Cover – Pattern is that you can make it entirely your own. Once the basic structure is complete, it’s time to add personal touches and finishing details. Consider using lace trim, gold thread, or small bells to enhance the holiday theme. These little details make your creation stand out.
You can also experiment with fabric combinations. Try mixing patterns like plaid, polka dots, or stripes for a modern twist, or keep it classic with rich velvet or linen for a more traditional look. The contrast between textures and colors gives your Christmas Holly Tissue Box Cover – Pattern a unique character.
For a more luxurious finish, embroider your family name or a Christmas greeting like “Merry Christmas” or “Joy to the World” on one of the panels. This turns your project into a personalized keepsake you can display year after year.
If you’re giving it as a gift, consider wrapping the finished tissue box cover with a matching tissue box inside. Handmade gifts like this show thoughtfulness and effort, and they’re always appreciated during the holiday season.
You can also make multiple covers for different rooms in your home. Use coordinating fabrics to create a cohesive holiday décor theme throughout your living space. A Christmas Holly Tissue Box Cover – Pattern in the bathroom, kitchen, and living room adds a consistent festive touch.
Finally, remember to store your cover properly after the holidays. Wash or spot-clean it gently, dry it completely, and store it flat to keep its shape. This way, your handmade creation will remain beautiful for many Christmases to come.
FAQ
Q: What is a Christmas Holly Tissue Box Cover – Pattern?
A: It’s a sewing pattern designed to create a decorative, reusable fabric cover for tissue boxes, featuring festive holly leaf and berry designs for Christmas décor.
Q: Do I need a sewing machine to make this?
A: No, while a sewing machine makes the process faster, you can hand-sew the Christmas Holly Tissue Box Cover – Pattern using simple stitches.
Q: What type of fabric works best?
A: Cotton, felt, or linen fabrics are great choices. They’re durable, easy to work with, and hold decorative elements well.
Q: Can I use glue instead of sewing?
A: Yes, fabric glue or hot glue can be used to attach decorations if you prefer a no-sew version, but stitching gives a longer-lasting result.
Q: How can I make it fit my tissue box perfectly?
A: Measure your box carefully—height, width, and length—and add ½ inch for seam allowances before cutting your fabric pieces.
Q: Is this pattern beginner-friendly?
A: Absolutely. The Christmas Holly Tissue Box Cover – Pattern uses straight seams and simple shapes, making it ideal for beginners.
Conclusion
Making your own Christmas Holly Tissue Box Cover – Pattern is a fun and rewarding way to celebrate the holiday season. You’ve learned how to select materials, cut and assemble your pieces, and personalize your design with creative details. This simple sewing project transforms an everyday item into a festive decoration that brings warmth and cheer to your home.
Whether you keep it for yourself or gift it to someone special, this handmade creation adds a unique, heartfelt touch to Christmas décor. I’d love to hear your honest opinions and suggestions—what colors or designs did you choose for your tissue box cover, and how did it brighten up your holiday space?