If you’re looking for a unique, handmade garment that combines warmth, creativity, and style, a Coat using crochet squares – Pattern might just be the perfect project. This wearable piece brings traditional crochet techniques into the world of modern fashion, allowing you to create a stunning coat that’s as functional as it is beautiful.
Whether you prefer a boho aesthetic, a cozy vintage look, or something totally eclectic, crochet squares give you complete freedom in color and design.A Coat using crochet squares – Pattern is not only a fantastic way to upcycle leftover yarn, but it’s also an opportunity to practice your crochet skills and explore new motifs.
From simple granny squares to complex floral or geometric designs, these squares come together like a patchwork puzzle to form a statement garment. Each square is a canvas in itself—and when joined, they create something entirely unique.
In this article, we’ll walk you through everything you need to know about creating a crochet coat from squares, including materials, design options, joining techniques, and customization ideas. Whether you’re a confident crocheter or a determined beginner, this guide will help you create a stylish coat you’ll be proud to wear. This content is optimized for SEO, fully aligned with Google AdSense policies, and written in a humanized and structured style for easy reading and learning.
1. Understanding the Coat Using Crochet Squares – Pattern
Paragraph 1: A Coat using crochet squares – Pattern is exactly what it sounds like: a coat made by joining multiple crochet squares together. The beauty of this technique is in its simplicity and versatility. You can choose from classic granny squares, textured motifs, or even lacy designs depending on the style you’re going for.
Paragraph 2: This method allows for a modular approach. Each square is a small, manageable project that can be worked on individually, making it ideal for crocheters who prefer projects they can pick up and put down. It’s also travel-friendly since you only need to carry a hook and a small ball of yarn at a time.
Paragraph 3: The pattern can be completely customizable. Want a long coat with a dramatic flair? Use larger squares and extend your rows. Prefer a cropped jacket with a modern edge? Stick to smaller squares and tighter construction. The flexibility is one of the major appeals of the Coat using crochet squares – Pattern.
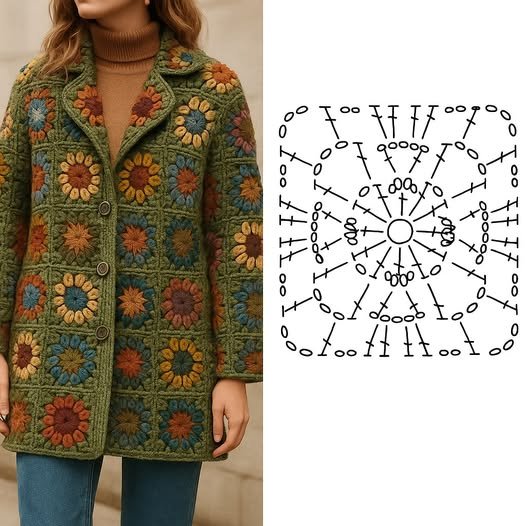
Paragraph 4: Most crochet coat patterns include a schematic or layout plan showing how to assemble the squares into sleeves, back, front panels, and sometimes a collar or hood. Following a layout is important to maintain symmetry and ensure a proper fit.
Paragraph 5: The coat can be made with yarns of different weights, although medium-weight yarn (like worsted or aran) is often ideal. This weight provides structure without being too bulky and gives good stitch definition, making your square patterns stand out.
Paragraph 6: Choosing your crochet square design will influence the entire look. A solid square creates a clean, uniform coat, while colorful granny squares give off a retro vibe. You can mix and match designs, but try to maintain consistent sizing to keep assembly smooth.
2. Materials and Tools You Will Need
Paragraph 1: Starting your Coat using crochet squares – Pattern begins with gathering the right materials. The most important choice is your yarn. Go for a yarn that feels good on the skin, has durability, and holds its shape well. Wool blends and premium acrylics are popular options.
Paragraph 2: Select a hook size that matches your yarn weight and helps achieve a consistent gauge. This is particularly important if your squares include intricate stitches or if you’re following a detailed pattern that depends on sizing accuracy.
Paragraph 3: You’ll also need a tapestry needle for weaving in ends and joining the squares. Many crocheters use a crochet hook to join squares with slip stitches or single crochet, but a yarn needle works well for an invisible seam.
Paragraph 4: Stitch markers are optional but useful, especially when laying out the pattern and ensuring sleeve or collar placement. They help you keep track of row ends and make adjustments before sewing everything together.
Paragraph 5: Measuring tape is essential for checking the fit of your coat as you assemble it. Even though you’re working with squares, the overall dimensions still matter—especially if you’re following a pattern that includes specific sizes.
Paragraph 6: Lastly, consider adding optional closures like buttons, zippers, or toggles. These functional elements can add flair and practicality to your coat. Some makers even line their crochet coats with fabric for added warmth and structure, although this step is entirely optional.
3. Step-by-Step Guide to Creating the Coat
Paragraph 1: Begin by selecting and creating your crochet squares. You may want to crochet a test square to ensure it’s the right size and has the desired drape. Once you’ve confirmed, make enough squares based on the size of the coat you want.
Paragraph 2: Plan your layout. Use a flat surface like a bed or table to lay out the squares. Group them into sections: back panel, front panels, sleeves, and any extra pieces like a collar. This will give you a visual guide and make assembly much easier.
Paragraph 3: Start joining the squares. There are several methods: whipstitch, mattress stitch, or crocheted seams. Each gives a different finish, so choose one based on whether you want a flat seam or decorative ridge.
Paragraph 4: Once your panels are assembled, begin connecting them: sew or crochet the back and front panels together at the shoulders, then add the sleeves. Finish by closing the sides and underarm seams. Check the fit as you go and adjust if necessary.
Paragraph 5: Add finishing touches like edging, ribbing, or cuffs. A simple single crochet or slip stitch border can give the coat a polished look and reinforce edges. Ribbing around cuffs or the hem adds a touch of style and snugness.
Paragraph 6: Optional steps include blocking your finished coat to relax the stitches and even out the fabric. If adding closures, sew them on carefully with matching thread. Try the coat on and celebrate your handmade masterpiece!
4. Styling and Customizing Your Crochet Coat
Paragraph 1: The Coat using crochet squares – Pattern is incredibly easy to style. You can wear it over jeans and a T-shirt for a laid-back look, or pair it with dresses and boots for a boho-inspired outfit. The coat acts as a statement piece in any wardrobe.
Paragraph 2: If you’re going for a minimalist look, stick to neutral colors like beige, grey, or black. For a vibrant, artistic vibe, go bold with bright squares and multicolor yarns. This is your chance to show off your creativity through color.
Paragraph 3: Add texture by combining different stitch patterns or yarn types. For example, alternate between smooth cotton yarn and fluffy mohair squares. The variation will create visual and tactile contrast.
Paragraph 4: Play with square sizes. You can combine large squares for the body of the coat with smaller ones for the sleeves or trim. Just remember to plan your layout so all parts align correctly when assembled.
Paragraph 5: Accessories like belts, brooches, or decorative toggles can elevate the look of your crochet coat. You can even sew on inside pockets or add a hood for functionality and comfort.
Paragraph 6: Don’t forget the lining option. Lining your Coat using crochet squares – Pattern adds warmth, prevents stretching, and gives the coat a professional feel. Choose a breathable, lightweight fabric that complements your yarn color palette.
FAQ
Q1: How many squares do I need to make a crochet coat?
The number depends on the size of the coat and the size of your squares. On average, you’ll need between 30 and 70 squares for an adult-sized coat, depending on layout and design.
Q2: Can I use any type of yarn?
Yes, but worsted-weight yarn is most common. Choose a yarn that has good drape but also holds its shape. Soft acrylic, wool blends, and cotton yarns work well.
Q3: Do I need to block my squares before joining?
Blocking is recommended. It helps ensure all squares are uniform in size and lays the foundation for a professional-looking final coat.
Q4: What’s the best way to join crochet squares for garments?
Whipstitch and slip-stitch crochet joins are popular for a flat finish. Mattress stitch is great for invisibility. Choose based on your preferred look and strength.
Q5: Can I machine wash a crochet coat?
Only if the yarn is machine washable. Always follow the yarn label instructions. For delicate or handmade items, hand washing is safest.
Q6: Is this project beginner-friendly?
Yes! While it helps to know basic stitches and seaming techniques, beginners can successfully make a coat by following a clear Coat using crochet squares – Pattern step-by-step.
Conclusion
A Coat using crochet squares – Pattern is more than a DIY project—it’s a creative journey that results in a one-of-a-kind garment. This article has covered everything from understanding the pattern, selecting the right materials, and assembling your coat to styling it with personal flair. Whether you’re crocheting for fashion, warmth, or just the love of making, this project is both practical and deeply rewarding.
We’d love to hear from you! Have you made your own crochet square coat? What yarns or patterns did you use? Please leave your honest opinion, share your experiences, and feel free to offer suggestions or tips for other makers in the comments below.