If you’ve ever wanted to crochet a rose – pattern included, you’re not alone. Roses are one of the most beautiful and symbolic flowers in the world, and when brought to life with yarn, they offer a timeless and elegant touch to any project.
Whether you’re looking to make a romantic gift, decorate your home, or add a floral flourish to a hat or scarf, learning how to crochet a rose can elevate your handmade crafts to a whole new level.
This detailed guide walks you through everything you need to know to crochet a rose – pattern included, even if you’re a beginner. You don’t need to be a master crocheter to create stunning yarn roses.
With a bit of patience and the right technique, you’ll be stitching beautiful blossoms in no time.Throughout this article, we’ll break down the process into clear, manageable sections, provide practical tips, and help you understand the techniques needed.
You’ll also find answers to common questions in the FAQ section and a helpful conclusion to summarize everything you’ve learned.
1. Materials and Tools Needed for Crocheting a Rose
Before diving into your crochet a rose – pattern, it’s important to gather all the materials and tools needed. Having the right supplies on hand ensures that your project runs smoothly from start to finish.
The most recommended yarn for crocheting roses is cotton or acrylic yarn. These fibers hold shape well and offer vibrant color options. A lightweight or DK (double knitting) yarn is ideal for beginners, while experienced crafters might enjoy experimenting with finer threads for a more delicate appearance.
You’ll also need the appropriate crochet hook size for your yarn. For most rose patterns, a 3.5mm to 4.5mm hook works well. Check the yarn label for suggested sizes, or adjust based on how tightly you crochet.
Additional tools include scissors, a tapestry needle for weaving in ends, and optionally, a hot glue gun or floral wire if you plan to attach the rose to something or shape it into a bouquet.
Choosing your rose color is part of the fun. Classic red or pink is always elegant, but don’t be afraid to go bold with purples, blues, or even ombre yarns for a creative twist on tradition.
It’s also helpful to have stitch markers if you’re a beginner. These will help you keep track of your rounds or rows, especially if you’re working on a layered rose with intricate shaping.
Lastly, set up your workspace in a quiet, well-lit area. Crocheting a rose requires attention to detail, and a calm environment will help you focus on each petal and stitch.
2. Understanding the Rose Pattern Structure
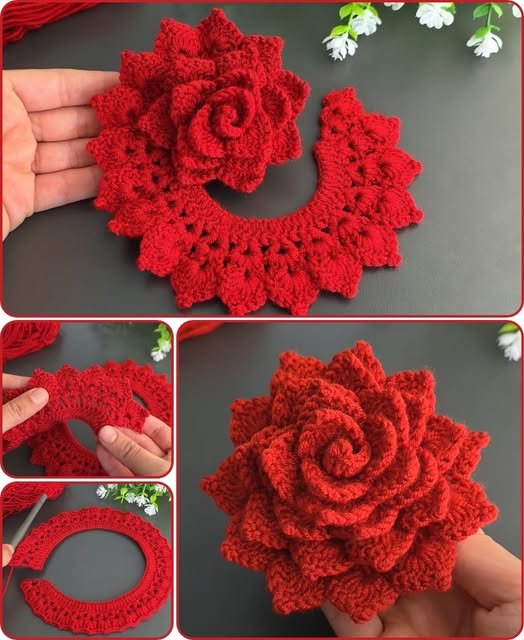
To successfully crochet a rose – pattern followers should understand the structure behind this elegant flower. Most crocheted roses follow a spiral or flat pattern that rolls into the final shape.
A typical rose pattern starts with a foundation chain, usually around 50 to 70 chains depending on the desired rose size. This chain forms the base from which the rose petals are built.
Next, you’ll crochet rows of increasing height stitches (e.g., single crochet, half double crochet, double crochet) into the chain. These varying stitches create ruffled layers that resemble the natural curl of rose petals.
Some rose patterns use short rows with strategically placed increases to form large outer petals. Others follow a continuous spiral technique that rolls tightly in the center and gradually expands outward.
Once the strip is finished, it’s rolled from one end to the other, shaping it into a rose as you go. This is where artistry comes in—tighten the roll for a bud, or loosen it slightly for a fuller, blooming rose.
Use a tapestry needle and leftover yarn to secure the base, stitching through multiple layers to hold everything in place. A touch of fabric glue can also help if you’re attaching it to accessories.
Understanding the construction of each petal layer is key to mastering any crochet a rose – pattern. After making a few, the shaping will start to feel natural, and you’ll be able to modify or create your own versions.
3. Creative Uses for Crocheted Roses
Once you’ve learned to crochet a rose – pattern by pattern, the creative possibilities are endless. These little yarn flowers can be used in many projects to add charm, elegance, or even whimsy.
One popular use is in fashion accessories. Add your crocheted rose to a headband, brooch pin, or hat for a touch of floral flair. Matching roses on a scarf and mittens set can make a unique handmade gift.
Home decor is another excellent outlet. String together several roses for a crocheted garland, or sew them onto throw pillows and blankets for an artistic, floral theme.
Weddings and events offer opportunities to showcase your roses. Use them in bridal bouquets, boutonnieres, or as table centerpieces. Since they won’t wilt, they also become beautiful keepsakes for guests.
Gift wrapping is made extra special with a handcrafted touch. Instead of a store-bought bow, attach a crocheted rose to your gift box or bag. It adds a personal, handmade element that recipients will treasure.
Roses can also be attached to keychains, hair clips, or used in jewelry like earrings or necklaces. Choose smaller patterns for delicate items, or larger ones for a bold statement.
These flowers can even become part of mixed-media art. Combine with felt, beads, or embroidery for unique pieces that showcase your crochet skills in new and creative ways.
4. Tips to Improve Your Crochet Rose Skills
Mastering the crochet a rose – pattern doesn’t happen overnight, but a few helpful tips can drastically improve your results. With practice, you’ll build confidence and develop your unique style.
Start with simple patterns. Many free and beginner-friendly rose patterns use basic stitches and offer a quick project that’s easy to repeat and perfect. Once comfortable, move on to layered or realistic rose designs.
Tension matters. If your stitches are too loose, your petals may appear floppy. Too tight, and the rose might not roll or form properly. Practice maintaining consistent tension throughout the rows.
Experiment with different yarn textures and weights. For a more rustic rose, use chunky yarn. For a fine, delicate flower, try lace or thread weight. Each gives a distinct finish and teaches you how yarn choice affects shape.
Watch video tutorials if you’re a visual learner. Seeing the pattern come together in real time helps with placement and petal shaping. Many creators offer step-by-step guidance online.
Don’t be afraid to modify a rose pattern. Want more petals? Add extra rows. Prefer a fuller bloom? Increase stitch heights. Customizing allows you to craft the perfect rose for any project.
Finally, keep all your practice roses! Even imperfect ones serve as reference points, show your growth, and can be used in upcycled art or learning projects later on.
Frequently Asked Questions (FAQ)
Q1: How long does it take to crochet a rose?
A: It depends on the pattern and your skill level. Beginners may take 30–60 minutes, while experienced crocheters can finish in 15–30 minutes.
Q2: What is the easiest crochet rose pattern for beginners?
A: A simple spiral rose pattern using a foundation chain and rows of double crochet stitches is ideal for beginners.
Q3: Can I use any yarn to crochet a rose?
A: Yes, but cotton or acrylic yarn in DK or worsted weight is best for structure and shape. Finer yarns create delicate roses, while thicker yarns make bold, larger flowers.
Q4: How do I attach a crocheted rose to other items?
A: You can sew the rose onto fabric or accessories using a tapestry needle, or use hot glue or floral wire depending on the application.
Q5: Do I need a special crochet hook to make a rose?
A: No special hook is needed. A standard aluminum or ergonomic hook that matches your yarn weight will work just fine.
Q6: Can I sell items made from a crochet rose pattern?
A: Yes, as long as the pattern you use allows for commercial use. Always credit the designer if required by copyright terms.
Conclusion
Learning to crochet a rose – pattern in hand is one of the most rewarding and versatile crochet skills you can develop. From simple decorative touches to heartfelt gifts and intricate accessories, these handcrafted flowers allow you to express creativity and beauty through yarn.
We’ve walked through the tools you need, the pattern structure, creative ideas, and expert tips to help you become confident in crocheting roses. The FAQ provided answers to common questions to support you even further on your journey.
We’d love to hear from you—please share your honest opinions and tell us what you liked about this guide. Have a suggestion or a favorite crochet rose story? Drop a comment and let’s grow this crafting community together!