Crochet an easy rose – Pattern is one of the most rewarding projects for both beginners and seasoned crafters looking to add a touch of handmade elegance to their decor or garments. Learning how to crochet an easy rose allows you to create timeless floral accents that never wither, providing a versatile pattern that can be used for bouquets, hair accessories, or even gift toppers. Whether you are picking up a hook for the first time or you are a pro looking for a quick afternoon project, this guide will walk you through every loop and stitch.
Creating a crochet an easy rose – pattern doesn’t require complex knowledge of advanced lace-making; instead, it relies on foundational stitches that build upon each other to create volume and texture. The beauty of a crochet rose lies in its construction, usually worked in a long strip that magically transforms into a lush blossom once rolled and stitched together. This method is the gold standard for easy crochet patterns because it eliminates the stress of working in difficult rounds while still delivering a professional, high-quality result.
In the world of DIY crafts, finding a reliable crochet an easy rose – pattern is essential for building your stitch library. We will focus on using soft acrylic yarn or mercerized cotton, which provides the stitch definition needed to make your petals pop. By following this tutorial, you will master the art of the rolled crochet rose, ensuring that your finished piece looks boutique-quality. Get your hooks ready, as we dive deep into the materials, the step-by-step process, and the professional finishing touches that make this crochet pattern stand out.
1. Essential Materials for Your Crochet an Easy Rose – Pattern
To begin your journey with this crochet an easy rose – pattern, the first thing you need is the right yarn weight. For a standard, realistic-sized flower, a medium weight (worsted) yarn is highly recommended as it is easy to handle and shows your stitches clearly. If you prefer a more delicate look, a fingering weight yarn or crochet thread will create a tiny, dainty rose perfect for jewelry.
The crochet hook size is equally important when working on your crochet an easy rose – pattern. Generally, a 4.0mm (G) hook works perfectly with worsted yarn to ensure the petals have enough structure to hold their shape without being too stiff. If your stitches are naturally loose, consider dropping down a half size to keep the flower petals firm and well-defined.
Don’t forget the notions that make the finishing process seamless. You will need a tapestry needle (also known as a yarn needle) with a large eye to weave in your ends and, more importantly, to sew the base of the rose together once it is rolled. A sharp pair of craft scissors is also vital for clean cuts, preventing the yarn from fraying as you finish your crochet project.
Stitch markers can be incredibly helpful for beginners following a crochet an easy rose – pattern, especially when counting the long foundation chain. Since the rose starts as a flat strip, miscounting your initial stitches can lead to a flower that is either too small or awkwardly shaped. Marking every 10th or 20th stitch ensures your foundation row is accurate and ready for the petal layers.
Texture and color choice can completely change the vibe of your crochet rose. Using a variegated yarn creates a beautiful natural depth, mimicking the color shifts found in real flowers, while a solid red or pink yarn offers a classic, romantic look. Always check your yarn label for care instructions, especially if you plan on attaching your rose to a washable item like a hat or sweater.
Lastly, having a bit of fabric stiffener or a wire stem can take your crochet an easy rose – pattern to the next level. If you want your rose to stand upright in a vase, wrapping a floral wire with green yarn provides the necessary support. These small additions transform a simple piece of crochet into a piece of handmade art that can be gifted or displayed permanently.
2. Understanding the Foundation Chain and First Row
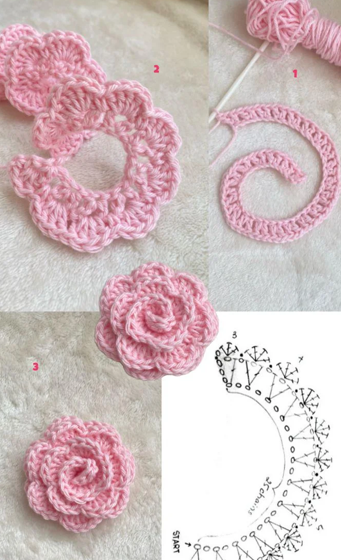
Every great crochet an easy rose – pattern starts with a foundation chain. For a medium-sized rose, you will typically want to chain about 50 to 60 stitches. This length determines how many petals your rose will have; a longer chain results in a fuller, more “cabbage-style” rose, while a shorter chain creates a cute, tight rosebud effect.
Once your chain is ready, the first row of your crochet an easy rose – pattern usually involves creating a series of V-stitches or arches. This is done by skipping a few chains and working a double crochet, a chain, and another double crochet into the same stitch. These arches serve as the “skeleton” for your petals, providing the gaps where you will later work multiple stitches to create curves.
Accuracy in this row is what makes this an easy pattern to follow. By creating these consistent spaces, you ensure that each petal has enough room to expand without overlapping in a messy way. This row sets the stage for the 3D effect of the rose, as the increasing number of stitches in the next row will cause the strip to naturally curl and twist.
As you work across the row, remember to keep your tension even. If your stitches are too tight, the rose will be difficult to roll; if they are too loose, the petals might look floppy. Finding that “sweet spot” of tension is key to a professional crochet finish. Most crochet patterns suggest a relaxed grip to give the yarn’s fibers room to breathe and bloom.
The beauty of the crochet an easy rose – pattern is its repetitive nature. Once you understand the rhythm of the V-stitch, the row flies by quickly. This is often referred to as “meditative crochet” because the patterns are predictable and soothing, making it a perfect project for relaxing after a long day or while watching your favorite show.
Before moving to the petal row, always do a quick count of your arches. If your crochet an easy rose – pattern calls for 20 arches and you only have 18, your rose might look a bit lopsided once assembled. Taking a moment to verify your work now saves time later and ensures that your handmade flower looks symmetrical and beautifully balanced.
3. Crafting the Petals for a Realistic Look
The magic happens in the second row of the crochet an easy rose – pattern, where you turn flat arches into rounded petals. To achieve this, you will work a combination of half-double crochets, double crochets, and sometimes treble crochets into each arch. Starting with shorter stitches at the edges and taller stitches in the middle creates that perfect semi-circle shape.
To make your crochet an easy rose – pattern look even more realistic, you can vary the size of the petals as you go across the strip. For example, you might work smaller petals (using only double crochets) at one end and larger petals (using treble crochets) at the other. When you roll the rose, the small petals become the inner bud, and the larger ones become the outer, blooming layers.
The term “shell stitch” is often used to describe this petal-making process. By grouping several stitches into a single space, the fabric naturally fans out. This is the secret behind the crochet an easy rose – pattern—the sheer volume of stitches in the second row forces the strip to ruffle, which is exactly what gives the rose its body and thickness.
Pay close attention to the turning chain at the start of this row. It counts as your first stitch and helps maintain the height of your petals. In a high-quality crochet pattern, these small details are what separate a beginner project from a masterpiece. Ensure you are working into the “chain-1 space” of your previous V-stitches to keep the petals centered and secure.
Color changes can also be introduced here if you want a multi-toned rose. By using a slightly lighter shade for the final row of stitches or a contrasting border, you can mimic the “sun-kissed” edges often seen in real gardens. This technique adds a layer of sophistication to your crochet an easy rose – pattern without adding significant difficulty.
As you finish the last petal, leave a long yarn tail—at least 12 to 15 inches. You will use this “long tail” for the assembly phase. Cutting the yarn too short is a common mistake; having extra length ensures you can securely sew through all the layers of the crochet rose without having to tie unsightly knots or join new yarn midway through.
4. Assembling and Rolling Your Crochet Rose
Now comes the most exciting part of the crochet an easy rose – pattern: the assembly. Lay your finished strip flat on a table with the “right side” facing up. Starting from the end with the smaller petals, begin to roll the strip inward tightly. This creates the center of the rose, which should look like a tightly furled bud before it starts to open up.
As you continue rolling the crochet an easy rose – pattern strip, begin to loosen your grip slightly. This allows the outer petals to flare out, mimicking the way a real rose opens to the sun. Keep the bottom edges of the strip (the foundation chain side) perfectly aligned as you roll; this creates a flat “base” that is easy to sew together.
Thread your tapestry needle with the long tail you left earlier. Insert the needle through all the layers of the base, going from one side to the other. It is crucial to catch every layer of the foundation chain to ensure the rose doesn’t “pop out” or unravel from the center. This structural sewing is what makes your crochet flower durable.
While sewing, don’t pull the yarn too tight, as it might distort the shape of the petals. Instead, use firm but gentle stitches to tack the layers in place. Rotate the flower as you sew, checking the front frequently to make sure the petals are sitting exactly where you want them. This is the stage where you can “sculpt” your crochet an easy rose – pattern result.
If you are making a crochet bouquet, this is the time to insert your wire stem. You can apply a small dab of hot glue to the tip of the wire and push it into the base of the rose before finishing your sewing. The yarn will grip the wire, and your stitches will hide the connection point, resulting in a clean, professional floral design.
Finally, “fluff” your petals. Use your fingers to gently pull the edges of the crochet outward and shape the curves. Because of the nature of crochet stitches, the yarn has a bit of memory and will hold the shape you give it. Your crochet an easy rose – pattern is now complete, ready to be pinned to a shawl, glued to a headband, or placed in a decorative vase.
FAQ – Frequently Asked Questions
1. What is the best yarn for a crochet rose?
For a sturdy rose that holds its shape, mercerized cotton is the best choice. It has a slight sheen and excellent stitch definition. However, acrylic yarn is a great, budget-friendly option for beginners practicing the crochet an easy rose – pattern.
2. How long does it take to crochet one rose?
An experienced crocheter can finish this pattern in about 20 to 30 minutes. If you are a beginner, it might take 45 minutes to an hour as you get used to the stitch repeats and the rolling technique.
3. Can I make this rose larger or smaller?
Yes! To make it larger, use a thicker yarn (like chunky weight) and a larger hook, or simply increase the number of stitches in your foundation chain. To make it smaller, use embroidery floss or lace-weight yarn with a 1.5mm hook.
4. How do I attach the rose to a hat or garment?
The best way is to use the yarn tail and a tapestry needle to sew the flat base of the rose directly onto the fabric. Make sure to anchor it in several spots so it doesn’t flop over when the garment is worn.
5. Do I need to block my crochet rose?
Usually, blocking isn’t necessary for a rolled rose because the rolling process provides the structure. However, if your petals look a bit wrinkled, a light steam from an iron (without touching the yarn) can help them relax and look more polished.
6. Can I wash my crochet roses?
If you used washable acrylic or cotton, yes. I recommend placing the item in a mesh laundry bag and using a delicate cycle. Reshape the petals while the rose is damp and let it air dry completely.
Conclusion
In this tutorial, we have explored the wonderful world of the crochet an easy rose – pattern, covering everything from the initial foundation chain to the final assembly and sculpting. We learned that the secret to a beautiful rose lies in the gradual increase of stitch height and the careful rolling of the finished strip. This project is a fantastic way to use up scrap yarn while creating something truly beautiful and functional for your home or wardrobe.
By mastering this crochet pattern, you now have the skills to create an endless garden of flowers that will never fade. Whether you’re making them for a special gift, a wedding bouquet, or just to brighten up your desk, the crochet rose is a classic design that never goes out of style.