A Crochet Bag – Tutorial is the perfect way to dive into the world of functional fiber arts, allowing you to create a stylish accessory that is both durable and uniquely yours. Whether you are a seasoned pro or just picking up a hook for the first time, crafting your own crochet bag offers a sense of accomplishment that store-bought items simply cannot match. This comprehensive tutorial will guide you through the essential steps, ensuring your finished project looks professional, feels sturdy, and serves as a testament to your creative skills.
When you start a Crochet Bag – Tutorial, you are not just making a carrier for your belongings; you are mastering the art of tension, texture, and structural integrity. The beauty of a crochet bag lies in its versatility, as you can easily adjust the size, strap length, and color palette to fit your personal aesthetic or specific needs. By following a well-structured tutorial, you ensure that your stitches are consistent and that the base of your bag is strong enough to handle daily wear and tear.
Finding a reliable Crochet Bag – Tutorial is the first step toward building a handmade wardrobe that stands out in a crowd of fast fashion. In this guide, we will explore the best materials, the most effective stitch patterns for longevity, and the finishing touches that elevate a simple sack into a high-end crochet bag. Our goal is to provide a humanized, easy-to-follow tutorial that respects your time and fuels your passion for the craft, making the entire process as enjoyable as the final result.
1. Selecting the Right Materials for Your Crochet Bag – Tutorial
Choosing the proper yarn is the foundation of any successful Crochet Bag – Tutorial, as the fiber content determines how much the bag will stretch over time. For a functional crochet bag, cotton or nylon blends are often preferred because they offer excellent stitch definition and minimal “sag” when carrying heavier items. In this tutorial, we recommend a medium-weight cotton yarn to ensure your project remains lightweight yet remarkably resilient.
The hook size you select for your Crochet Bag – Tutorial is equally important for achieving the right fabric density. Using a slightly smaller hook than the yarn label suggests can create a tighter, more “solid” fabric, which is ideal for a crochet bag that doesn’t require a fabric liner. This tutorial emphasizes checking your gauge early on to avoid a bag that ends up much larger or smaller than intended.
Beyond yarn and hooks, your Crochet Bag – Tutorial kit should include a tapestry needle, sharp scissors, and stitch markers. Stitch markers are particularly vital when working in rounds, a common technique for a crochet bag, to keep track of your increases and row transitions. Following this tutorial properly means being organized from the very first stitch to the final weave-in of your ends.
Hardware can also play a significant role in your Crochet Bag – Tutorial, especially if you want a more modern look. Consider incorporating magnetic snaps, D-rings, or even leather straps to give your crochet bag a high-end, boutique-quality finish. This tutorial will focus on a “yarn-only” version first, but these additions are great ways to customize your work as you gain confidence.
Durability is a recurring theme in any professional Crochet Bag – Tutorial, as bags naturally face more friction than blankets or scarves. Selecting a high-quality, mercerized cotton yarn provides a subtle sheen and prevents the crochet bag from pilling after just a few uses. This tutorial encourages investing in good materials to ensure your hard work lasts for many seasons to come.
Finally, consider the color transitions within your Crochet Bag – Tutorial to make the project visually engaging. Variegated yarns can create beautiful, effortless patterns, while solid colors highlight intricate stitch work and the structural lines of the crochet bag. This tutorial is designed to work with any color scheme, allowing your individual personality to shine through every loop and pull.
2. Mastering the Foundation and Base Stitches
The base is the most critical part of this Crochet Bag – Tutorial, as it bears the weight of everything you carry. Most crochet bag designs start with either a rectangular or oval base, worked in tight single crochet stitches to provide a flat, stable bottom. In this tutorial, we will focus on the oval base method, which creates a classic silhouette that is both trendy and spacious.
To begin the base of your crochet bag, you will start with a foundation chain that determines the length of your bag. This tutorial suggests starting with a chain of twenty to thirty stitches, depending on your desired size, and then working around both sides of the chain. By following this Crochet Bag – Tutorial technique, you eliminate seams and create a seamless transition from the bottom to the sides.
Increasing at the corners or ends of your base is a skill emphasized in every Crochet Bag – Tutorial to keep the fabric flat. If you don’t increase enough, your crochet bag will start to “cup” too early; if you increase too much, it will ripple. This tutorial provides a specific stitch count for each round of the base to ensure a perfectly smooth and professional foundation.
Once the base reaches the desired width, this Crochet Bag – Tutorial moves into the “body” of the project. This is where you stop increasing and simply work even rounds, which causes the sides of your crochet bag to grow upward. It is a satisfying stage of the tutorial where you can finally see the 3D shape of your creation beginning to take form.
Texture is a great way to add “wow” factor to your Crochet Bag – Tutorial, and we recommend using the “Waistcoat Stitch” or “Thermal Stitch” for extra thickness. A crochet bag made with these dense stitches is incredibly sturdy and often doesn’t need a lining at all. This tutorial explores how these stitches affect yarn consumption, so be sure to have an extra skein on hand just in case.
Consistency is the secret ingredient in a high-quality Crochet Bag – Tutorial, so try to maintain the same hand tension throughout the day. If you find your stitches getting tighter or looser, take a break and come back to the tutorial with fresh eyes. A well-crafted crochet bag is defined by the uniformity of its stitches, reflecting the care and attention you put into the process.
3. Shaping the Body and Adding Decorative Elements
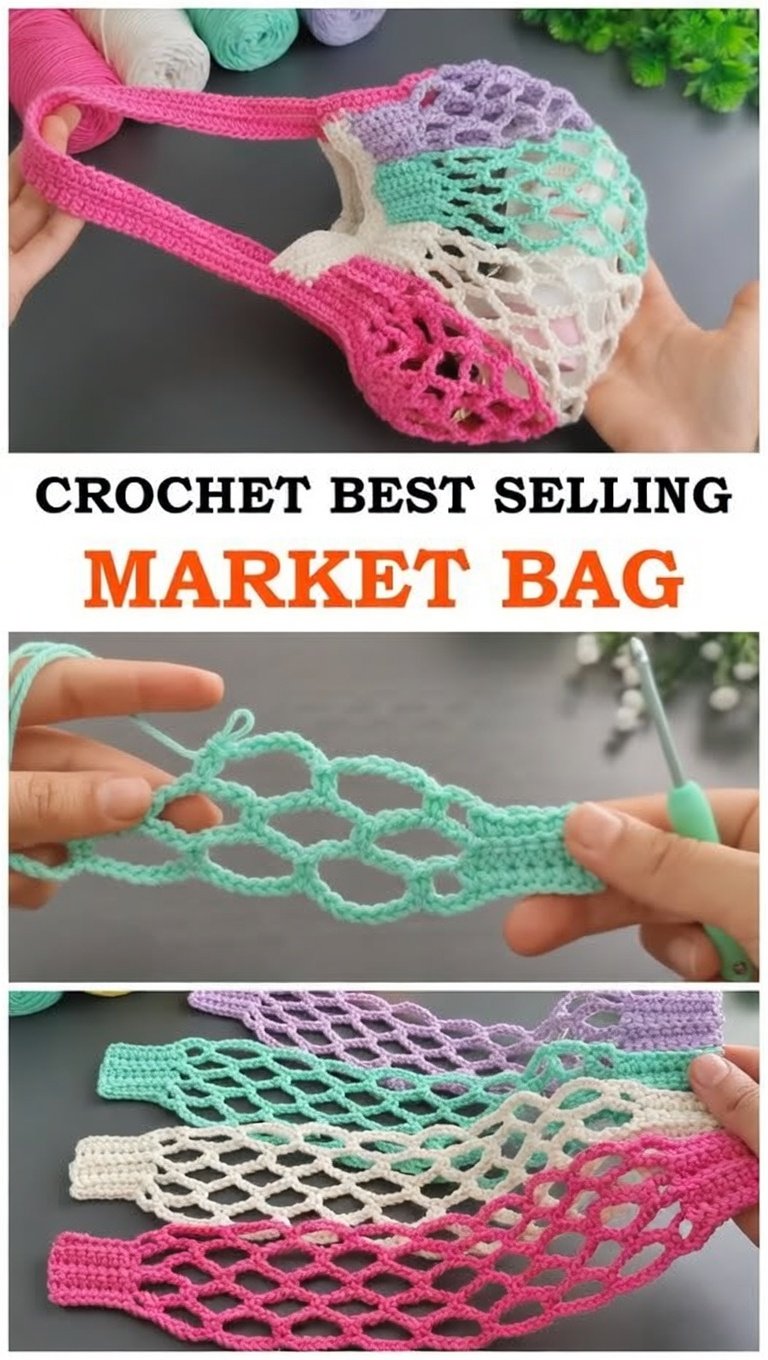
As you progress through the body of your Crochet Bag – Tutorial, you can experiment with different stitch patterns like shells, bobbles, or even simple stripes. The crochet bag body is essentially a canvas for your creativity, and this tutorial encourages you to mix and match textures to create a unique look. Remember that “holey” stitches like the mesh stitch are great for market bags but less ideal for a crochet bag intended to hold small items like keys.
Integrating color changes into your Crochet Bag – Tutorial is an excellent way to use up scrap yarn or create a trendy “ombre” effect. To keep your crochet bag looking neat, this tutorial recommends carrying the yarn inside the stitches (tapestry crochet) or using the “invisible join” method. This ensures that the “seam” of your work remains nearly invisible to the naked eye.
The height of your crochet bag is entirely up to you, but this tutorial suggests a standard height of ten to twelve inches for a medium tote. As you reach the top, you might want to switch back to a few rows of solid single crochet to reinforce the rim. This step in the Crochet Bag – Tutorial provides a stable place to eventually attach the handles or straps.
Adding a “lip” or a decorative border is a popular way to finish the main body in many a Crochet Bag – Tutorial. The “Crab Stitch” (reverse single crochet) creates a corded look that is very durable and adds a professional touch to the top of your crochet bag. This tutorial considers this the “finishing touch” that makes your handmade item look like it came from a designer store.
Internal pockets are an advanced but rewarding addition to any Crochet Bag – Tutorial. You can crochet a small square separately and sew it into the interior of your crochet bag using a yarn needle. This tutorial finds that even a single pocket for a smartphone makes the bag much more functional for daily use.
Throughout this Crochet Bag – Tutorial, always keep an eye on the symmetry of your work. Fold the bag in half occasionally to make sure the sides are rising evenly and that the “seam” isn’t leaning too far to one side. This tutorial aims for perfection, and these quick checks ensure your crochet bag is balanced and aesthetically pleasing from every angle.
4. Crafting Durable Straps and Finishing Touches
The straps are often the “make or break” point of a Crochet Bag – Tutorial, as they must be strong enough to support the weight of the filled bag. Avoid simple chains; instead, this tutorial recommends the “I-cord” or a wide band of “Thermal Stitches” for your crochet bag handles. These methods prevent the straps from stretching into thin, uncomfortable strings when you put items inside.
Deciding on the length of your straps is a personal choice that this Crochet Bag – Tutorial helps you navigate. Do you want a handheld tote, an over-the-shoulder bag, or a crossbody style? This tutorial suggests pinning the straps in place first with safety pins to “test drive” the length before permanently attaching them to your crochet bag.
Secure attachment is the most vital part of the assembly phase in our Crochet Bag – Tutorial. Use a “X” stitch pattern with your tapestry needle when sewing the straps onto the crochet bag to distribute the weight across a larger area. This tutorial ensures that your handles won’t snap or pull away from the body, even if you carry a laptop or books.
Blocking your finished project is a step often skipped in a basic Crochet Bag – Tutorial, but it makes a world of difference. Wet blocking helps settle the stitches and gives your crochet bag a crisp, finished shape. This tutorial recommends stuffing the bag with towels while it dries to help it “remember” its three-dimensional form.
Embellishments like tassels, pom-poms, or wooden beads can be added after the main Crochet Bag – Tutorial is complete. These small details add a bohemian flair to your crochet bag and are a great way to express your individual style. This tutorial encourages you to have fun with these extras, as they are easily removable or changeable later on.
Congratulations on completing this Crochet Bag – Tutorial! You now have a custom-made, high-quality crochet bag that is ready for the world. By following every step of this tutorial, you have learned not just a pattern, but the fundamental principles of construction that will serve you in all your future fiber arts endeavors.
FAQ – Frequently Asked Questions
How long does it take to finish a Crochet Bag – Tutorial?
Depending on your skill level and the size of the bag, it usually takes between 5 to 15 hours. A simple market bag might be a weekend project, while a detailed tote with pockets may take a week of evening work.
Does my crochet bag need a lining?
It depends on the stitch you use. If you use a dense stitch like the Thermal Stitch mentioned in this tutorial, a lining is optional. However, for lace or mesh patterns, a fabric liner is recommended to keep small items from falling out.
What is the best yarn for a crochet bag?
Cotton is the gold standard for any Crochet Bag – Tutorial because it doesn’t stretch as much as wool or acrylic. It is also washable and very durable for everyday use.
How do I prevent the straps from stretching?
The best way is to use a non-stretch stitch like the I-cord or to crochet over a piece of nylon webbing or cotton cord. This tutorial also suggests using a smaller hook for the straps to increase density.
Can I wash my crochet bag?
Yes, if you used cotton or synthetic yarn. We recommend hand washing in cool water and laying it flat to dry (or stuffing it with towels) to maintain the shape you achieved during this tutorial.
Conclusion
In this Crochet Bag – Tutorial, we have covered everything from selecting the perfect cotton yarn to mastering the foundation base and crafting sturdy, reliable straps.
We learned that the key to a professional crochet bag lies in the details: maintaining consistent tension, choosing the right hook size, and reinforcing stress points. This tutorial was designed to give you the confidence to create a functional piece of art that reflects your personal style and technical growth.