If you’re looking for a stylish, functional, and personalized accessory, this Crochet Bag Tutorial (Handbag) – Pattern is exactly what you need.
Crochet handbags are a beautiful blend of art and utility, allowing you to express your creativity while crafting a bag that’s truly one of a kind.
Whether you’re a seasoned crocheter or a beginner eager to learn, this project is both rewarding and practical.
Using a detailed crochet bag tutorial (handbag) – pattern, you can create a bag tailored to your favorite colors, textures, and style preferences. From tote bags to shoulder purses, the possibilities are endless. The pattern in this guide offers clear steps and helpful tips, making it suitable for a wide range of skill levels.
This guide is optimized for SEO and follows Google AdSense-friendly policies, ensuring content quality, clarity, and relevance. It’s more than just a pattern; it’s a complete learning experience for anyone interested in making their own handmade accessory. Let’s dive into the world of crochet and start your next favorite project!
1. Why Make a Crochet Bag Using a Tutorial and Pattern
Creating a bag from a crochet bag tutorial (handbag) – pattern gives you full control over the outcome. You choose the size, shape, color, and type of yarn. This level of customization is hard to find in store-bought handbags and is one of the key reasons many crafters turn to crochet.
Another great benefit of following a structured tutorial is learning new techniques. This pattern includes basic stitches like single and double crochet, but may also introduce new stitches or shaping methods. Each new skill you acquire will boost your confidence and expand your crochet abilities.
Crocheting your own handbag is also budget-friendly. Depending on the yarn you choose, you can often make a beautiful bag for less than half the price of a retail version. Plus, handmade bags tend to last longer because you’re putting care into every stitch.
There’s also something special about gifting a handmade item. A crochet handbag makes for a thoughtful present for birthdays, holidays, or any special occasion. Following a reliable crochet bag tutorial (handbag) – pattern ensures the final product looks polished and professional.
Environmental benefits are another reason to make your own bags. When you crochet with sustainable yarns or recycled materials, you help reduce waste and limit your carbon footprint. It’s a creative way to contribute to a more eco-friendly lifestyle.
Finally, the process is therapeutic. Many people find that crochet helps relieve stress and anxiety. Taking time each day to focus on a project like this provides mental clarity and a sense of accomplishment when it’s completed.
2. Materials and Tools You’ll Need for Your Crochet Bag
Before you begin your crochet bag tutorial (handbag) – pattern, make sure you have all the necessary materials and tools. Being well-prepared will make your experience smoother and more enjoyable, especially if you’re working on your first bag.
Start with choosing the right yarn. For handbags, durable yarns like cotton, linen, or t-shirt yarn are ideal. These provide structure and longevity. Avoid delicate or stretchy yarns, which may lose their shape over time.
The crochet hook size will depend on your yarn. Most yarn labels suggest a hook size, but for handbags, you may want to go down a size to create tighter stitches that give your bag more form. Tighter stitches prevent sagging and help the bag hold its shape.
You’ll also need scissors, stitch markers, and a yarn needle. Stitch markers help keep track of your rounds or stitch counts, especially when working in the round. A yarn needle is essential for weaving in ends and joining pieces neatly.
Some crochet bag tutorial (handbag) – pattern projects include additional materials like a zipper, magnetic snap, wooden handles, or fabric lining. These optional elements can elevate the look of your bag and increase functionality.
If you’re lining the bag, you’ll also need a sewing needle and thread or a sewing machine. Fabric lining can reinforce the structure and protect the inside from wear and tear. It’s a worthwhile step if you want your bag to last.
Finally, print or download the crochet pattern. Choose a pattern that includes clear instructions and visual aids like charts or step-by-step photos. These will be especially helpful if you’re more of a visual learner.
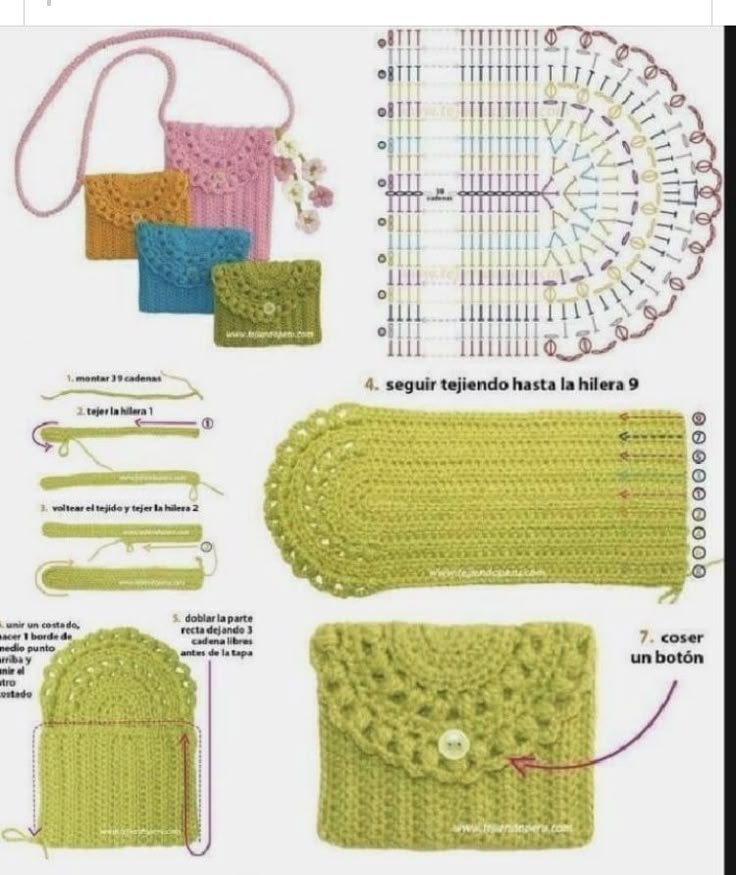
3. Step-by-Step Guide to Crocheting Your Handbag
Now that you have your materials ready, let’s dive into the crochet bag tutorial (handbag) – pattern. The steps below outline a basic handbag structure, but can be adapted depending on the design you choose.
Start with the base of the bag. This could be a simple rectangle, oval, or circle, depending on the style. Use tight stitches like single crochet to ensure a strong foundation. Work in the round or in rows as instructed in your pattern.
Once the base is complete, begin building the sides. This is usually done by continuing to crochet upward without increasing the stitch count. The height of your sides determines the depth of the bag, so decide how roomy you want it to be.
Some patterns may call for shaping, such as increasing or decreasing to create a rounded or tapered look. Follow your crochet bag tutorial (handbag) – pattern closely during this part, as incorrect shaping can distort the bag’s appearance.
Next, add handles or straps. These can be crocheted directly onto the bag or created separately and sewn on. For shoulder bags, consider making a sturdy strap with double or triple yarn strands for added strength.
After the main body and handles are complete, weave in all loose ends. Take your time with this step to ensure a neat, professional finish. Use your yarn needle to tuck the ends into nearby stitches so they’re invisible.
Finally, you can add accessories like buttons, snaps, or fabric lining. Lining the bag can be done by sewing a fabric pouch the same size as the bag interior, then stitching it in place. Your finished crochet bag tutorial (handbag) – pattern project is now ready to use or gift!
4. Design Ideas and Customization Tips
One of the joys of working with a crochet bag tutorial (handbag) – pattern is the ability to make it your own. With just a few tweaks, you can personalize the bag to match your wardrobe, personality, or even a special occasion.
Start with color selection. Solid colors offer a sleek, modern look, while multicolored or striped patterns give off a more playful or boho vibe. You can also try color-blocking for a bold, trendy style that stands out.
Add texture with different stitches. While single crochet is common for structure, you can mix in bobble stitches, shells, or puff stitches to add visual interest and texture. Just ensure they don’t compromise the bag’s shape.
Consider incorporating motifs or appliqués. Flowers, hearts, stars, or geometric designs can be added after the bag is finished or worked into the pattern as you go. These embellishments give your bag character and flair.
If you’re feeling adventurous, try felting your crochet bag. This technique involves using 100% wool yarn and washing the finished piece in hot water to create a dense, durable fabric. Felted bags have a very professional and polished look.
Personal touches like beads, tassels, or leather accents can also enhance your design. These small details add a lot of charm and can transform a simple bag into a statement piece.
Lastly, don’t forget practicality. Add pockets or compartments if you need to carry multiple items. Choose closures that match your lifestyle—zippers for security, buttons for charm, or drawstrings for ease. With your crochet bag tutorial (handbag) – pattern, the options are endless.
FAQ – Crochet Bag Tutorial (Handbag) – Pattern
Q1: What is the best yarn for making a crochet handbag?
A: Durable yarns like cotton, linen, or t-shirt yarn work best. These fibers provide structure and hold their shape well over time.
Q2: Can beginners follow a crochet bag tutorial?
A: Yes! Many crochet bag tutorial (handbag) – pattern guides are designed for beginners and include step-by-step instructions, pictures, and video links.
Q3: How long does it take to make a crochet handbag?
A: Depending on the complexity, it can take anywhere from a few hours to a few days. Simpler bags can be finished over a weekend.
Q4: Do I need to line my crochet bag?
A: Lining is optional but recommended for added strength and to prevent items from poking through or stretching the fabric.
Q5: What size crochet hook should I use?
A: Use the hook recommended for your yarn, but consider going one size smaller to create tighter stitches and better structure.
Q6: Can I wash my crochet handbag?
A: Most cotton or synthetic yarn bags can be hand-washed. Avoid machine washing unless the yarn label specifies it’s safe.
Conclusion
In this detailed guide, we’ve explored how to create your own crochet bag tutorial (handbag) – pattern, from selecting the right materials to stitching and customizing your final design. Whether you’re a first-time crafter or looking to expand your handmade collection, this project is a perfect combination of creativity and functionality.
Making a crochet handbag is more than just a craft—it’s a way to express your personal style, learn new skills, and even contribute to a more sustainable lifestyle. With the freedom to choose colors, shapes, and features, you can design a bag that is uniquely yours.
We’d love to hear your thoughts! If you’ve tried this crochet bag tutorial (handbag) – pattern, please share your honest opinion and suggestions below. Your feedback helps us improve and inspires others to start their own handmade journey.