The Crochet Bandana Pattern is a timeless project that bridges the gap between vintage aesthetics and modern street style, offering crafters a quick and satisfying way to create wearable art. Whether you are looking to protect your hair from the summer sun or simply want to add a bohemian flair to your outfit, a well-executed Crochet Bandana Pattern provides the perfect balance of breathability and structure. Because these accessories require relatively small amounts of yarn, they are often the go-to choice for “stash-busting” or practicing new stitches without committing to a full-sized blanket or sweater.
Understanding the mechanics of a Crochet Bandana Pattern is essential for ensuring the finished piece sits comfortably on the head without slipping or bunching. Most designs follow a triangular geometry, starting either from the widest top edge or increasing from a single point at the bottom. By following a professional Crochet Bandana Pattern, you gain access to the specific stitch counts and row repetitions needed to achieve that classic kerchief shape, ensuring that the ties are long enough to be secure while the main body of the fabric remains light and airy.
In this detailed guide, we will explore everything you need to know about the Crochet Bandana Pattern, focusing on the two core pillars of the craft: the Crochet Bandana, which is the physical accessory, and the Pattern, which serves as your technical roadmap. We will dive into material selection, stitch variations like the granny stitch or solid shells, and how to customize your project for different head sizes. By the end of this article, you will have the confidence to pick up your hook and transform a single skein of yarn into a stunning, handmade headpiece that reflects your unique personality.
1. Essential Materials for Your Crochet Bandana Pattern
Selecting the right fiber is the most critical decision when starting your Crochet Bandana Pattern. Since this accessory is worn directly against the hair and forehead, you want to choose a yarn that is soft, non-itchy, and lightweight. Most experts recommend 100% mercerized cotton or a high-quality bamboo blend because these fibers are breathable and hold their shape well even in humid weather. Avoid heavy wools for a summer-style Crochet Bandana Pattern, as they can become too hot and may cause the bandana to sag under its own weight.
The crochet hook you choose will determine the “drape” of your Crochet Bandana. For a standard Crochet Bandana Pattern, a hook size between 3.5mm (E) and 4.5mm (G) is usually ideal. If you want a lacier, more delicate look, you might go up a hook size to loosen the tension. Always check the gauge provided in your Crochet Bandana Pattern to ensure the finished dimensions will fit an adult head, as small changes in hook size can significantly alter the final width and height of the triangle.
Beyond yarn and hooks, you will need a few basic notions to complete your Crochet Bandana Pattern professionally. A pair of sharp embroidery scissors and a tapestry needle are required for weaving in the ends of your yarn. Since a Crochet Bandana often features stripes or color changes, you might have several tails to hide. Weaving them in securely ensures that your handmade piece can withstand multiple washes and daily wear without coming apart at the seams.
Stitch markers are incredibly helpful when following a Crochet Bandana Pattern, especially if the design involves complex increases. By marking the center stitch of the triangle, you can easily identify where to place your “peak” stitches, which helps maintain perfect symmetry. This is a common tip found in many Crochet Bandana Pattern tutorials to prevent the triangle from leaning to one side or becoming lopsided as the rows grow longer and more numerous.
The “ties” of the Crochet Bandana are another area where material choice matters. Some makers prefer to use the same yarn as the body of the bandana, while others might use a contrasting ribbon or even a braided cord. If you are following a traditional Crochet Bandana Pattern, the instructions will likely guide you to crochet a long chain directly into the corners of the triangle. This creates a seamless transition and ensures the straps are strong enough to be tied in a secure knot at the nape of the neck.
Finally, consider the “bloom” and colorfastness of your yarn before you start the Crochet Bandana Pattern. Since hair products or sweat might come into contact with the fabric, you want a yarn that won’t bleed colors when washed. Pre-testing a small swatch is a pro move in the world of the Crochet Bandana Pattern. It allows you to see how the fabric behaves after being wet and dried, ensuring your final accessory remains beautiful and functional for many seasons to come.
2. Mastering the Geometry and Stitches of the Pattern
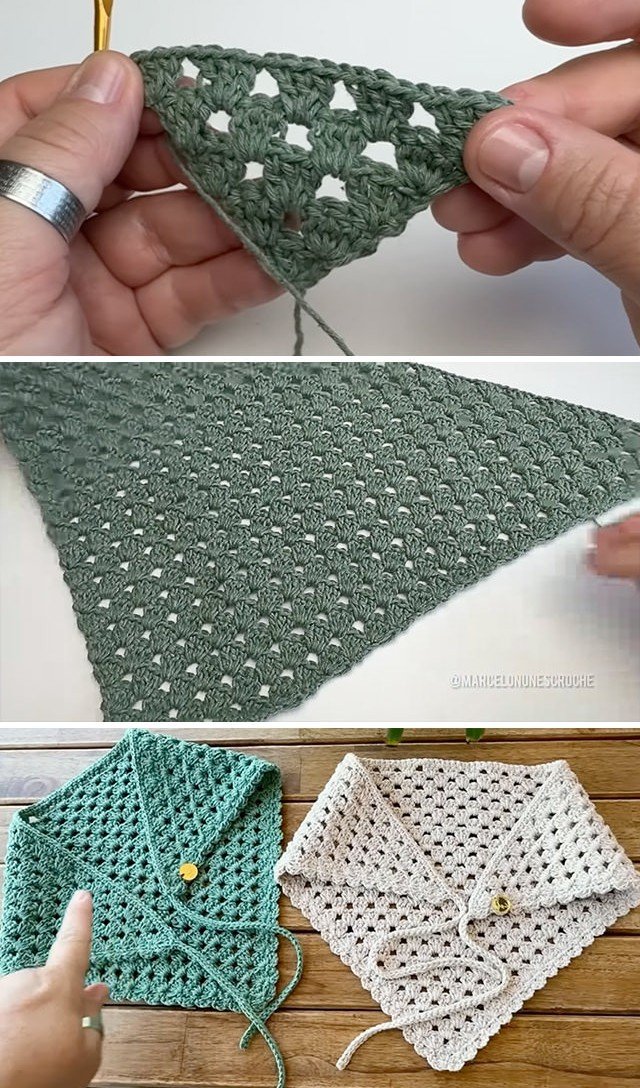
The most common shape for a Crochet Bandana Pattern is an isosceles triangle. This is achieved by increasing at the edges and usually in the center of every row. Understanding the math behind these increases is the “secret” to a flat-laying Crochet Bandana. If you don’t increase enough, the fabric will curl like a bowl; if you increase too much, it will ripple. A well-written Crochet Bandana Pattern takes the guesswork out of this process, providing a rhythmic sequence of stitches that naturally expands the fabric into a perfect triangular form.
The “Granny Stitch” is perhaps the most iconic choice for a Crochet Bandana Pattern. This involves clusters of three double crochets worked into the spaces between clusters from the previous row. This style gives the Crochet Bandana a vintage, 1970s feel and provides plenty of ventilation. Because the granny stitch is so repetitive, it makes the Crochet Bandana Pattern very meditative and easy to memorize, allowing you to crochet while watching a movie or chatting with friends without losing your place.
For those who prefer a more modern or bohemian look, the “Shell Stitch” or “V-Stitch” can be used in a Crochet Bandana Pattern. These stitches create a more solid fabric with decorative scalloped edges. When using a solid stitch, the Crochet Bandana becomes a more substantial accessory, perfect for keeping hair in place during a windy day or for a more modest head covering. Many designers combine different stitches within a single Crochet Bandana Pattern to create horizontal bands of varying textures.
Border techniques are a vital part of the Crochet Bandana Pattern finish. A simple row of single crochet around the entire perimeter can stabilize the edges and prevent them from stretching out over time. Some patterns might include a picot border or a fringe to add extra personality. Adding these final touches according to the Crochet Bandana Pattern instructions elevates the project from a simple triangle to a professional-looking garment that looks like it belongs in a high-end boutique.
The “Tension” of your stitches is particularly important in a Crochet Bandana Pattern. If your stitches are too tight, the bandana will be stiff and won’t conform to the shape of your head comfortably. Most patterns suggest a relaxed tension to allow the fabric some “give.” If you find your work is too rigid, try relaxing your grip on the yarn or switching to a larger hook to ensure your Crochet Bandana has that soft, flexible drape that is characteristic of quality crochet work.
Lastly, let’s discuss the “foundation row.” Some Crochet Bandana Pattern variations start with a magic ring at the center-top, while others start with a long chain along the top edge. The magic ring method usually results in a more “pointed” triangle, while the top-down chain method creates a flatter, wider shape. Experimenting with both styles within the world of the Crochet Bandana Pattern allows you to discover which fit best suits your specific head shape and personal styling preferences.
3. Customizing Your Crochet Bandana for All Ages
Adjusting the size of a Crochet Bandana Pattern is surprisingly simple once you understand the basic construction. To make a child-sized version, you simply stop repeating the increase rows earlier than the pattern specifies for an adult. Because the shape is a triangle, the width and height grow proportionally. This scalability is a major advantage of the Crochet Bandana Pattern, making it a great gift idea for mothers and daughters who want matching “mini-me” accessories for a day at the park or the beach.
Colorwork can completely transform a basic Crochet Bandana Pattern. You can create a “gradient” effect by using ombré yarn or manually change colors every two rows for a bold, striped look. If you are feeling advanced, you can even incorporate “intarsia” or “tapestry” crochet into your Crochet Bandana Pattern to add a small flower or a heart motif in the center of the triangle. These customizations turn a standard Crochet Bandana into a unique piece of wearable art that no one else will have.
For those who want extra security, you can modify the Crochet Bandana Pattern to include “ear loops” or a wider band at the base. While the traditional tie-back method is popular, some people find it slips on silky hair. By adding a small hidden hair clip or a bit of silicone grip to the inside of the Crochet Bandana, you can ensure it stays in place all day long. These practical modifications don’t require changing the core pattern but add a layer of functionality that is highly appreciated by the wearer.
The length of the ties in your Crochet Bandana Pattern should be customized based on how you plan to wear it. If you like a big, floppy bow, you should double the length of the chains suggested in the pattern. If you prefer a hidden knot under your hair, shorter, sturdier ties are better. Many modern Crochet Bandana Pattern designs also suggest adding a bead or a tassel to the end of the ties for a bit of extra weight and a bohemian decorative touch.
Styling the Crochet Bandana is just as much fun as making it. You can wear it “babushka style” tied under the chin, or the classic “biker style” tied at the back. Some people even use their finished Crochet Bandana Pattern project as a neck scarf or a bag accessory when they aren’t wearing it in their hair. This multi-use capability makes the Crochet Bandana one of the most versatile items you can create from a single crochet pattern, offering incredible value for the time spent making it.
If you are making the bandana for someone with sensitive skin, consider lining the front edge of the Crochet Bandana Pattern with a thin strip of soft fabric. While most cotton yarns are gentle, a lining can prevent forehead irritation for those who wear the bandana for many hours at a time. This level of customization shows the care and thought that goes into a handmade Crochet Bandana, making it far superior to any mass-produced accessory found in a store.
4. Care, Maintenance, and Longevity of Your Hand-Crocheted Accessory
To keep your Crochet Bandana looking its best, proper washing is essential. Since most Crochet Bandana Pattern designs use cotton, hand-washing in cool water with a mild detergent is the safest route. Avoid wringing the fabric, as this can distort the triangular shape and stretch out the delicate stitches. Instead, roll the Crochet Bandana in a clean towel to remove excess moisture and then lay it flat on a drying rack, reshaping the corners according to the original pattern dimensions.
Blocking is a “pro-level” step that makes a huge difference in the final appearance of your Crochet Bandana Pattern. By pinning the wet bandana into its perfect triangular shape and letting it dry, you “set” the stitches and sharpen the edges. This is particularly important for lacey Crochet Bandana designs where the holes in the stitch work need to be opened up to show the intricate detail of the pattern. A blocked bandana looks much more high-end and lays flatter against the head.
Over time, you may notice small “pills” or fuzzy bits forming on your Crochet Bandana, especially if you used an acrylic blend. You can easily remove these with a fabric shaver or a small pair of scissors. By maintaining the surface of the fabric, you ensure that the details of the Crochet Bandana Pattern remain crisp and visible. Regular maintenance like this can extend the life of your favorite hair accessory by years, making the initial effort of following the pattern even more worthwhile.
Storage is another factor in the longevity of your Crochet Bandana. Instead of stuffing it into a drawer, consider hanging it or folding it neatly. Because the ties on a Crochet Bandana Pattern can be thin, they are prone to tangling with other items like jewelry or zippers. Keeping your bandanas in a small dedicated box or on a hook keeps the Crochet Bandana ready to wear at a moment’s notice and prevents unnecessary stress on the yarn fibers.
If your Crochet Bandana ever gets a snag, don’t panic. Use your crochet hook to gently pull the snagged loop back into the body of the stitches on the “wrong side” of the fabric. Because you followed a structured Crochet Bandana Pattern, the integrity of the surrounding stitches should remain intact. This ease of repair is one of the many reasons why crochet is such a durable medium for everyday accessories like the Crochet Bandana.
Finally, don’t be afraid to update your Crochet Bandana as styles change. If you find you no longer like the fringe on your Crochet Bandana Pattern, you can carefully snip it off and add a new border. The beauty of crochet is that it is a “living” fabric that can be unraveled, modified, and reworked. This sustainable approach to fashion is at the heart of the DIY movement, and the Crochet Bandana Pattern is the perfect entry point for anyone looking to build a more conscious and creative wardrobe.
Frequently Asked Questions (FAQ)
How long does it take to complete a Crochet Bandana Pattern?
For an intermediate crocheter, a standard Crochet Bandana can be completed in about 2 to 4 hours. It is an ideal weekend project or something to work on during a long commute. Beginners might take a bit longer as they learn the increase techniques required by the pattern.
Is a Crochet Bandana Pattern beginner-friendly?
Absolutely! Most patterns use basic stitches like the double crochet and chain stitch. If you can make a granny square, you can easily follow a Crochet Bandana Pattern. The triangular shaping is a great way to learn about increasing and stitch placement.
How much yarn do I need for a Crochet Bandana?
Typically, one 50g skein of DK or sport-weight yarn is more than enough for a standard Crochet Bandana Pattern. If you plan to add long fringe or tassels, you might want to have a second skein on hand just in case.
Can I wear a crochet bandana in the water?
While you can wear a Crochet Bandana at the beach, cotton yarn can become heavy and saggy when wet. It is better to use it as a sun protector rather than a swim cap. If it does get wet, make sure to dry it flat to maintain the shape of the pattern.
Why is my bandana curling at the edges?
Curling usually happens due to tight tension or a lack of sufficient increases at the edges. If you follow the Crochet Bandana Pattern exactly and it still curls, try using a larger hook size to allow the stitches more room to lay flat.
What is the best way to tie a Crochet Bandana?
The most secure way is to place the long edge across your forehead, pull the two ties under your hair at the back of your neck, and tie a double knot. This keeps the Crochet Bandana snug against your head and prevents it from shifting.
Conclusion
The Crochet Bandana Pattern is a versatile and rewarding project that offers endless opportunities for creativity and personal expression. In this article, we have explored the essential materials needed to get started, the technical geometry of the triangular shape, and how to customize and care for your finished Crochet Bandana.
By mastering these techniques, you can create a beautiful accessory that is both functional and fashionable. We hope this guide has inspired you to pick up your hook and start your very own Crochet Bandana Pattern today! Please leave your sincere opinion and any suggestions or variations you’ve tried in the comments below—we love to hear from fellow crafters!