This Crochet Blouse – Tutorial is designed to guide you through the rewarding process of creating a custom, handmade garment that fits your style and body perfectly. There is something truly magical about transforming a simple ball of yarn into a sophisticated piece of wearable art that you can proudly say you made yourself. Whether you are looking for a breezy summer top or a cozy layering piece, mastering the art of the crochet blouse allows you to break away from fast fashion and embrace a more sustainable, creative wardrobe.
In this comprehensive Crochet Blouse – Tutorial, we will focus on the foundational techniques required to build a professional-looking garment from the ground up. Many beginners feel intimidated by the idea of making clothing, fearing complex shaping or sizing issues, but this guide simplifies the process into manageable steps. By understanding stitch gauge, pattern repeats, and assembly methods, you will gain the confidence to create a handmade crochet top that rivals any boutique find in both quality and aesthetic appeal.
Throughout the following sections of this Crochet Blouse – Tutorial, we will explore everything from choosing the right fiber to the final finishing touches that make a garment truly shine. We will use a versatile design that can be easily adapted for different sizes, ensuring that your crochet project is as functional as it is beautiful. Get your hooks ready and find a comfortable spot, because we are about to dive into a world of texture, color, and fashion-forward crochet techniques that will elevate your crafting skills to a whole new level.
1. Selecting the Right Yarn and Hook for Your Blouse
The most critical decision in your Crochet Blouse – Tutorial journey is selecting the appropriate yarn, as the fiber content dictates the drape and breathability of the finished garment. For a summer blouse, mercerized cotton yarn or bamboo blends are excellent choices because they are cool against the skin and offer a slight sheen. If you prefer a more autumnal look, a lightweight alpaca or wool blend provides warmth without adding excessive bulk to your silhouette.
Equally important is the selection of your crochet hook, which must complement your yarn weight to achieve the correct stitch definition. For most DK or sport weight yarns used in a Crochet Blouse – Tutorial, a 3.5mm or 4.0mm hook is the standard starting point. However, it is essential to check your tension; if you crochet tightly, your blouse might turn out stiff, whereas a loose tension might make the fabric too transparent for comfortable wear.
Before starting your actual project, you must create a gauge swatch. This is a small square of the pattern’s main stitch used to verify that your measurements match the tutorial’s requirements. If your swatch is too small, switch to a larger hook; if it is too large, move to a smaller one. Skipping this step in a Crochet Blouse – Tutorial is the most common reason for a garment not fitting correctly, so take the extra ten minutes to ensure accuracy.
Consider the color palette of your yarn, as this will determine how often you wear your finished piece. Solid colors are great for showcasing intricate lace stitches, while variegated yarns can add a fun, bohemian vibe to simpler patterns. If you are a beginner following this Crochet Blouse – Tutorial, starting with a lighter-colored yarn will make it much easier to see your stitches and identify any mistakes before they become difficult to fix.
You should also calculate the total yardage needed for your size to avoid running out of yarn mid-project. Most medium-sized blouses require between 800 to 1,200 yards of yarn depending on the complexity of the stitch pattern. Always check the dye lot numbers on the yarn labels to ensure color consistency across your entire project, as subtle differences in shade can become very obvious once the blouse is fully assembled.
Lastly, gather your essential notions, including stitch markers, a sharp pair of scissors, and a blunt yarn needle for weaving in ends. Stitch markers are especially helpful in a Crochet Blouse – Tutorial for marking the armhole decreases or the beginning of a round. Having these tools organized and ready will make your crafting experience much more fluid and enjoyable, allowing you to focus on the rhythm of your stitches.
2. Mastering Foundation Stitches and Pattern Repeats
The construction of our Crochet Blouse – Tutorial begins with the foundation row, which determines the width of your garment. Instead of a traditional chain, many professional crocheters prefer a foundation double crochet (FDC) because it provides more elasticity at the hemline. This ensures that the bottom of your blouse isn’t too tight and allows the fabric to move naturally with your body as you walk and sit.
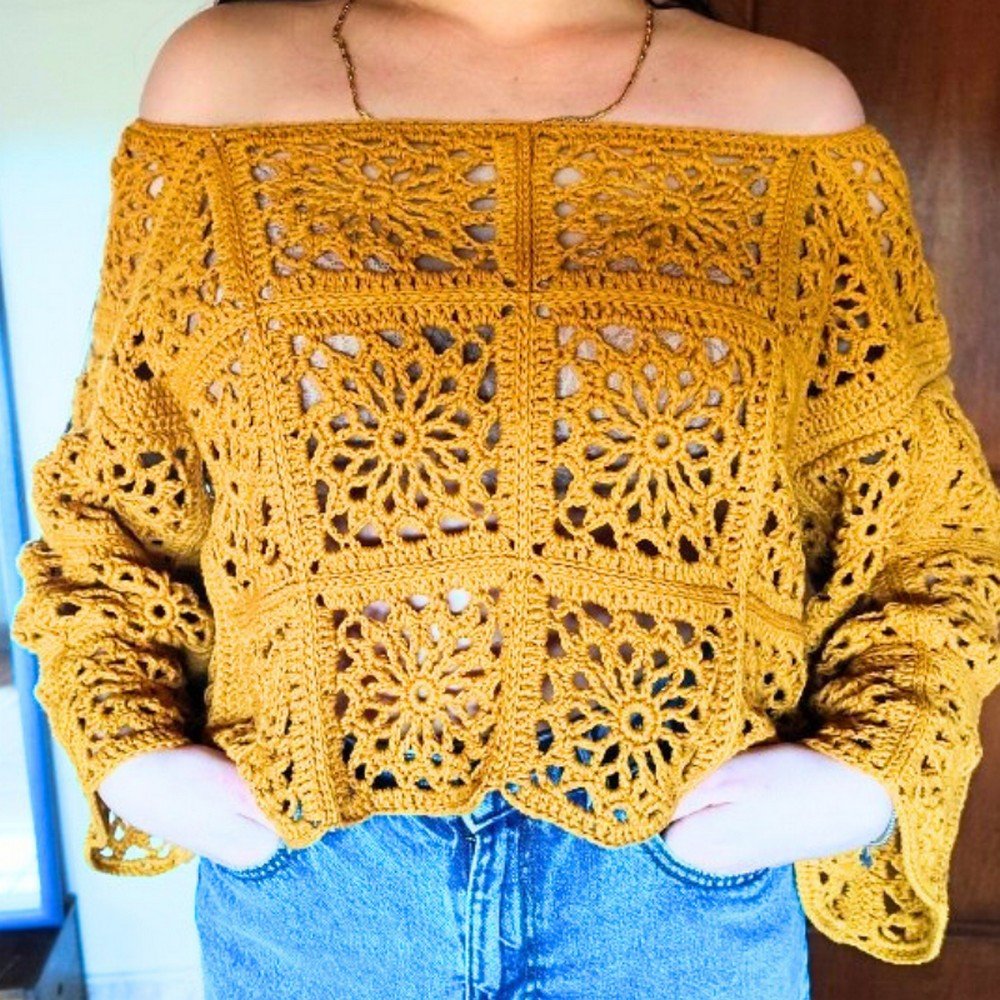
Once the foundation is set, we move into the main pattern repeat, which usually consists of a combination of basic crochet stitches like the double crochet and the chain stitch. In this Crochet Blouse – Tutorial, we utilize a classic “V-stitch” or “Shell stitch” to create a fabric that is both sturdy and visually interesting. Learning to “read” your stitches is vital here, as it allows you to identify where you are in the pattern without constantly looking back at the written instructions.
Consistency in your turning chains is another secret to a high-quality finished product. In this Crochet Blouse – Tutorial, we recommend using a “standing stitch” or a “stacked single crochet” instead of the usual chain three at the beginning of rows. This technique creates a straighter edge and eliminates the unsightly gaps that often appear at the sides of handmade crochet garments, giving your blouse a more professional, “store-bought” look.
As you work through the body of the blouse, you will practice the art of even tension. If your tension varies, the sides of your blouse may look wavy or uneven. If you find yourself getting tired, take a break; your stitches will naturally change as your hands fatigue. Maintaining a steady pace is a key component of a successful Crochet Blouse – Tutorial, ensuring that the front and back panels are identical in size and shape.
Many modern designs incorporate negative ease, meaning the blouse is slightly smaller than your actual body measurements to provide a form-fitting look. If you prefer a loose, oversized fit, you can easily adapt this Crochet Blouse – Tutorial by adding more pattern repeats to the width. The beauty of custom crochet is the ability to tailor every aspect of the design to your personal comfort and style preferences.
Don’t be afraid to use life lines—a thin piece of scrap yarn woven through a completed row. If you make a mistake several rows later, you can easily “frog” (rip out) your work back to the life line without losing the entire project. This is an advanced SEO-optimized crochet tip that saves hours of frustration and ensures your crochet blouse remains a stress-free and therapeutic creative outlet.
3. Shaping the Neckline and Armholes
Shaping is where your Crochet Blouse – Tutorial truly transforms from a flat piece of fabric into a three-dimensional garment. This stage involves decreasing stitches at specific intervals to create the curves needed for the armholes and the neckline. Whether you choose a classic crew neck, a deep V-neck, or a modern boat neck, the principles of symmetrical decreasing remain the same to ensure a balanced look.
For the armholes, we typically use a “staircase” decrease method, where you skip a few stitches at the beginning of a row and use slip stitches to move the yarn to the correct starting position. In this Crochet Blouse – Tutorial, we focus on creating a smooth curve that won’t pinch or bind under the arms. Using stitch markers to mark the exact center of your panels will help you keep your decreases perfectly aligned on both the left and right sides.
The neckline is often the focal point of a handmade blouse, so extra care should be taken during this part of the Crochet Blouse – Tutorial. For a V-neck, you will work each side of the front panel separately, decreasing one stitch every other row. This creates a soft, diagonal line that is very flattering. Always count your stitches at the end of every shaping row to ensure that both “shoulders” have the same final stitch count.
If you are following this Crochet Blouse – Tutorial for a sleeveless design, the shaping ends here, but for a short or long-sleeved version, you will also need to create “sleeve caps.” These are separate pieces that are later sewn into the armholes. Sleeve caps require precise mathematical shaping to fit the curve of the body panel, so follow the stitch counts in the tutorial closely to avoid a bulky or puckered shoulder seam.
Blocking your panels before assembly is a game-changer in the world of garment crochet. By pinning your front and back pieces to a blocking board and lightly steaming them, you can relax the fibers and set the final dimensions. This makes it much easier to align the edges for seaming and ensures that the stitch pattern is fully opened up and visible, showcasing the hard work you put into your Crochet Blouse – Tutorial.
Finally, consider the shoulder seams. Instead of a thick, bulky seam, we recommend using the mattress stitch or a slip stitch join on the wrong side of the fabric. This creates a flat, almost invisible connection that won’t rub uncomfortably against your skin. Proper assembly is what separates a “homemade” looking item from a truly professional crochet fashion piece that you can wear with confidence in any setting.
4. Finishing Details and Customizing Your Look
The final stage of the Crochet Blouse – Tutorial involves adding the “finishing touches” that tie the whole garment together. This includes adding a ribbed border to the sleeves and hemline, which provides a polished look and prevents the edges from curling. A simple single crochet or crab stitch border around the neckline can also help reinforce the opening, ensuring it doesn’t stretch out or lose its shape over time.
Customization is the heart of this Crochet Blouse – Tutorial. You can easily add length to turn the blouse into a crochet tunic or dress, or stop early for a trendy cropped top style. If you want a more romantic look, consider adding a delicate lace ruffle to the sleeves or using a contrasting color for the borders. These small changes allow you to use one pattern to create multiple, distinct looks for your wardrobe.
Buttons or ties can also be added to the back or front of the neckline for extra detail. If your crochet blouse has a wider neckline, adding a dainty functional button closure can help it sit perfectly on your shoulders. For a more bohemian style, you can crochet lariat ties with tassels at the ends, which adds movement and a touch of whimsy to your handmade apparel.
Weaving in your ends is the final, albeit least favorite, task of any Crochet Blouse – Tutorial. Use a sharp needle and weave the yarn tails in multiple directions through the densest part of the stitches to ensure they won’t pop out after washing. A well-finished garment should look almost as good on the inside as it does on the outside—this is the mark of a truly dedicated crochet artist.
Proper care is essential to ensure your crochet blouse lasts for years. Most handmade garments should be hand-washed in cold water with a gentle wool wash and laid flat to dry on a towel. Never hang a wet crochet blouse, as the weight of the water will stretch the stitches and permanently ruin the shape of your hard work. Treat your blouse with the same love you used to create it.
Congratulations on completing your project! Following a Crochet Blouse – Tutorial is a significant milestone in any crafter’s journey, representing hours of patience, skill, and creativity. You now possess a unique, custom-fitted garment that reflects your personality and your dedication to the craft. We hope this experience inspires you to continue exploring the world of crochet fashion and creating beautiful, sustainable clothing for yourself and your loved ones.
FAQ – Frequently Asked Questions
1. Is this Crochet Blouse – Tutorial suitable for absolute beginners?
This tutorial is best for advanced beginners who are comfortable with basic stitches and are ready to learn about shaping and garment construction. If you have made a few scarves or blankets, you are definitely ready to try this blouse!
2. How long does it take to complete a full crochet blouse?
On average, an experienced crocheter can finish a blouse in 15 to 25 hours, depending on the complexity of the stitch pattern and the size. Beginners should expect to take a bit longer as they navigate the shaping and assembly steps for the first time.
3. What if my blouse is too see-through?
If you find the stitch pattern too open, you can wear a matching camisole or tank top underneath. Alternatively, you can use a smaller hook to create a denser fabric, or choose a design that uses more solid stitches like half-double crochet in the bodice area.
4. Can I use acrylic yarn for this blouse?
While you can use acrylic, it is often less breathable than natural fibers. For a Crochet Blouse – Tutorial, we recommend a high-quality “anti-pilling” acrylic or a cotton blend to ensure the garment is comfortable to wear and doesn’t get “fuzzy” after just a few washes.
5. How do I adjust the pattern for a larger size?
The easiest way is to add more foundation stitches in multiples of the pattern repeat. Measure the widest part of your bust and add 2-4 inches for “ease,” then calculate how many pattern repeats are needed to reach that width.
6. Do I need to block the blouse every time I wash it?
You don’t need a full pin-and-steam blocking every time, but you should always reshape the garment while damp and lay it flat to dry. This helps maintain the integrity of the shaping and keeps the stitches looking crisp and neat.
Conclusion
In this Crochet Blouse – Tutorial, we have covered the essential journey from selecting the perfect fiber and hook to mastering the technical art of garment shaping and assembly. We learned how to verify gauge, create foundation rows with elasticity, and add professional finishing touches like ribbing and invisible seaming.
This project is more than just a tutorial; it is an invitation to explore sustainable fashion and the immense satisfaction of wearing something you created with your own two hands. By following these steps, you have moved beyond simple projects and into the world of textile design, building a functional piece of art that is uniquely yours.