The Crochet Bottle Holder – Pattern you choose can transform a simple hydration habit into a personalized fashion statement that is both eco-friendly and incredibly practical. Whether you are heading out for a summer hike, commuting to the office, or attending a music festival, having a dedicated carrier for your water bottle ensures that you stay hydrated without the hassle of holding a cold, sweating container. Crafting your own accessories allows for total customization in terms of size, color, and texture, making the Crochet Bottle Holder – Pattern a favorite project for makers of all skill levels.
In the world of modern fiber arts, finding the perfect Crochet Bottle Holder – Pattern means balancing aesthetic appeal with structural integrity to ensure your bottle stays secure. Many enthusiasts prefer using cotton yarn for these projects because of its durability and lack of stretch, which prevents the holder from becoming too long once a full bottle is placed inside. As you dive into this craft, you will discover that a Crochet Bottle Holder – Pattern is not just a utility item but a canvas for experimenting with various crochet stitches and vibrant color palettes.
Mastering a Crochet Bottle Holder – Pattern provides a wonderful opportunity to practice circular crochet techniques and handle shaping with ease. This guide is designed to walk you through the essential elements of creating a high-quality carrier, focusing on SEO-optimized tips and professional construction methods. By the end of this article, you will understand how to select the right crochet supplies, follow a step-by-step crochet tutorial, and finish your project with a sturdy strap that stands the test of time and heavy usage.
1. Understanding the Essentials of a Crochet Bottle Holder – Pattern
A successful Crochet Bottle Holder – Pattern begins with understanding the base construction, which usually starts with a magic ring or a small chain loop. This foundation is crucial because it determines the diameter of your holder, ensuring it fits your specific water bottle or reusable flask snugly. Most patterns utilize increments of stitches in each round to create a flat, circular bottom that provides stability when the bottle is set down on a flat surface.
Selecting the right crochet hook size is the next vital step in executing your Crochet Bottle Holder – Pattern effectively. For a standard water bottle, a 4.0mm (G) or 5.0mm (H) hook is often recommended to achieve a tight enough tension that the bottle doesn’t slip through the gaps. If your gauge is too loose, the fabric will overstretch, so keeping your stitches consistent is key to a professional-looking finish that remains functional over months of use.
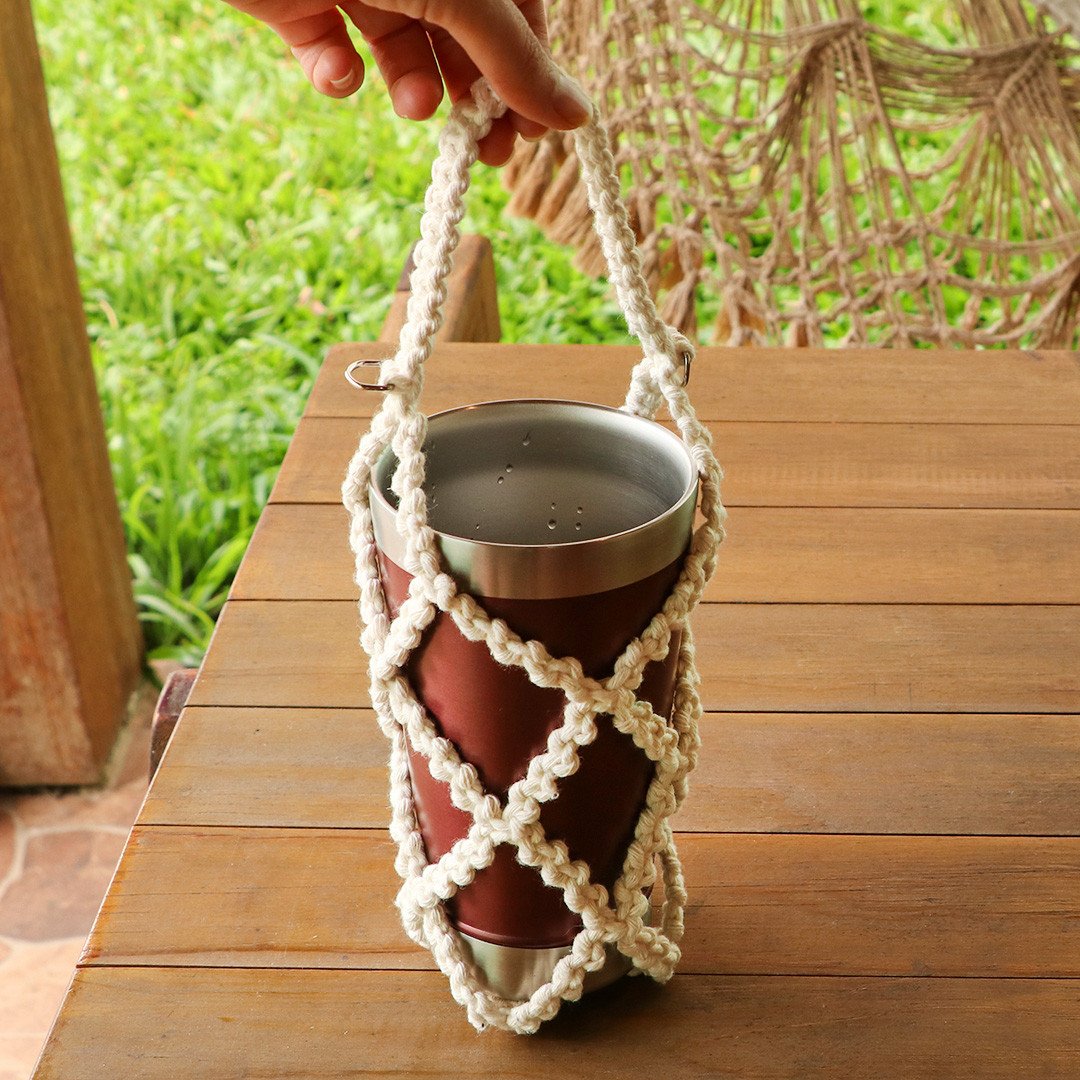
The Crochet Bottle Holder – Pattern usually transitions from the flat base to the sides using a technique called working in the back loops only. This creates a defined “corner” or ridge that helps the holder sit upright and hug the sides of the bottle. From there, you can choose simple single crochet rows for a solid look or more decorative mesh stitches to save on yarn and allow the bottle’s design to peek through the fabric.
Durability is a major factor when following a Crochet Bottle Holder – Pattern, especially if you plan to use it outdoors. Using natural fibers like cotton or hemp is highly recommended because they are breathable and easy to wash. Synthetic yarns might stretch too much under the weight of water, which weighs approximately one kilogram per liter, potentially dragging your hand-made bottle carrier down to your knees if the strap isn’t reinforced.
Another aspect of the Crochet Bottle Holder – Pattern involves deciding on the height of the “body” of the carrier. Some prefer a full-coverage design that protects the entire bottle from scratches, while others opt for a “shorty” version that only covers the bottom half. Regardless of the style, ensuring the stitch count remains consistent throughout the body of the work will prevent the holder from tapering inward or outward unexpectedly.
Finally, a comprehensive Crochet Bottle Holder – Pattern will always include instructions for a comfortable strap or handle. You can choose a short handle for hand-carrying or a long cross-body strap for hands-free convenience during long walks. Adding a reinforced strap by crocheting over a piece of cord or using a thermal stitch can add extra longevity to your project, making it a reliable companion for all your daily adventures.
2. Choosing the Best Materials for Your Crochet Project
When you sit down to start your Crochet Bottle Holder – Pattern, the yarn choice is your most important technical decision. Mercerized cotton is widely considered the gold standard for this specific project because the mercerization process increases the yarn’s strength and gives it a beautiful slight sheen. This type of yarn is also less likely to pill or fray, ensuring that your crochet accessory looks new even after multiple trips through the washing machine.
In addition to yarn, your Crochet Bottle Holder – Pattern kit should include a sharp pair of scissors, a tapestry needle for weaving in ends, and several stitch markers. Stitch markers are particularly helpful when working in continuous rounds, which is a common method for these holders. They allow you to keep track of the beginning of each row without having to count every single stitch, reducing errors and making the process much more relaxing.
The weight of the yarn also impacts how the Crochet Bottle Holder – Pattern turns out in the end. A worsted weight (Level 4) yarn is the most common choice as it works up quickly and provides a sturdy structure. However, if you want a more delicate or intricate look, you could use a DK weight (Level 3) yarn, though you may need to adjust your stitch count to ensure the holder still fits the circumference of your favorite water bottle.
Don’t overlook the importance of ergonomic crochet hooks when working on a Crochet Bottle Holder – Pattern. Since these projects often require a tighter tension to ensure the bottle is held securely, your hands can become tired more quickly. An ergonomic handle provides a better grip and reduces strain on your wrist, allowing you to finish your DIY bottle sleeve in one sitting without discomfort or repetitive strain issues.
Color theory also plays a role in how your Crochet Bottle Holder – Pattern is perceived; bright, neon colors are great for visibility during hikes, while muted earthy tones offer a sophisticated look. You can even use variegated yarn to create a self-striping effect without having to change yarn colors manually. This adds a level of visual complexity to a simple pattern, making it look much more difficult to create than it actually is.
Lastly, consider adding embellishments to your Crochet Bottle Holder – Pattern to make it truly unique. Small wooden beads, crochet flowers, or even a personalized name tag can turn a functional item into a thoughtful gift. Many makers also like to add a drawstring closure at the top using a simple chain stitch cord to ensure the bottle doesn’t slide out if the holder is tipped upside down in a bag.
3. Step-by-Step Techniques for a Sturdy Construction
To begin the body of your Crochet Bottle Holder – Pattern, you will likely use the double crochet stitch or the half-double crochet stitch to build height rapidly. The half-double crochet is particularly effective because it provides a denser fabric than double crochet but is more flexible than single crochet. This balance is ideal for creating a “sleeve” that can stretch slightly to accommodate different bottle shapes while maintaining its original form.
One popular variation in a Crochet Bottle Holder – Pattern is the v-stitch or the filet crochet technique, which creates a grid-like appearance. This “mesh” style is not only trendy but also uses significantly less yarn, making it an excellent scrap-buster project. When using a mesh design, just ensure the holes are smaller than the base of the bottle to prevent any risk of the container slipping through the gaps of your handcrafted carrier.
The transition from the body to the strap in a Crochet Bottle Holder – Pattern requires careful attention to centering. You want the strap to be perfectly aligned so the bottle hangs straight when worn. Most patterns suggest finding the midpoint of your top round and attaching your yarn there to begin the strap. Using slip stitches to reinforce the attachment points is a pro tip that prevents the strap from tearing away under the weight of a full bottle.
For those who want a more “boho” vibe, the Crochet Bottle Holder – Pattern can incorporate bobble stitches or puff stitches. These add a wonderful tactile texture to the holder, making it easier to grip even if your hands are sweaty or the bottle has condensation on it. While these stitches use more yarn, the result is a high-end, boutique-style accessory that looks like it was purchased from a specialty craft store.
If you are following a Crochet Bottle Holder – Pattern for a child, consider making the strap adjustable. You can do this by adding buttons or using a sliding knot technique with the crochet cord. An adjustable strap ensures that the holder can grow with the child or be shared between different family members, increasing the overall utility and value of the time you spent crafting the item.
As you reach the final stages of the Crochet Bottle Holder – Pattern, the “finishing” process is what separates an amateur project from a professional one. Blocking your finished holder—wetting it slightly and letting it dry in shape—can help even out your stitches and give the project a crisp look. Finally, weaving in your yarn tails securely using a zigzag motion with your tapestry needle ensures that your hard work won’t unravel during heavy use.
4. Customizing Your Pattern for Different Bottle Sizes
The beauty of a versatile Crochet Bottle Holder – Pattern is that it can be easily adapted for everything from a small 12oz plastic bottle to a massive 40oz insulated flask. To customize the size, simply continue the increase rounds on the base until the circle matches the diameter of the bottom of your bottle. As long as you follow the basic math of crochet circles, you can scale the pattern up or down without needing a completely different set of instructions.
For taller bottles, you simply add more rounds to the body of your Crochet Bottle Holder – Pattern. It is often helpful to slide the bottle into the holder as you work to check the height. Ideally, the crochet fabric should reach the “shoulder” of the bottle, where it begins to taper toward the neck. This provides maximum protection and stability, ensuring the bottle stays upright and doesn’t wobble while you are moving.
If you are using a Crochet Bottle Holder – Pattern for a bottle with a handle or a wide mouth, you may need to adjust the top opening. Instead of finishing with a standard round, you can create a “slashed” opening or use elastic thread held along with your yarn for the final round. This allows the top of the holder to stretch wide to accommodate the bottle’s features and then snap back into place for a secure fit.
In some cases, you might want to add insulation properties to your Crochet Bottle Holder – Pattern. While yarn itself provides some thermal protection, you can line the inside of your crochet sleeve with a layer of insulated batting or even a piece of an old neoprene sleeve. This keeps your water colder for longer periods, which is a fantastic upgrade for anyone living in warmer climates or using their carrier for summer sports.
The Crochet Bottle Holder – Pattern can also be modified to include a small pouch for phone or keys. By crocheting a small rectangle and sewing it onto the side of the holder, you create a multi-functional “walking bag.” This is an incredibly popular modification on social media platforms like Pinterest and Instagram, as it turns a simple bottle carrier into a complete hands-free solution for short trips outdoors.
Finally, remember that the Crochet Bottle Holder – Pattern is a reflection of your personal style. Don’t be afraid to experiment with stripes, ombre effects, or even glow-in-the-dark yarn for nighttime safety. The more you practice these modifications, the more confident you will become in your ability to read and adapt any crochet pattern to suit your specific needs, making you a more versatile and creative fiber artist.
FAQ: Everything You Need to Know About Crochet Bottle Holders
What is the best yarn for a Crochet Bottle Holder – Pattern?
The best yarn is 100% cotton. Cotton is sturdy, inelastic, and handles moisture well. Unlike acrylic, it won’t stretch out significantly when the bottle is full, ensuring your carrier maintains its shape over time.
How long should the strap be on a crochet water bottle carrier?
For a cross-body style, a strap is typically 40 to 45 inches long. However, keep in mind that even cotton will stretch slightly under weight, so it is often better to make the strap 2 or 3 inches shorter than your desired final length.
Can I wash my crochet bottle holder?
Yes! If you used cotton or synthetic yarn, you can usually machine wash it on a gentle cycle. It is recommended to air dry the holder to prevent any unwanted shrinkage and to maintain the integrity of the stitches.
How do I make the bottom of the holder flat?
To ensure a flat base, you must follow the standard rules of circle increases (e.g., increasing by 6 or 8 stitches every round). If the base starts to bowl, you aren’t increasing enough; if it ripples, you are increasing too much.
Is this project suitable for beginners?
Absolutely. A Crochet Bottle Holder – Pattern is one of the best projects for beginners because it covers all the basics: working in the round, basic stitches, and simple shaping. It’s a quick project that provides instant gratification.
How much yarn do I need for one bottle holder?
Usually, one 50g ball of worsted weight cotton yarn is more than enough to complete a standard-sized holder, including the strap. This makes it a very affordable and accessible project.
Conclusion
In this article, we have explored the essential steps and techniques involved in creating a high-quality Crochet Bottle Holder – Pattern.
We covered the importance of selecting the right cotton yarn, the technical details of increasing rounds for a flat base, and how to customize your project for various bottle sizes and styles. From choosing an ergonomic hook to adding functional features like adjustable straps and phone pouches, you now have the knowledge to create a durable and stylish accessory.