If you’re searching for a stylish, cozy, and beginner-friendly project, the Crochet bow pillow – Pattern might just be your next obsession. This adorable and functional piece adds a playful charm to any room while showcasing your crochet skills. Whether for home décor, a thoughtful gift, or even a product to sell, this pillow offers something for every crocheter.
The Crochet bow pillow – Pattern is not only eye-catching but also surprisingly simple to create. It generally consists of basic stitches and easy shaping, making it accessible to beginners, yet versatile enough for seasoned makers to customize. You can experiment with yarn colors, textures, and even add decorative elements to give it a personal touch.
In this article, we’ll explore everything you need to know about the Crochet bow pillow – Pattern: from materials and tools, to step-by-step instructions, creative variations, and where to find high-quality patterns online. Let’s jump into the cozy world of crochet and get ready to make your own beautiful bow pillow.
1. Materials and Tools Needed for the Crochet Bow Pillow – Pattern
Before starting your Crochet bow pillow – Pattern, it’s essential to gather the proper tools and materials to ensure your project goes smoothly and looks professional.
The most important material is yarn. Most crochet bow pillows use worsted weight yarn or bulky yarn for a soft, plush finish. Cotton yarn is ideal if you’re looking for durability and stitch definition, while acrylic or polyester yarn can offer a cozy, fluffy texture.
You’ll also need a crochet hook that matches your yarn’s thickness. For worsted yarn, a 5.0mm or 5.5mm hook is usually recommended. Using a slightly smaller hook than suggested can help make your stitches tighter, resulting in a more structured pillow.
A pillow insert or fiberfill stuffing will be necessary to give your pillow shape and volume. Fiberfill is a great option if you’re creating a fully crocheted pillow without a fabric insert, offering softness and easy shaping.
Have a yarn needle ready for sewing and weaving in ends. You’ll use this tool to assemble the bow, close seams, and finish your project with a neat and tidy look. Scissors are, of course, another must-have item for trimming yarn ends.
Some crafters like to add buttons, zippers, or ties if the pillow has a removable cover. While optional, these additions can make the pillow more functional and easier to wash.
Lastly, it’s helpful to print or have access to your Crochet bow pillow – Pattern. Whether you’re following a video, PDF, or written instructions, having a clear reference ensures you won’t miss any steps during the project.
2. Step-by-Step Instructions to Make the Crochet Bow Pillow – Pattern
Creating a Crochet bow pillow – Pattern typically involves crocheting three main parts: the pillow body, the bow center, and the tie that creates the bow effect. Here’s how you can approach each stage step by step.
Start by crocheting two rectangular panels of equal size for the pillow body. These will form the front and back. Most patterns use simple stitches like single crochet (sc) or half double crochet (hdc) to keep the texture smooth and consistent.
Once your panels are complete, you’ll sew or crochet them together along three edges, leaving one side open to insert the pillow or stuffing. If you’re using fiberfill, make sure to stuff it evenly and generously to give the pillow a full, plush look.
The next part is crafting the center band, which will transform your rectangle into a bow shape. This is usually a short strip crocheted in the same stitch pattern as the panels. Wrap it around the middle of the pillow horizontally and sew the ends together at the back.
To create the distinct bow “knot” effect, you’ll cinch the center of the pillow before attaching the band. Use yarn or a thread to tightly gather the middle of the pillow, then wrap the center band over it to hide the cinching and secure it in place.
If your pattern includes an envelope back or zipper, attach it before sewing the panels together. This allows you to remove and wash the cover easily, especially if the pillow is decorative and frequently handled.
Finish by weaving in all loose ends and adding any final touches like tassels, buttons, or a decorative border. And just like that, you’ve completed your very own Crochet bow pillow – Pattern project!
3. Creative Variations and Styling Ideas
One of the most enjoyable aspects of working with the Crochet bow pillow – Pattern is the opportunity to personalize it. With just a few tweaks, you can create multiple versions that suit various rooms, styles, and occasions.
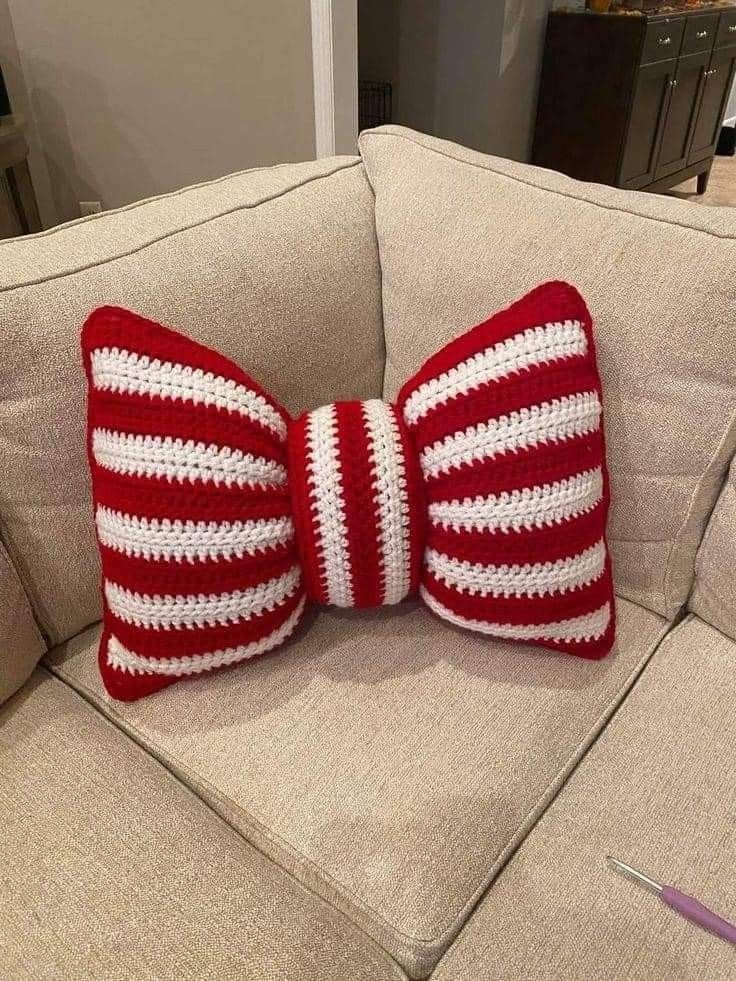
Experiment with color combinations. You can make solid-colored pillows for a minimalist look, or try stripes, ombre fades, or even themed palettes like holiday colors. Color-blocking with contrasting tones can also make the bow shape pop.
Consider changing the stitch texture. Instead of basic stitches, try using the grit stitch, waffle stitch, or moss stitch to add depth and interest. Textured stitches can give your pillow a handcrafted, cozy vibe.
Add embellishments like buttons, tassels, or pom-poms on the corners for an extra decorative touch. These elements are especially fun for kids’ rooms, nurseries, or festive seasonal décor.
Try making mini bow pillows for decorative accents or couch cushions. On the flip side, a jumbo-sized bow pillow makes a bold statement and works well as a floor cushion or a bed centerpiece.
If you’re into upcycling, use scrap yarn in different textures and shades to make a colorful patchwork-style bow pillow. This eco-friendly version is eye-catching and unique.
You can even create a matching set by pairing your bow pillow with other crochet items like blankets, footstools, or wall hangings. A coordinated theme can tie your room together and showcase your crochet talent.
4. Where to Find the Best Crochet Bow Pillow – Pattern Designs
There are plenty of places where you can find high-quality Crochet bow pillow – Pattern designs, both free and premium. Whether you prefer PDFs, videos, or printed guides, the internet is full of great resources.
Etsy is a popular destination for paid patterns from independent designers. These patterns usually come with detailed instructions and professional photos, making them ideal for beginners and experienced crocheters alike.
Ravelry is another excellent source. You can search specifically for bow pillows, filter by difficulty level, and read user reviews. It’s a great way to explore different techniques and see finished project photos for inspiration.
For free patterns, check out popular crochet blogs like Repeat Crafter Me, Moogly Blog, or All Free Crochet. These sites often provide downloadable patterns, charts, and even YouTube video tutorials.
Speaking of YouTube, it’s one of the best platforms for visual learners. Many creators offer complete walkthroughs for making bow pillows, including tips on yarn selection, sizing, and finishing techniques.
Pinterest is a great tool for browsing ideas. You can search for “crochet bow pillow,” save your favorite styles, and follow links to patterns or tutorials. It’s also a great way to get inspired by how others have styled their pillows.
Lastly, many crochet books and magazines feature pillow patterns, including bow designs. If you prefer working from a printed page, consider adding a few to your crochet library for future reference.
FAQ: Crochet Bow Pillow – Pattern
Q1: Is the Crochet bow pillow – Pattern suitable for beginners?
Yes! Most bow pillow patterns use simple stitches like single or half double crochet. Assembling the pillow is also easy, making it perfect for first-time makers.
Q2: How long does it take to make a crochet bow pillow?
Depending on the size and stitch complexity, it can take between 4 to 8 hours to complete. Some advanced versions may take longer with added details.
Q3: What yarn works best for a bow pillow?
Worsted weight or bulky yarns are ideal. Cotton yarn gives structure, while acrylic yarn provides softness and stretch. Choose based on the desired finish.
Q4: Can I wash a crochet bow pillow?
Yes, especially if it has a removable cover. If not, spot clean or hand wash gently. Use machine-safe yarn and follow care instructions on the label.
Q5: Do I need to use a pillow insert?
No, but it helps maintain shape. You can also use fiberfill stuffing. If using an insert, make sure your pillow panels are sized accordingly.
Q6: Can I sell bow pillows made from these patterns?
Most designers allow you to sell finished products, but always check the pattern’s licensing terms. Give credit when required and avoid reselling the pattern itself.
Conclusion
The Crochet bow pillow – Pattern is more than just a decorative item—it’s a fun and fulfilling project that lets you explore color, texture, and creativity while producing something beautiful and practical. Whether you’re a beginner or an experienced crocheter, this pattern opens up countless possibilities for personalization and style.
We hope this guide helped you get started and inspired you to make your own crochet bow pillow. If you’ve made one, share your experience below! We’d love to hear your thoughts, tips, or suggestions to help others in the crochet community.
Happy stitching!
🧶🎀