Creating a Crochet bunny ear napkin holder for Easter – Pattern is one of the most charming ways to add a personalized, handmade touch to your holiday tablescape. This delightful Crochet bunny ear napkin holder for Easter – Pattern combines functionality with whimsical design, ensuring that your festive dinner feels both cozy and professional. Whether you are an experienced crafter or a beginner looking for a seasonal project, following a structured pattern allows you to produce consistent, high-quality results that will impress your guests and family members during the spring celebrations.
The beauty of a Crochet bunny ear napkin holder for Easter – Pattern lies in its versatility and the joy of the crochet process itself. By using various yarn weights and textures, you can adapt this pattern to suit any decor style, from rustic farmhouse to modern minimalist. This specific Crochet bunny ear napkin holder for Easter – Pattern focuses on creating sturdy, upright bunny ears that loop elegantly around your linens, serving as both a practical tool and a centerpiece conversation starter. It is a project that breathes life into your Easter brunch or dinner setting.
As you embark on this creative journey with the Crochet bunny ear napkin holder for Easter – Pattern, you will find that it is a wonderful way to utilize scrap yarn while practicing essential stitches. The pattern is designed to be quick and satisfying, making it possible to create a full set of napkin holders in just one weekend. In the following sections, we will break down the materials, the structural logic of the bunny ear design, and the finishing techniques required to make your Easter table shine with handmade warmth.
2. Choosing the Best Materials for Your Crochet bunny ear napkin holder for Easter – Pattern
Selecting the right yarn is the first step in successfully executing a Crochet bunny ear napkin holder for Easter – Pattern. For a project like a napkin holder, you want a fiber that is durable and holds its shape well. Mercerized cotton yarn is often the top choice for this pattern because it has a slight sheen and a stiff structure that helps the bunny ears stand tall without flopping over.
The hook size you choose for your Crochet bunny ear napkin holder for Easter – Pattern is equally important for the final look. Usually, using a slightly smaller crochet hook than recommended on the yarn label creates a tighter tension. This tight stitch work is vital for a napkin holder because it ensures the fabric is dense enough to maintain a circular ring shape under the weight of the napkin.
Colors play a massive role in the Easter theme of your Crochet bunny ear napkin holder for Easter – Pattern. While classic white and soft cream are traditional choices for a bunny, don’t be afraid to experiment with pastel shades like lavender, mint green, or baby blue. These colors evoke the feeling of spring and complement the floral arrangements typically found on an Easter dining table.
In addition to yarn and hooks, your Crochet bunny ear napkin holder for Easter – Pattern might require a few notions. You will need a tapestry needle for weaving in ends and perhaps some stitch markers to keep track of your rounds. If you want extra stability, some crafters like to crochet around a wooden or plastic curtain ring, though this specific pattern often creates the ring purely from yarn.
Sustainability is another benefit of making a Crochet bunny ear napkin holder for Easter – Pattern. By using high-quality natural fibers, you are creating a reusable holiday item that reduces the need for disposable decorations. These napkin holders can be washed gently and stored away for years, becoming a beloved part of your family’s Easter traditions and memories.
Lastly, consider the texture of your fabric. A Crochet bunny ear napkin holder for Easter – Pattern can incorporate different stitches to create a furry effect. For instance, using a brushed alpaca yarn or a velvet yarn can make the bunny ears feel incredibly soft to the touch. This sensory detail adds an extra layer of luxury to your handmade Easter accessories.
2. Mastering the Anatomy of the Bunny Ear Design
The most iconic part of the Crochet bunny ear napkin holder for Easter – Pattern is, of course, the ears. To achieve that perfect long, pointed look, the pattern typically uses a combination of single crochet, half double crochet, and double crochet stitches. This gradient of stitch heights creates the natural taper seen in real rabbit ears, giving your napkin holder an authentic silhouette.
In a professional Crochet bunny ear napkin holder for Easter – Pattern, the ears are usually worked in the round or as two flat pieces joined together. Working in the round (amigurumi style) results in a seamless, 3D effect that looks great from every angle. This ensures that when your guests look at the napkin holder from the side or back, the craftsmanship remains flawless.
The “fold” is a secret technique often found in a high-quality Crochet bunny ear napkin holder for Easter – Pattern. By folding the base of the ear slightly before sewing it onto the ring, you create a “pinched” look that adds depth. This small detail makes the ears look like they are sprouting naturally from the holder, rather than just being flat triangles stuck onto a circle.
Stability is a common challenge when following a Crochet bunny ear napkin holder for Easter – Pattern. If your yarn is too soft, the ears might wilt. To fix this, some makers use a thin floral wire inside the ears. However, a well-written pattern should provide enough structural integrity through tight stitching alone, making the item safe and easy to maintain.
The ring portion of the Crochet bunny ear napkin holder for Easter – Pattern must be sized correctly to fit a standard cloth napkin. Usually, a diameter of about two inches is perfect. The pattern will guide you through creating a sturdy foundation chain and working several rows of stitches to create a band that is wide enough to support the weight of the bunny ears.
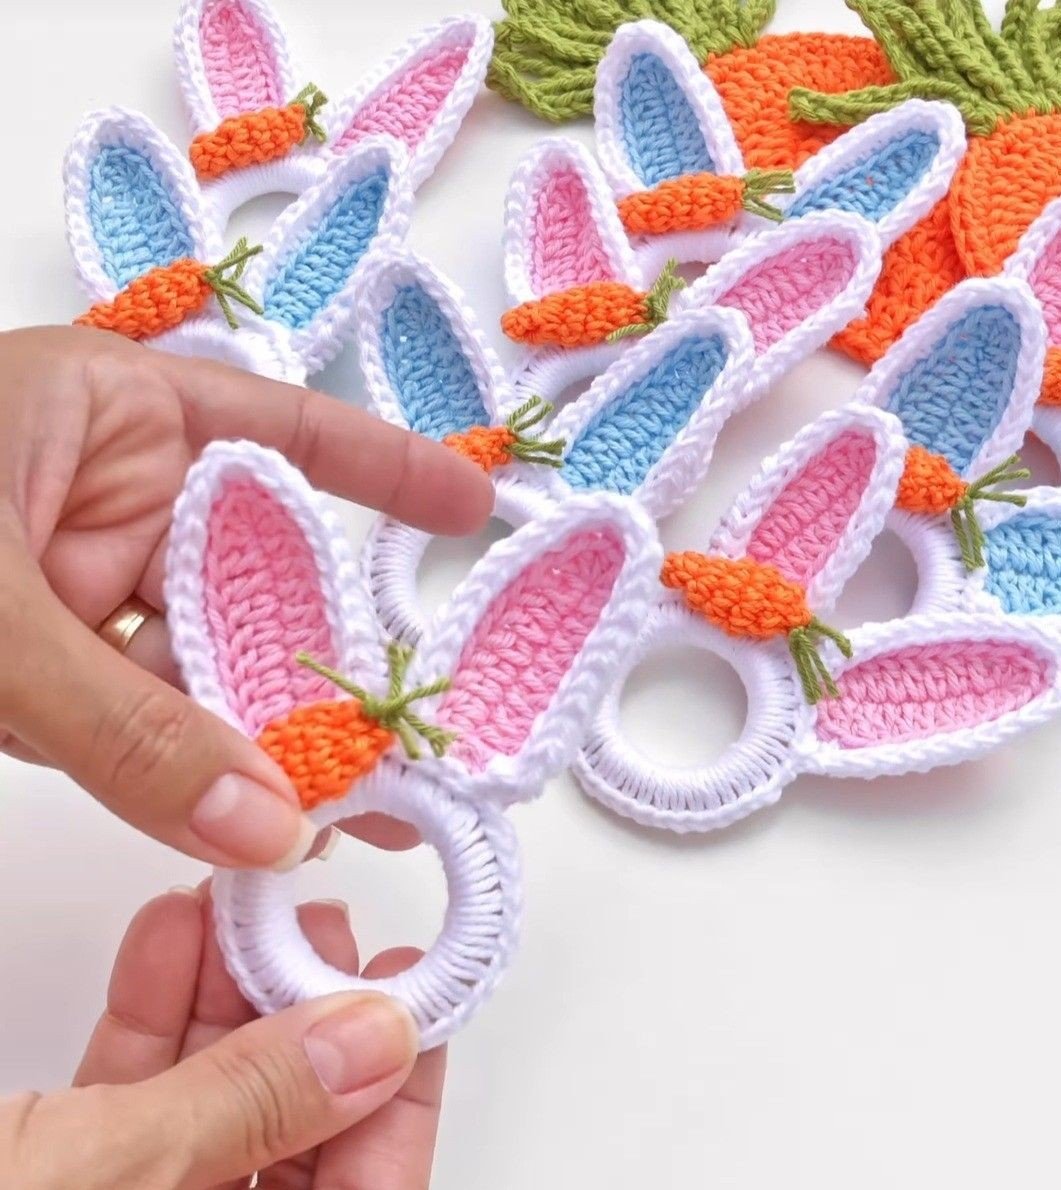
Don’t forget the inner ear detail! Many versions of the Crochet bunny ear napkin holder for Easter – Pattern include a secondary color for the “insides” of the ears. Using a soft pink or a patterned fabric insert can make the napkin holder pop. This contrast defines the shape of the bunny and adds a sophisticated decorative element to the final piece.
3. Step-by-Step Execution of the Easter Napkin Holder
To begin your Crochet bunny ear napkin holder for Easter – Pattern, you will first construct the main ring. This is usually done by joining a series of chains into a circle and working single crochet stitches into the center. This creates a solid, thick base that serves as the anchor for the rest of your Easter themed decoration.
Once the ring is complete, you move on to the ear component of the Crochet bunny ear napkin holder for Easter – Pattern. You will typically start at the tip of the ear with a magic ring and increase your stitches gradually. This method allows you to control the width and length of the bunny ears, ensuring they are proportional to the size of the napkin ring.
After the first ear is finished, it is crucial to count your stitches to ensure the second ear is an exact match. A symmetric Crochet bunny ear napkin holder for Easter – Pattern is what separates a beginner project from a professional-looking product. Consistency in tension between the two ears will make your Easter table look organized and high-end.
The assembly phase is where your Crochet bunny ear napkin holder for Easter – Pattern truly comes together. Using a yarn needle, you will securely sew the ears to the top of the ring. It is best to space them slightly apart to allow the napkin to slide through easily without distorting the shape of the ears or the ring itself.
Adding embellishments is an optional but fun step in the Crochet bunny ear napkin holder for Easter – Pattern. You might choose to add a small pom-pom as a bunny tail on the back of the ring. Alternatively, a tiny satin ribbon bow tied around the base of the ears can add a touch of elegance and color coordination to your Easter theme.
Finally, block your finished work. Blocking is a technique where you dampen the crochet and pin it into shape until dry. For the Crochet bunny ear napkin holder for Easter – Pattern, this ensures the ears are perfectly flat and straight. Once dry, your handmade napkin holders are ready to hold your finest linens for the Easter feast.
4. SEO Tips and Customization for Your Crochet Project
If you are sharing your Crochet bunny ear napkin holder for Easter – Pattern online, optimizing for SEO is essential. Use keywords like “handmade Easter decor,” “free crochet pattern,” and “DIY napkin rings” in your descriptions. This helps fellow crochet enthusiasts find your work and ensures your Crochet bunny ear napkin holder for Easter – Pattern reaches a wide audience of holiday crafters.
Customizing the Crochet bunny ear napkin holder for Easter – Pattern can also include changing the “animal.” While bunny ears are the most popular for Easter, the same basic ring pattern can be used to create chick wings or lamb ears. This flexibility allows you to create a diverse “menagerie” of napkin holders for a lively and fun Easter table setting.
Another way to enhance the Crochet bunny ear napkin holder for Easter – Pattern is by playing with yarn weight. Using a chunky yarn will result in large, oversized ears that are very modern and trendy. Conversely, using lace-weight thread creates a delicate, vintage-style napkin holder that looks beautiful with heirloom linens and china.
For those looking to sell their creations, a Crochet bunny ear napkin holder for Easter – Pattern is a high-profit item. They are quick to make, require very little yarn, and can be sold in sets of four or six. Packaging them in a nice box with some Easter grass makes them an irresistible impulse buy at spring craft fairs or on digital marketplaces.
Consider the “user experience” of your Crochet bunny ear napkin holder for Easter – Pattern. If you are writing the pattern for others, include plenty of photos. Visual aids showing the stitch placement for the ears and the assembly process can significantly help beginners who are trying to replicate your Easter masterpiece without frustration.
Lastly, think about the practicality of your design. Ensure that the yarn you suggest in your Crochet bunny ear napkin holder for Easter – Pattern is easy to clean. Since these will be near food and drinks, accidents can happen. Recommending a washable cotton ensures that the napkin holders remain a hygienic and beautiful part of the table for many years to be.
FAQ: Common Questions About Crochet Bunny Ear Napkin Holders
What is the best yarn for a Crochet bunny ear napkin holder for Easter – Pattern?
The best yarn is a 100% cotton or a cotton blend. Cotton is stiff enough to hold the shape of the ears and is also heat-resistant and easy to wash, which is important for items used on a dining table.
How long does it take to make one napkin holder?
Following this Crochet bunny ear napkin holder for Easter – Pattern, a single holder usually takes about 30 to 45 minutes. It is a perfect “TV project” that you can work on while relaxing.
Can I make these if I am a total beginner?
Yes! This pattern uses basic stitches like chains, single crochet, and increases. If you know the fundamentals of crochet, you can definitely complete a Crochet bunny ear napkin holder for Easter – Pattern.
Do I need to starch the ears to make them stand up?
Usually, if your tension is tight, you don’t need starch. However, if your yarn is very soft, a little bit of fabric stiffener or laundry starch on the ears can help them stay upright throughout the Easter dinner.
What size napkins do these holders fit?
This Crochet bunny ear napkin holder for Easter – Pattern is designed for standard 18×18 or 20×20 inch cloth napkins. The crochet fabric has a bit of stretch, so it can accommodate slightly thicker linens as well.
Can I add beads or sequins to the ears?
Certainly! Adding small beads or sequins can give your Crochet bunny ear napkin holder for Easter – Pattern a bit of sparkle. Just make sure they are sewn on very securely, especially if there will be children at the table.
Conclusion
In this article, we have explored the wonderful world of the Crochet bunny ear napkin holder for Easter – Pattern. We covered everything from choosing the ideal mercerized cotton yarn to the technical aspects of tapering stitches for that perfect bunny ear shape.
We also discussed how assembly, blocking, and even SEO can play a role in making your project a success. This pattern is more than just a craft; it is a way to bring a touch of handmade love to your Easter celebrations, creating a festive atmosphere that your guests will cherish.