Creating a Crochet Bunny – Pattern is one of the most rewarding projects for crafters of all skill levels, offering a perfect blend of creativity and sentimentality. Whether you are looking to make a soft companion for a newborn, a festive decoration for springtime, or a thoughtful handmade gift for a friend, mastering the Crochet Bunny – Pattern allows you to bring a touch of whimsy into the real world. The beauty of these long-eared friends lies in their versatility, as you can easily customize their size, color, and texture simply by switching your yarn or hook size.
The popularity of the Crochet Bunny – Pattern has surged in recent years, driven by the global amigurumi movement which focuses on creating small, stuffed yarn creatures. For many, this specific pattern serves as an entry point into the world of 3D crochet, teaching essential techniques like working in the round, increasing, and decreasing to create organic shapes. It is more than just a craft; it is a way to practice mindfulness and patience while producing something that will likely be cherished for years to come.
As you dive into this guide, you will discover that finding the right Crochet Bunny – Pattern is the first step toward a successful project. High-quality patterns provide clear instructions on stitch counts, assembly, and finishing touches like embroidery or safety eyes. In the following sections, we will explore the essential materials you need, the foundational stitches required, and how to troubleshoot common issues to ensure your Crochet Bunny – Pattern results in a professional-looking, adorable stuffed animal every single time.
1 Understanding the Essentials of a Crochet Bunny – Pattern
Before you pick up your hook, it is vital to understand that a Crochet Bunny – Pattern is essentially a roadmap for your stitches. Most modern patterns use standard terminology, typically in US or UK terms, so always check the legend before starting. This ensures your Crochet Bunny has the correct proportions and doesn’t end up looking lopsided or unintentionally large.
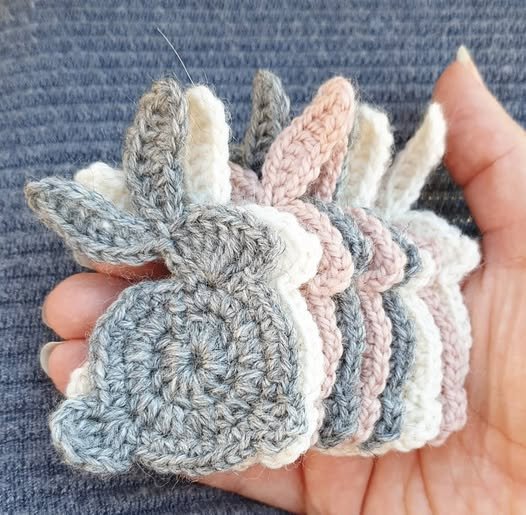
Choosing the right yarn is the next crucial step in executing your Crochet Bunny – Pattern perfectly. For a classic look, many crafters prefer cotton yarn because it provides excellent stitch definition and keeps its shape well. However, if you want a “cuddle factor,” chenille or velvet yarn can turn a standard Crochet Bunny – Pattern into a super-soft plushie that is hard to put down.
The crochet hook size mentioned in your Crochet Bunny – Pattern is often smaller than what the yarn label suggests. This is a deliberate technique in amigurumi to create a tight fabric. A dense weave ensures that the polyester fiberfill stuffing doesn’t peek through the holes, giving your Crochet Bunny a clean and professional finish that stands the test of time.
In addition to yarn and hooks, your Crochet Bunny – Pattern will likely call for safety eyes, a tapestry needle, and stitch markers. Stitch markers are your best friend when working in continuous spirals, which is the standard method for most bunny patterns. They help you keep track of where each round begins, preventing errors in your Crochet Bunny – Pattern count.
Understanding gauge is also helpful, though less critical than in garment making. If your tension is too loose, your Crochet Bunny might turn out larger and softer; if it’s too tight, the pattern will yield a smaller, firmer toy. Consistency is the goal here, ensuring that the limbs and ears of your Crochet Bunny – Pattern match each other in size and density.
Finally, take a moment to read through the entire Crochet Bunny – Pattern before you start. Look for special stitches like the magic ring (or magic circle), which is the standard way to begin pieces so there is no hole in the center. Familiarizing yourself with the flow of the pattern will make the actual crocheting process much smoother and more enjoyable.
2 Mastering Stitches for Your Crochet Bunny – Pattern
The most common stitch you will encounter in any Crochet Bunny – Pattern is the single crochet (sc). This short, compact stitch creates the sturdy walls needed for stuffed toys. Mastering the tension of your single crochet is the secret to making a Crochet Bunny that looks like it came from a high-end boutique rather than a beginner’s practice session.
To create the curves of the head and body, your Crochet Bunny – Pattern will utilize increases (inc) and decreases (dec). An increase involves placing two stitches into a single stitch from the previous row. This expands the diameter of your work, allowing you to shape the round belly or the chubby cheeks of your Crochet Bunny with precision.
Conversely, the invisible decrease (inv dec) is a specialized technique frequently recommended in a high-quality Crochet Bunny – Pattern. By looping through only the front loops of two stitches, you can reduce the stitch count without creating the bulk or gaps that a standard decrease might leave. This keeps the surface of your Crochet Bunny smooth and professional.
The magic ring is perhaps the most important foundational skill for any Crochet Bunny – Pattern. It allows you to pull the starting yarn tail tight, completely closing the hole at the top of the head or the bottom of the feet. Without this technique, the stuffing inside your Crochet Bunny might fall out, or the toy may lack that polished, “closed” look.
As you follow the Crochet Bunny – Pattern, you might also encounter the slip stitch (sl st) and the chain stitch (ch). These are often used for joining rounds or creating small details like tiny tails or inner ear flaps. Even though they are simple, performing them with even tension is key to the overall symmetry of your Crochet Bunny – Pattern project.
Lastly, some advanced Crochet Bunny – Pattern designs might include the bobble stitch or half-double crochet for added texture. These stitches can simulate fluffy fur or provide a different shape for the paws. Always refer to the stitch guide provided within your specific pattern to ensure you are executing these decorative elements correctly.
3 Assembly and Finishing Touches for the Crochet Bunny – Pattern
Once all the individual pieces of your Crochet Bunny – Pattern are crocheted, the assembly phase begins. This is where your creation truly comes to life. Using a tapestry needle and the long yarn tails left from your work, you will sew the ears, arms, and legs onto the body. Proper placement is vital for the character of your Crochet Bunny.
When attaching the ears, refer to the Crochet Bunny – Pattern photos for guidance on height and spacing. Some people prefer long, floppy ears that hang down, while others like upright, alert ears. Pinning the pieces in place before sewing allows you to adjust the “expression” of your Crochet Bunny before making any permanent attachments.
Stuffing is an art form within the Crochet Bunny – Pattern process. You want to add enough fiberfill to make the bunny firm, but not so much that the stitches stretch and show the white fluff inside. Pay extra attention to the neck area; a well-stuffed neck ensures your Crochet Bunny doesn’t end up with a “wobbly head” syndrome.
The face is the soul of your Crochet Bunny – Pattern. If you are making this for a small child, it is highly recommended to embroider the eyes and nose with embroidery floss or yarn instead of using plastic safety eyes. This prevents any choking hazards and gives your Crochet Bunny a soft, classic “nursery” look that is safe for all ages.
Adding a small pink nose or a “Y” shape for the mouth is a common requirement in a Crochet Bunny – Pattern. These small details can change the bunny’s mood from sleepy to curious. Use a contrasting color of yarn to make these features pop, and hide your knots deep inside the head of the Crochet Bunny to keep the exterior clean.
Finally, don’t forget the tail! Most Crochet Bunny – Pattern instructions include a small pom-pom or a crocheted sphere for the tail. Placing it low on the back allows the bunny to sit upright more easily. Once the final thread is woven in, give your Crochet Bunny a little squeeze to distribute the stuffing evenly and admire your handmade masterpiece.
4 Caring for Your Finished Crochet Bunny – Pattern Project
After putting hours of love into your Crochet Bunny – Pattern, you want it to last. If you used acrylic or cotton yarn, your bunny is likely durable, but it still requires gentle care. Most handmade crochet items should be hand-washed in cool water with a mild detergent to prevent the stitches from fraying or the stuffing from clumping.
If your Crochet Bunny – Pattern was made with specialty yarns like mohair or delicate wool, you must be even more cautious. Avoid wringing the toy out, as this can distort the shape you worked so hard to achieve. Instead, roll the Crochet Bunny in a clean towel to remove excess moisture and let it air dry completely in a well-ventilated area.
Over time, your Crochet Bunny might develop “pills” or small fuzzballs, especially if it is played with frequently. You can easily remove these with a fabric shaver or small scissors to keep the Crochet Bunny – Pattern looking fresh. Regular “fluffing” of the stuffing can also help maintain the toy’s original silhouette over years of use.
If you gave your Crochet Bunny – Pattern to a child, check the attachments periodically. Ensure the ears and limbs remain securely sewn on and that no threads have come loose. Re-securing a limb is a quick fix that ensures the Crochet Bunny remains a safe and sturdy companion for many more adventures.
Storing your Crochet Bunny is also important if it’s a seasonal decoration. Keep it in a breathable cotton bag rather than plastic to prevent any moisture buildup or “old yarn” smells. This ensures that every time you bring out your Crochet Bunny – Pattern creation, it looks and smells as good as the day you finished the last stitch.
The joy of a Crochet Bunny – Pattern doesn’t end when the project is over. Seeing the smile it brings to a recipient’s face or the charm it adds to your home is the ultimate reward. By following these care steps, your Crochet Bunny will remain a beautiful testament to your skill and creativity for a very long time.
FAQ – Frequently Asked Questions
1. Is a Crochet Bunny – Pattern suitable for absolute beginners?
Yes, many patterns are designed specifically for beginners. Look for a Crochet Bunny – Pattern that uses only basic stitches like the single crochet and provides clear assembly instructions. It is a great way to learn amigurumi.
2. What is the best yarn for a Crochet Bunny – Pattern?
Cotton yarn is excellent for durability and stitch definition. However, if you want a softer, plushier feel, many crafters use polyester blanket yarn or chenille yarn. The choice depends on the intended use of the Crochet Bunny.
3. How long does it take to complete a Crochet Bunny – Pattern?
For an intermediate crocheter, a standard-sized Crochet Bunny can take anywhere from 4 to 8 hours. Beginners may take a bit longer as they learn to navigate the shaping and assembly steps.
4. Can I sell the bunnies I make from a Crochet Bunny – Pattern?
Usually, yes! Most designers allow you to sell finished items made from their pattern, provided you give credit to the original designer. Always check the “Terms of Use” section within your specific Crochet Bunny – Pattern.
5. What can I use instead of safety eyes for a baby-safe bunny?
For infants, it is best to embroider eyes using black yarn or embroidery floss. This eliminates the risk of a plastic eye becoming a choking hazard, making your Crochet Bunny – Pattern project safe for all ages.
6. Why does my Crochet Bunny have holes in it?
Holes usually appear if your crochet hook is too large for the yarn or if your tension is too loose. Try using a hook that is 0.5mm or 1.0mm smaller than recommended on the yarn label to keep your Crochet Bunny – Pattern stitches tight.
Conclusion
In this article, we have explored the wonderful world of the Crochet Bunny – Pattern, covering everything from the essential materials and foundational stitches to the delicate process of assembly and long-term care.
We learned that the secret to a perfect Crochet Bunny lies in tight tension, the right yarn choice, and those final, personalized touches that give the toy its unique character. Whether you are a seasoned pro or just starting your journey, following a well-structured Crochet Bunny – Pattern is a fulfilling way to create something truly special.