A Crochet Bunny Rabbit Coaster – Pattern is the perfect way to combine functionality with an adorable aesthetic, especially as we approach the spring season or look for charming handmade gifts. Whether you are a seasoned crafter or just picking up a hook for the first time, creating a bunny coaster allows you to practice essential stitches while producing something genuinely useful for your home. This crochet project isn’t just about protecting your furniture from water rings; it’s about infusing your living space with a touch of handmade warmth and whimsical personality that store-bought items simply cannot replicate.
When you dive into a Crochet Bunny Rabbit Coaster – Pattern, you are engaging in a creative process that yields quick results, making it an ideal choice for “instant gratification” crafting. The beauty of this specific yarn project lies in its versatility, as you can customize the colors to match your kitchen decor or use pastel shades for a festive Easter brunch table setting. Beyond the visual appeal, these handmade coasters are durable, washable, and serve as fantastic conversation starters when you host friends for coffee or tea.
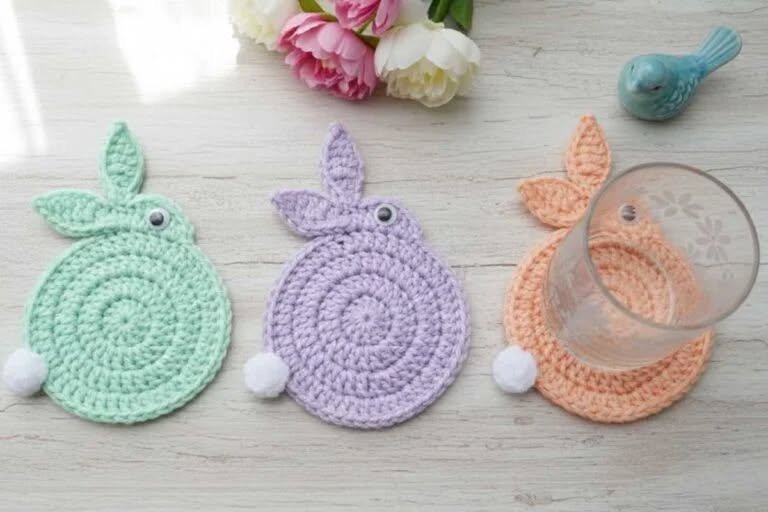
Mastering the Crochet Bunny Rabbit Coaster – Pattern requires understanding the basic anatomy of the design, which typically involves a circular base for the face and two long, floppy ears attached at the top. Using the right cotton yarn is crucial for absorbency, ensuring that your crochet bunny does its job effectively while looking cute. In this comprehensive guide, we will explore every detail of this crochet pattern, from selecting your materials to finishing the final stitch, ensuring you have all the knowledge needed to create a fleet of little rabbits for your coffee table.
1. Materials Needed for Your Crochet Bunny Rabbit Coaster – Pattern
To start your Crochet Bunny Rabbit Coaster – Pattern, you must first gather the high-quality supplies that will ensure a professional finish. I highly recommend using a 100% cotton yarn because cotton is heat-resistant and highly absorbent, which are the two most important qualities for any functional coaster. Unlike acrylic, cotton won’t melt under a hot mug and will soak up condensation from cold drinks perfectly.
The hook size is the next critical component of your crochet kit. For a standard medium-weight cotton, a 3.5mm (E) or 4.0mm (G) crochet hook usually works best to create a tight, sturdy fabric. You want your stitches to be dense enough so that moisture doesn’t seep through the gaps of your crochet stitches and reach the wooden surface underneath.
Don’t forget the small details that bring your Crochet Bunny Rabbit Coaster – Pattern to life, such as a tapestry needle for weaving in ends. You will also need a sharp pair of craft scissors and perhaps some embroidery floss if you decide to add a nose or whiskers to your bunny’s face. These finishing touches are what transform a simple circle into a recognizable bunny rabbit.
Stitch markers are also a “must-have” for this crochet pattern, especially since we will be working in rounds. It is very easy to lose track of where a row begins when you are focused on the rhythm of your single crochet or double crochet stitches. Using a marker ensures your bunny face stays perfectly symmetrical and circular.
For the eyes and nose, some crafters prefer safety eyes, but for a coaster that needs to stay flat, embroidery is often the better choice. Flat features allow the mug to sit securely on the crochet surface without wobbling. If you are making these for a household with small children, embroidered faces are also much safer than plastic attachments.
Lastly, having a measuring tape nearby is helpful to ensure all your coasters end up the same size. A standard bunny coaster usually measures about 4 to 5 inches in diameter, excluding the ears. Consistency is key if you are planning to gift these as a handmade coaster set or sell them at local craft fairs.
2. Understanding the Foundation Stitches for the Pattern
Before you begin the actual Crochet Bunny Rabbit Coaster – Pattern, you need to be comfortable with the Magic Ring (or Magic Circle) technique. This is the gold standard for starting circular projects because it allows you to pull the center tight, leaving no hole in the middle of your bunny’s face. It provides a clean, professional look that is essential for high-quality crochet work.
Most bunny coaster patterns rely heavily on the double crochet (dc) stitch for the main body. This stitch adds height quickly and creates a slightly flexible yet firm texture that is ideal for a drink mat. Learning how to maintain even tension while performing these stitches will prevent your coaster from “ruffling” or curling at the edges.
The increase stitch is another vital element you will use throughout the Crochet Bunny Rabbit Coaster – Pattern. Increasing means putting two stitches into a single stitch from the previous row. This mathematical expansion is what keeps the circle flat as it grows larger, and mastering the rhythm of increases is the secret to a perfectly flat crochet coaster.
When it comes to the ears of the Crochet Bunny Rabbit Coaster – Pattern, you will likely use a combination of slip stitches, single crochets, and half-double crochets. This variation in stitch height is what creates the tapered, organic shape of a rabbit’s ear. It’s a great way to practice transitioning between different stitch types within a single row.
Joining your rounds is usually done with a slip stitch (sl st). While some patterns use continuous spirals, a joined round often provides a clearer “top” for the bunny where the ears should be attached. Learning how to do an invisible join can further elevate the quality of your Crochet Bunny Rabbit Coaster – Pattern, making the seam almost impossible to find.
Finally, don’t overlook the importance of the chain stitch (ch). It serves as the “turning chain” or the starting height for new rows. In this crochet pattern, the chain usually counts as the first stitch, so keeping your chains neat and consistent is vital for the overall symmetry of the bunny rabbit’s head.
3. Step-by-Step Guide to Crafting the Bunny Ears
The most iconic part of the Crochet Bunny Rabbit Coaster – Pattern is, without a doubt, the ears. To start the ears, you will usually attach your yarn to the top edge of the finished circle and create a foundation chain. The length of this chain determines whether your bunny has short, perky ears or long, lop-eared features.
Once your chain is ready, you will work back down the chain using a series of graduated stitches. Typically, you start with a slip stitch at the tip for a pointed look, followed by single crochets, and then half-double crochets as you move toward the base. This technique gives the ear its characteristic width and structure, making your crochet bunny look realistic.
To make the ears “pop,” many artists use a contrasting yarn color for the inner ear. You can either crochet two separate pieces and sew them together or simply surface-stitch a pink center onto the main ear. Adding this detail makes the Crochet Bunny Rabbit Coaster – Pattern much more visually appealing and professional.
Symmetry is the biggest challenge when working on the ears. You must ensure that the second ear is placed an equal distance from the center as the first one. A good tip for this crochet pattern is to count the stitches between the ears carefully; usually, a gap of 2 to 4 stitches provides the most balanced look for a bunny rabbit.
After finishing the stitches, you will need to “finish off” the yarn. Leave a long yarn tail when you cut the thread, as you will need this to sew the ears firmly to the head. A sturdy attachment is important because coasters undergo a lot of handling, and you don’t want your bunny ears becoming loose after a few uses.
If you want your ears to stand upright rather than laying flat, you can use a smaller hook for the ears to create a stiffer fabric. Alternatively, some people use a light spray of fabric stiffener. However, for a Crochet Bunny Rabbit Coaster – Pattern, floppy ears often add to the “shabby chic” charm and make the coaster easier to store.
4. Finishing Touches and Blocking Your Coaster
Once the structural work of your Crochet Bunny Rabbit Coaster – Pattern is complete, it’s time for the “face” work. Using a tapestry needle and some black or pink yarn, you can embroider a simple ‘V’ shape for the nose and two small ‘x’ shapes or French knots for the eyes. These tiny details give your crochet coaster its soul and character.
Weaving in your ends is a step you should never skip. Use your needle to weave the yarn tails through the back of the stitches in multiple directions. This ensures that even after multiple trips through the washing machine, your handmade bunny won’t unravel. This is a hallmark of a well-made crochet pattern project.
Blocking is the “secret weapon” of professional crocheters. Even if your coaster looks a bit wonky or curled, blocking can fix it. Simply pin your Crochet Bunny Rabbit Coaster – Pattern onto a foam mat in a perfect circle, spritz it with water, and let it dry completely. This sets the stitches and ensures the coaster lies perfectly flat on your table.
If you plan on selling these, consider adding a cork backing or a felt lining. While not strictly part of the crochet pattern, gluing a piece of felt to the bottom adds a premium feel and provides extra protection for delicate wood surfaces. It also hides the back of your embroidery stitches for a cleaner look.
For those who want to get extra creative with their Crochet Bunny Rabbit Coaster – Pattern, you can add a small pom-pom as a tail on the edge, though this might make the coaster less stable for a cup. Alternatively, adding a small bow tie or a flower near one ear can designate “boy” or “girl” bunnies for a personalized gift set.
Finally, take a moment to inspect your work for any loose loops or inconsistent tension. The joy of a Crochet Bunny Rabbit Coaster – Pattern is in the handmade quality, but a little bit of quality control goes a long way. Once you are satisfied, your bunny coaster is ready to hold your favorite mug or be wrapped up as a thoughtful gift.
FAQ – Frequently Asked Questions
1. What is the best yarn for a Crochet Bunny Rabbit Coaster – Pattern?
The best yarn is definitely 100% cotton. Cotton is durable, heat-resistant, and absorbs moisture from cold drinks, preventing puddles on your table. Brands like Lily Sugar ‘n Cream or 24/7 Cotton are popular choices for this specific crochet project.
2. How long does it take to make one bunny coaster?
For an intermediate crocheter, one Crochet Bunny Rabbit Coaster – Pattern usually takes between 30 to 45 minutes. This makes it a fantastic “weekend project” if you want to create a full set of six or eight coasters in a single sitting.
3. Can I wash these coasters in a machine?
Yes, if you used cotton yarn! It is recommended to wash them in a mesh laundry bag on a gentle cycle and then lay them flat to dry. You might need to re-shape (block) them slightly after washing to keep the ears looking sharp.
4. Is this pattern suitable for absolute beginners?
Absolutely! This crochet pattern uses basic stitches like the single crochet, double crochet, and magic ring. It is a great way for beginners to practice working in the round and learning how to shape ears.
5. What size hook should I use for a standard coaster?
A 3.5mm or 4.0mm hook is standard for worsted weight cotton yarn. If you find your stitches are too loose, drop down a hook size to ensure the coaster is firm and functional.
6. Do I have to use a Magic Ring to start?
While a Magic Ring provides the cleanest center, you can also start by chaining 4 and joining with a slip stitch to form a ring. However, the Magic Ring is preferred for the Crochet Bunny Rabbit Coaster – Pattern to keep the bunny’s “nose” area tight.
Conclusion
In this article, we have explored the delightful world of the Crochet Bunny Rabbit Coaster – Pattern, covering everything from the essential cotton yarn and tools to the specific stitches needed for the head and ears.
We discussed the importance of tension, the art of embroidery for facial features, and the professional finish that blocking provides. Creating these coasters is a rewarding way to practice your crochet skills while making a charming addition to your home decor or a heartfelt gift for a friend.