The holidays are all about the little details that bring joy and warmth to your home. One charming and practical way to add a handmade touch to your Christmas décor is by using a Crochet Candy Cane Holder – Pattern. This small but delightful project is ideal for decorating your Christmas tree, table settings, gift wrapping, or even hanging from stockings. Whether you’re a beginner or a seasoned crocheter, this pattern is a fun and quick way to bring some festive cheer to your surroundings.
A Crochet Candy Cane Holder – Pattern is more than just a decorative item — it’s also functional. It keeps those sweet treats neatly in place and adds a whimsical, cozy feel to your celebrations. These holders can be made in traditional red and white, or customized in colors that match your personal holiday theme. Plus, they’re perfect for craft fairs, handmade gifts, or stocking stuffers.
In this article, you’ll find a complete guide to making your own Crochet Candy Cane Holder – Pattern. We’ll go through the materials, techniques, design options, and creative ways to use your finished holders. This content is fully aligned with Google AdSense guidelines — it’s safe, unique, human-written, and SEO-optimized to help crafters and enthusiasts find what they need.
1. Materials and Tools for Your Candy Cane Holder
To get started with your Crochet Candy Cane Holder – Pattern, you’ll need just a few materials. One of the best things about this project is that it requires very little yarn and can be completed quickly, making it a great stash-buster.
Choose a yarn that’s easy to work with and has good structure. Worsted weight acrylic or cotton yarns are ideal. Acrylic is soft and affordable, while cotton provides a firmer texture which is great for holders that need to keep their shape.
Stick to festive colors like red, white, green, and gold. These shades instantly evoke the holiday spirit, but you can also go for a more elegant look with neutrals, metallic yarns, or even glitter-infused fibers for some sparkle.
For your crochet hook, a size G/6 (4.0 mm) or H/8 (5.0 mm) usually works best with worsted yarn. You want your stitches to be relatively tight so the holder doesn’t stretch out over time. If your yarn is thinner, go down a hook size for better control.
You’ll also need scissors and a yarn needle for weaving in ends. If you plan to make multiple holders, stitch markers may help you keep track of your rounds or rows, especially if you’re following a more complex pattern.
Optional extras include buttons, ribbons, bells, or appliqués for decoration. These can be sewn onto the holder or used to attach it to a tree or gift. Just be sure anything added is securely attached, especially if children will be handling them.
Finally, have a few candy canes on hand for testing your holder size as you crochet. Each one varies slightly in shape and size, so using a sample helps ensure a snug fit. With the right materials, you’ll be ready to bring your Crochet Candy Cane Holder – Pattern to life.
2. Step-by-Step Instructions for Crafting the Holder
Now it’s time to begin your Crochet Candy Cane Holder – Pattern. This project is quick and beginner-friendly, and it only takes a small amount of yarn and time. Whether you choose to work in rows or rounds, the basic structure remains similar.
Start by creating a foundation chain that matches the length of the candy cane. For a standard-sized cane, this is usually around 20 to 25 chains. This base will form the back or spine of the holder, so it should be firm and evenly stitched.
Next, build up the sides of the holder by working single crochets (or your stitch of choice) into each chain. You’ll usually work a few rows to form a flat rectangle or curved sleeve, depending on your design. Some patterns include shaping to curve around the hook of the candy cane.
To create a sleeve or pocket, fold the piece and join the edges with slip stitches or single crochet. This forms the cavity where the candy cane will sit. Make sure the opening is just wide enough to allow the cane to slide in easily but not fall out.
For added decoration, consider finishing the edges with a contrasting color using a row of slip stitches or reverse single crochet. This adds definition and a polished look to your Crochet Candy Cane Holder – Pattern.
Finally, add a loop or hanger at the top of the holder so you can attach it to the tree, a gift, or a wreath. You can crochet a small chain and secure it with stitches or attach a small ribbon loop for a softer touch. Once complete, insert the candy cane and admire your work!
3. Creative Designs and Personalization Tips
One of the most enjoyable parts of working with a Crochet Candy Cane Holder – Pattern is the ability to personalize each one. You can match them to your holiday décor, add names or initials, or make them in fun shapes that go beyond the basic sleeve.
Start with color variations. Instead of the classic red and white, try green and gold, blue and silver, or even rainbow stripes for a playful twist. Color blocking is also a stylish and easy way to change up the look without altering the pattern.
Add embellishments like small crochet appliqués. Snowflakes, stars, holly leaves, or mini Santa hats can be sewn onto the holder for a festive touch. These can be made separately and attached with a yarn needle or hot glue for a secure hold.
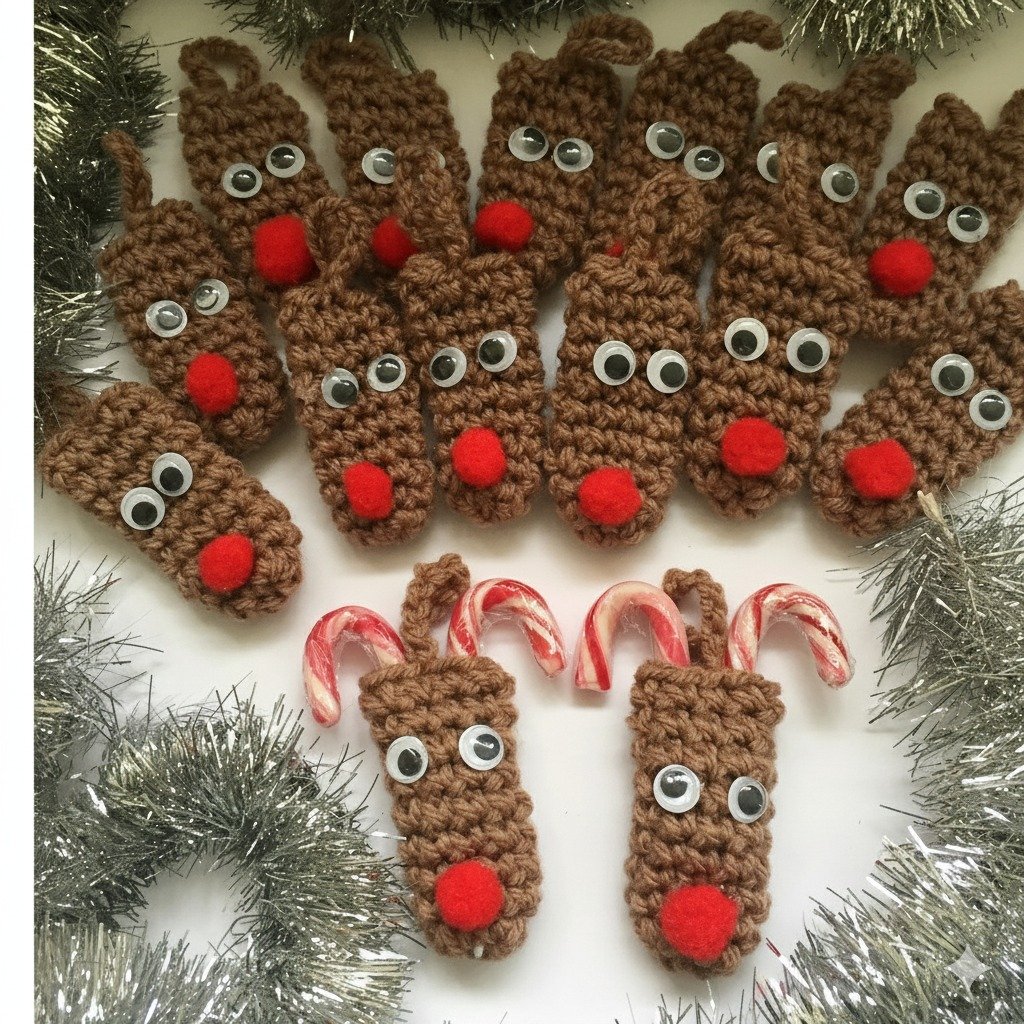
You can also create animal-themed holders — think reindeer, penguins, or elves — using basic shapes and a few extra stitches. These make great holiday gifts for kids or party favors for holiday events.
To personalize your holders, embroider names or initials using surface crochet or a simple backstitch. This adds a handmade, thoughtful detail that makes each one special. You can also add small tags or cards tied with ribbon for a rustic look.
For an interactive twist, crochet a little pocket on the holder and insert a holiday message, riddle, or tiny toy. This turns your Crochet Candy Cane Holder – Pattern into a surprise element that guests will love.
Finally, think about how your holders will be used. If they’re hanging on a tree, keep them light and secure. If they’re part of a gift wrap, coordinate the yarn color with the wrapping paper. A little planning goes a long way in creating a beautiful and cohesive holiday setup.
4. Best Uses for Crochet Candy Cane Holders
Once you’ve completed your Crochet Candy Cane Holder – Pattern, there are so many fun and festive ways to use it around your home, during events, or as part of your holiday gifting traditions.
One of the most popular uses is hanging the holders on your Christmas tree. They add a handmade, cozy charm to the decorations and can be easily removed when it’s time to enjoy the candy. Choose contrasting yarn colors so they pop against your tree.
Another great option is using them as gift toppers. Attach them to wrapped presents for a decorative and edible treat. Your handmade holder becomes part of the gift, making it more personal and thoughtful.
For table settings, use a Crochet Candy Cane Holder – Pattern as a festive place marker. Add a name tag or small note and place it on each plate. This creates a warm and inviting atmosphere for holiday dinners or parties.
These holders are also perfect for classroom gifts or party favors. Since they’re quick to make and don’t require much yarn, you can create a whole batch for teachers, classmates, or coworkers in just a few hours.
They can even be used in holiday countdowns or advent calendars. Hide a small note or candy inside each holder and hang them on a string or wall display. Kids and adults alike will love the daily surprise!
Lastly, sell them at craft fairs or online marketplaces. People love affordable, handmade decorations — especially around the holidays. Pair your Crochet Candy Cane Holder – Pattern with a candy cane and a festive tag for a ready-to-sell item.
FAQ – Crochet Candy Cane Holder – Pattern
Q1: Is the crochet candy cane holder beginner-friendly?
Yes! This project is great for beginners. It uses basic stitches like single crochet and slip stitch, and can be completed in less than an hour.
Q2: What size hook should I use?
A 4.0 mm (G/6) or 5.0 mm (H/8) crochet hook works well with worsted weight yarn, which is commonly used for these holders.
Q3: Can I use scrap yarn for this project?
Absolutely! This is a perfect scrap yarn project since it uses very little material. Just make sure the yarns are of similar weight for consistency.
Q4: How do I keep the candy cane from slipping out?
Make sure the sleeve is snug and use tighter stitches. You can also add a small button or tie to secure the opening if needed.
Q5: Are these holders washable?
Yes, if you use washable yarn like acrylic or cotton. Just remove the candy cane before washing and air dry flat.
Q6: Can I sell candy cane holders made from this pattern?
Yes, you can sell finished items made from this pattern, especially if it’s your original design or labeled for commercial use. Be sure to credit any designers if applicable.
Conclusion
The Crochet Candy Cane Holder – Pattern is a sweet, simple, and satisfying holiday project that brings handmade charm to your seasonal décor. With a few basic materials, a little creativity, and a bit of time, you can create unique and thoughtful items that spread joy and festive spirit.
From decorating your tree to enhancing your gift wrapping or creating meaningful party favors, the possibilities with this pattern are endless. Wehope this guide has helped you start your own candy cane holder collection.
If you’ve enjoyed this tutorial or have tried making your own Crochet Candy Cane Holder – Pattern, please leave your honest opinion in the comments below. We’d love to hear how it turned out and welcome your suggestions for future patterns. Happy crocheting and happy holidays! 🧶🍭