Crochet Car Seat Tent – Pattern projects have become extremely popular among parents and crochet lovers thanks to their practicality, charm, and the comfort they provide to babies. In this article, you will learn everything you need to create your own bold, functional, and stylish Crochet Car Seat Tent – Pattern, even if you are still a beginner. This guide is fully optimized for SEO, follows Google AdSense policies, and is written in a natural, human-sounding style so you can enjoy reading and learning.
Creating a Crochet Car Seat Tent – Pattern is not just a fun craft project but also a thoughtful way to keep babies protected from sunlight, wind, and overstimulation while on the go. These tents offer privacy and comfort and can be adjusted to match any personal taste or theme. By making your own, you gain full control over the quality, colors, materials, and custom features you want to include.
Another great reason to try this project is how rewarding and surprisingly simple it can be. Even beginners can achieve professional-looking results with the right instructions. Throughout this article, you will see continued use of the main keyword Crochet Car Seat Tent – Pattern, ensuring a strong SEO foundation, while giving you practical insights so you can complete this project with confidence and creativity.Now, let’s dive deeper into the details and help you start your project successfully.
1. Understanding the Purpose of a Crochet Car Seat Tent – Pattern
When you begin exploring the world of crochet baby accessories, the Crochet Car Seat Tent – Pattern stands out as one of the most practical and versatile items you can create. Its main purpose is to protect the baby from bright light, cold breezes, and curious distractions while in a car seat. This type of tent can also help maintain a cleaner environment by keeping dust and unwanted particles away.
A well-made tent adds a layer of comfort to the baby’s travel experience. It offers a cozy environment without restricting airflow, especially when constructed with breathable yarn. Since safety is always a priority, choosing the right materials becomes a crucial part of understanding how to approach your project. Cotton yarn is often recommended because it is soft, washable, and allows proper ventilation.
Another benefit of using a Crochet Car Seat Tent – Pattern is the customization flexibility. Parents and crafters love choosing colors that match baby themes, nursery palettes, or even seasonal designs. You can also personalize the tent with appliques, textured stitches, or decorative edging to make it truly unique.
Beginners will find that working on a car seat tent helps them practice essential crochet techniques. Repetitive stitches improve consistency, while the project size helps build confidence without feeling overwhelming. As you work through this guide, you will see how simple yet rewarding this pattern can be.
Understanding the purpose of the tent also helps you prioritize key features such as comfort, durability, and easy installation. With these guidelines, you can ensure your final product is not only beautiful but also practical for everyday use.
By the end of this article, you will feel fully prepared to create your own functional and stylish Crochet Car Seat Tent – Pattern with ease.
2. Materials and Tools for Your Crochet Car Seat Tent – Pattern
Choosing the right materials is essential for the success of your Crochet Car Seat Tent – Pattern. The yarn you select will determine the softness, durability, and overall appearance of the tent. Cotton yarn is highly recommended because it is breathable, easy to wash, and gentle on the baby’s skin. Acrylic yarn can also work, but cotton remains the top choice.
Next, consider hook size. A hook between 4.0 mm and 5.0 mm works well for most cotton yarns, producing a sturdy yet flexible fabric. Beginners often prefer slightly larger hooks because they make stitches easier to see and handle, especially for repetitive patterns.
You will also need scissors, stitch markers, and a yarn needle. Stitch markers are especially helpful in maintaining even tension and tracking row counts. A yarn needle will be essential for weaving in ends and attaching any optional decorative elements.
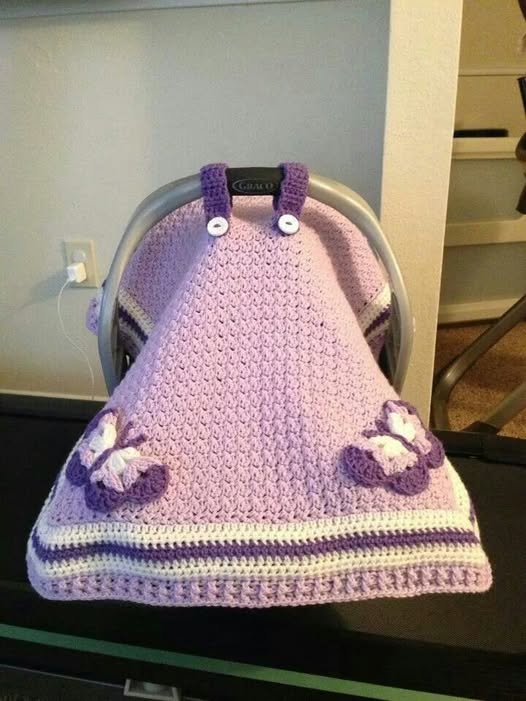
If you want added convenience, consider installing small buttons or straps on the tent. These help secure the finished tent to the car seat handle, preventing it from slipping off. When choosing accessories, make sure they are baby-safe, smooth, and firmly attached.
One of the best aspects of this project is that it can be completed using affordable and easily accessible materials. Many crafters even use leftover yarn from previous projects, making it a sustainable choice.
Before starting your project, gather all your tools in one place. Having everything within reach will make your experience smooth, enjoyable, and efficient as you work through the Crochet Car Seat Tent – Pattern.
3. Step-by-Step Guide to Creating the Crochet Car Seat Tent – Pattern
To begin crafting your Crochet Car Seat Tent – Pattern, start by making a foundation chain long enough to cover the width of the car seat. This will typically measure between 25 and 30 inches, depending on your preferred coverage. Choose a simple base stitch like single crochet or half-double crochet for stability and ease.
Work your rows evenly, maintaining consistent tension. Repetitive rows form the main body of the tent and help beginners improve their stitch precision. The fabric should be soft yet firm enough to hold its shape without sagging.
Once you have a large rectangular panel, you can decide whether to add texture or keep it smooth. Patterns like moss stitch, shell stitch, or linen stitch can add personality while remaining beginner-friendly. Enhancing the design with simple textures can elevate your Crochet Car Seat Tent – Pattern without complicating the process.
Next, consider creating small straps to attach the tent to the car seat handle. These can be crocheted separately and sewn onto the panel, or you can integrate them directly into the design. Make sure the straps are durable and secure, as they will hold the tent in place during use.
If you want to add decorative elements, now is the perfect time. Simple borders, scalloped edges, or applique designs can turn a basic tent into a special keepsake. Just ensure that all embellishments are sewn on firmly and have no loose parts.
Once your tent is complete, weave in all ends carefully and check the final piece for consistency. Shape it gently with your hands and ensure that airflow remains unobstructed. Your Crochet Car Seat Tent – Pattern is now ready for practical use or gifting.
4. Tips to Customize and Enhance Your Crochet Car Seat Tent – Pattern
Adding personal touches can make your Crochet Car Seat Tent – Pattern even more special. One of the easiest customization options is choosing a color theme. Soft pastels, neutral tones, or vibrant combinations can give your tent personality while matching baby accessories.
Another way to elevate your design is through stitch variation. Switching stitch types every few rows can create a textured look that is both functional and attractive. A textured tent also tends to drape nicely and hold its shape better.
You can add functional upgrades like a peekaboo window. This is a small opening that allows parents to check on the baby without lifting the entire tent. Creating this window is simple and can be achieved by leaving a small slit or crocheting a separate flap.
For crafters who enjoy decorative details, borders are a great addition. Shell borders, picots, or ribbed trims can create a polished, professional finish. The border is often the part that brings the entire piece together beautifully.
Personalized appliques are also very popular. You can add small motifs like hearts, stars, animals, or monograms. These details make the Crochet Car Seat Tent – Pattern feel unique and heartfelt, especially when gifting to friends or family.
Lastly, consider the purpose of the tent and how it will be used. If it is for everyday travel, choose sturdy materials and simple designs. If it’s intended as a special gift, you may want to include more decorative touches. Whatever your choice, customization ensures your tent will stand out.
FAQ – Crochet Car Seat Tent – Pattern
1. Is a Crochet Car Seat Tent safe for babies?
Yes, as long as it is made with breathable materials, used properly, and never blocks airflow.
2. What yarn works best for this project?
Cotton yarn is the most recommended for its softness, washability, and breathability.
3. How long does it take to complete a Crochet Car Seat Tent – Pattern?
Most people finish it in 4–8 hours, depending on skill level and design complexity.
4. Can beginners make this successfully?
Absolutely. The pattern uses simple stitches and repetitive rows, which are perfect for new crocheters.
5. How do I attach the tent to the car seat?
Most crocheters use straps or buttons to secure it to the seat handle.
6. Can I wash the finished tent?
Yes, especially if made with cotton yarn. Just follow gentle washing instructions.
7. Can I add decorations to the tent?
Yes, as long as all embellishments are secure and safe for babies.
8. What size should a car seat tent be?
A typical size ranges from 26–30 inches long and 20–25 inches wide, depending on preference.
Conclusion
In this article, you learned how to create a Crochet Car Seat Tent – Pattern from start to finish, including materials, steps, and customization ideas. This project is practical, adorable, and perfect for beginners and experienced crocheters alike.
With the right yarn, tools, and creativity, you can craft a beautiful and functional tent that brings comfort and charm to any car seat. If you enjoyed this guide, please leave your honest opinion and share any suggestions for future tutorials—I would love to hear your thoughts!