A crochet cardigan – pattern is one of the most versatile and satisfying projects you can add to your handmade wardrobe.
Whether you’re an experienced crocheter or a beginner with some basic skills, creating your own cardigan offers not only comfort but also a beautiful way to express your personal style.
With the right pattern, yarn, and technique, you can make a cozy piece that fits perfectly and turns heads.
Cardigans are timeless. They’re practical for every season, easy to layer, and incredibly customizable. From long, chunky designs for winter to light, lacy versions for spring, a crochet cardigan offers endless creative possibilities. You can choose from cropped, oversized, or tailored fits, and adjust colors and textures to match your preferences. The pattern becomes the blueprint to build a handmade garment that lasts for years.
In this guide, we’ll walk you through everything you need to know about starting your own crochet cardigan – pattern. From selecting materials and understanding the construction to adding your own unique touch and taking care of your finished garment, we’ve got you covered. Let’s bring warmth, elegance, and creativity into your crochet journey.
1. Choosing the Right Yarn and Tools for Your Crochet Cardigan
The first step in starting your crochet cardigan – pattern is selecting the appropriate materials. Choosing the right yarn and hook will make a big difference in the final product’s appearance, texture, and wearability.
Start by considering the yarn weight. Worsted weight yarn is a popular choice for cardigans due to its balance between warmth and manageability. However, if you’re looking for a lighter piece, try DK or sport-weight yarn for more drape and softness. Chunky yarn can be used for thicker, winter-friendly cardigans.
Fiber type is also key. Cotton is breathable and ideal for warmer months, while wool or wool blends offer insulation and elasticity for colder seasons. Acrylic is a budget-friendly, easy-care option, great for beginners and everyday wear.
When it comes to the crochet hook, always refer to the yarn label’s suggested size, but also consider your tension and the desired drape. Some patterns may call for a slightly larger hook to create a looser fabric or a smaller one for tighter stitches.
Don’t forget the notions: stitch markers, measuring tape, scissors, and a yarn needle will all come in handy during construction. Optional buttons, zippers, or toggles can be added for closure, depending on the pattern.
Lastly, think about your color palette. Neutrals like beige, gray, and black offer versatility, while pastels or bold colors add personality. Multi-colored or ombré yarns can give your cardigan a stylish twist without needing complex stitch changes.
Once you have your tools and yarn ready, you’re set to follow a crochet cardigan – pattern that suits your level and desired style.
2. Understanding the Construction of a Crochet Cardigan – Pattern
Most crochet cardigan – pattern designs follow a few basic construction styles, which makes understanding the foundation extremely helpful before you start. Knowing how your cardigan comes together will help you visualize the final result and make the stitching process more efficient.
One of the most common methods is the panel construction, where you crochet individual pieces (back, two fronts, and sleeves) and sew them together. This gives the cardigan a structured, tailored feel and allows for easier customization of fit.
Another popular option is the top-down construction, which starts at the neckline and works downward in one piece, often using raglan or circular yokes. This method is great for trying on as you go and adjusting lengths or widths mid-project.
Side-to-side construction is less common but perfect for certain designs with horizontal stitch patterns. It adds a unique texture and can be flattering for many body types. You begin at one side seam and work across the body in rows.
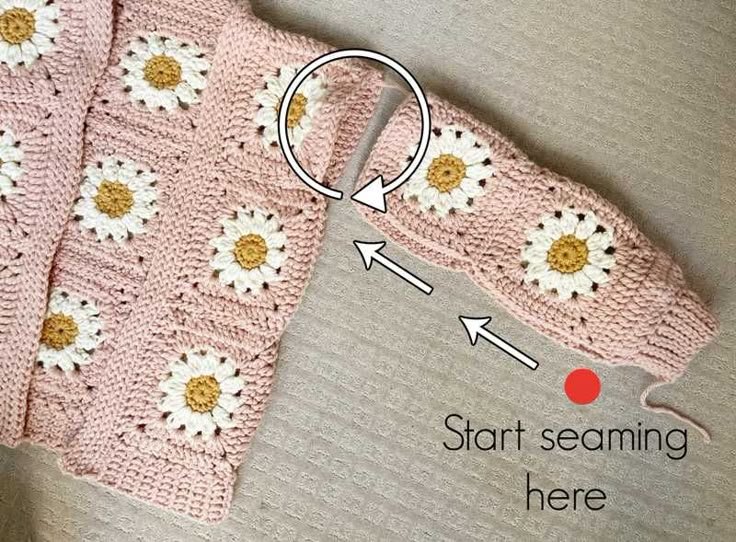
Some cardigans are made in a modular format, using granny squares or other motifs joined together. This method is fun and flexible, especially for beginners or those who love colorful patchwork styles.
Sleeve attachment can vary by pattern. Set-in sleeves are sewn separately and inserted later, while in some top-down or modular patterns, the sleeves are crocheted directly onto the body. Each method affects the fit and look.
Lastly, understand the role of edging and finishing. Ribbed cuffs, hems, and necklines are usually worked in the back loop only (BLO) or using front post and back post stitches for stretch and structure. This finishing touch is where your cardigan truly comes together.
3. Step-by-Step Tips to Follow a Crochet Cardigan Pattern
Following a crochet cardigan – pattern may seem daunting, but with clear steps and a little patience, you’ll complete it with confidence. Below are some useful tips to ensure success throughout your project.
Read the pattern completely before starting. This helps you understand the construction, special stitches, and materials needed. Make sure you’re comfortable with all terms, and look up unfamiliar stitches in advance.
Take your measurements and choose the right size. A well-fitted cardigan depends on matching the bust, arm length, and overall length. Adjust the stitch count or rows where necessary if you’re between sizes.
Make a gauge swatch. This step is essential! Working a 4×4 inch (10×10 cm) swatch lets you test your tension. Matching the gauge ensures your cardigan will be the correct size once finished.
Use stitch markers to track important areas like armholes, yoke increases, or button placements. This keeps your work organized and helps you avoid mistakes.
Count your stitches often. It’s easy to accidentally add or miss stitches, especially when working longer rows or rounds. Consistent stitch counts will keep the shape and fit as intended.
Try on as you go, especially if your pattern is top-down or modular. Adjusting early can save you from needing to unravel large sections later on. Don’t hesitate to modify the length or width to suit your preferences.
4. Customizing and Caring for Your Crochet Cardigan
One of the greatest advantages of making a crochet cardigan – pattern is how easy it is to customize. You’re not limited to the pattern exactly as written—you can tweak colors, stitches, and structure to make it your own.
Change up the stitch pattern. Many cardigans use simple stitches like single crochet (sc) or double crochet (dc), but you can incorporate textures like bobbles, shells, or waffle stitches for added dimension and interest.
Play with color blocking or stripes. This is a great way to use up leftover yarn and add a fashion-forward twist. Just make sure to carry or weave in your yarn ends cleanly to maintain a polished look.
Add pockets or buttons. Pockets can be stitched directly into the pattern or added afterward. Buttons, toggles, or even zippers give your cardigan a practical and stylish finish.
Make it season-appropriate. Use lighter yarns and airy stitch patterns for spring and summer, or bulky yarns and closed stitches for cold-weather wear. You can even line your cardigan for extra warmth.
Personalize the fit. Want a longer cardigan? Just add more rows to the body. Prefer a cropped look? Stop early and finish with a neat ribbed edge. Sleeve lengths, necklines, and overall ease can all be adjusted to suit you.
Care properly for your finished piece. Hand-washing in cold water with gentle detergent is best, especially for natural fibers. Lay flat to dry to avoid stretching. Store your cardigan folded rather than hanging to prevent shoulder sagging.
Frequently Asked Questions (FAQ)
Q1: How long does it take to crochet a cardigan?
A: The time varies by pattern complexity, yarn weight, and your crochet speed. A basic pattern may take 10–20 hours, while advanced designs might take longer.
Q2: Is a crochet cardigan suitable for beginners?
A: Yes! Many patterns are beginner-friendly. Look for patterns labeled “easy” or “beginner,” using basic stitches and simple construction.
Q3: What yarn is best for a crochet cardigan?
A: It depends on the season. Cotton is great for light cardigans, while wool or acrylic works well for warmth. Make sure the yarn feels soft and isn’t too heavy for wearability.
Q4: Can I resize a cardigan pattern?
A: Absolutely. Most patterns offer multiple sizes, and you can adjust the length or width by adding or subtracting rows/stitches. Gauge swatching is key for resizing accurately.
Q5: How do I choose the right size?
A: Measure your bust and refer to the sizing chart in your pattern. Consider how loose or fitted you want the cardigan to be and select accordingly.
Q6: Should I block my finished cardigan?
A: Yes. Blocking smooths out stitches and ensures the cardigan lays evenly. It’s especially important for pieces made with natural fibers or intricate stitch patterns.
Conclusion
Creating a crochet cardigan – pattern is a fulfilling and creative experience that allows you to build a timeless wardrobe piece from scratch. From choosing your materials and understanding construction to adding your personal flair and taking care of your work, every step contributes to a garment filled with love and style.
Whether you’re making it for yourself or as a gift, a handmade crochet cardigan is something to cherish. We hope this guide has inspired you to start your own project. Please leave your honest opinion, experiences, or suggestions below—