Creating a Crochet Cat Ear Hair Clip- Pattern is one of the most delightful ways to combine a love for felines with the art of yarn crafting. This Crochet Cat Ear Hair Clip- Pattern offers a fast, accessible, and incredibly cute project for crafters of all skill levels who want to add a touch of whimsy to their hairstyles. Whether you are making these for a costume, a gift, or simply to express your personality, understanding the nuances of a well-designed pattern ensures that your cat ears stand upright and look professional.
A high-quality Crochet Cat Ear Hair Clip- Pattern focuses on geometric precision, usually involving a series of increases and decreases to create that perfect triangular feline shape. By using this specific pattern, you can experiment with various yarn weights and colors to mimic different breeds, from a sleek black cat to a fluffy ginger tabby. The beauty of a hair clip design is its versatility, allowing the wearer to position the ears exactly where they want on the head, unlike traditional headbands which can sometimes be restrictive.
To successfully execute this Crochet Cat Ear Hair Clip- Pattern, you will need to familiarize yourself with basic crochet stitches and the assembly process. The project is inherently portable, making it the perfect “on-the-go” craft that yields a finished product in under an hour. Throughout this guide, we will break down the essential components of the Crochet Cat Ear Hair Clip- Pattern, ensuring you have all the knowledge required to create a durable, stylish, and comfortable hair accessory that stays secure all day long.
2. Choosing the Best Materials for Your Crochet Cat Ear Hair Clip- Pattern
The first step in starting your Crochet Cat Ear Hair Clip- Pattern is selecting the right yarn. For a hair clip, you want a fiber that is lightweight but sturdy enough to hold its shape without drooping. A mercerized cotton yarn or a stiff acrylic blend is often the preferred choice because these materials offer excellent stitch definition, making the crochet texture pop and keeping the cat ear structure firm.
The hook size you choose for your Crochet Cat Ear Hair Clip- Pattern is equally important for the final look. If you use a hook that is too large, the stitches will be loose, and the ear might flop over; if it is too small, the fabric may become overly dense and difficult to work with. Most patterns recommend a 2.5mm or 3.0mm crochet hook to create a tight, weave-like fabric that conceals any stuffing or the back of the clip.
Speaking of the clip, you will need to decide between alligator clips, snap clips, or bobby pins. Most professionals using a Crochet Cat Ear Hair Clip- Pattern opt for alligator clips with teeth because they provide a much stronger grip on the hair, especially for the slightly top-heavy weight of a crochet cat ear. You can also line the clip with ribbon to make it more comfortable and aesthetically pleasing.
Don’t forget the stuffing or interfacing! While some Crochet Cat Ear Hair Clip- Pattern designs are made of two flat pieces joined together, others are worked in the round and require a tiny amount of poly-fill to give them a 3D effect. If you prefer a flatter look, you might skip the stuffing but use a stiffening spray or a bit of diluted white glue to ensure the ears maintain their pointed tips over time.
Color selection is where your Crochet Cat Ear Hair Clip- Pattern really comes to life. You can go for realistic tones like white, grey, or chocolate brown, or opt for “kawaii” aesthetics using pastel pinks and purples. Some makers even use variegated yarn to give the cat ears a mottled or tortoiseshell appearance, adding a layer of depth and uniqueness to every single hair clip they produce.
Finally, you will need a tapestry needle and sharp scissors to finish your Crochet Cat Ear Hair Clip- Pattern. Weaving in the ends securely is vital, as hair accessories undergo a lot of handling and movement. A dab of hot glue or specialized fabric glue is also recommended to attach the finished crochet piece to the metal hair clip base, ensuring a bond that won’t break during use.
2. Mastering the Stitches for the Crochet Cat Ear Hair Clip- Pattern
Most versions of a Crochet Cat Ear Hair Clip- Pattern rely on the magic ring (or magic circle) to begin. This technique allows you to start your work in the round without leaving a hole at the very tip of the ear. By mastering the magic ring, you ensure that the apex of your cat ear is sharp and clean, which is a hallmark of a high-quality, handmade crochet accessory.
The single crochet (sc) is the workhorse of the Crochet Cat Ear Hair Clip- Pattern. Because it creates a dense and sturdy fabric, it is the ideal stitch for structural items. In this pattern, you will frequently use increases (placing two stitches in one) to widen the ear as you move from the tip down to the base, creating that classic triangular feline silhouette.
For those who want a bit more texture, some Crochet Cat Ear Hair Clip- Pattern variations incorporate the half double crochet (hdc) or even slip stitches for the borders. Using a slip stitch around the edge of the finished ear can give it a “piped” look, which adds a professional finish and helps the ear stand out against the wearer’s hair, especially if the colors are similar.
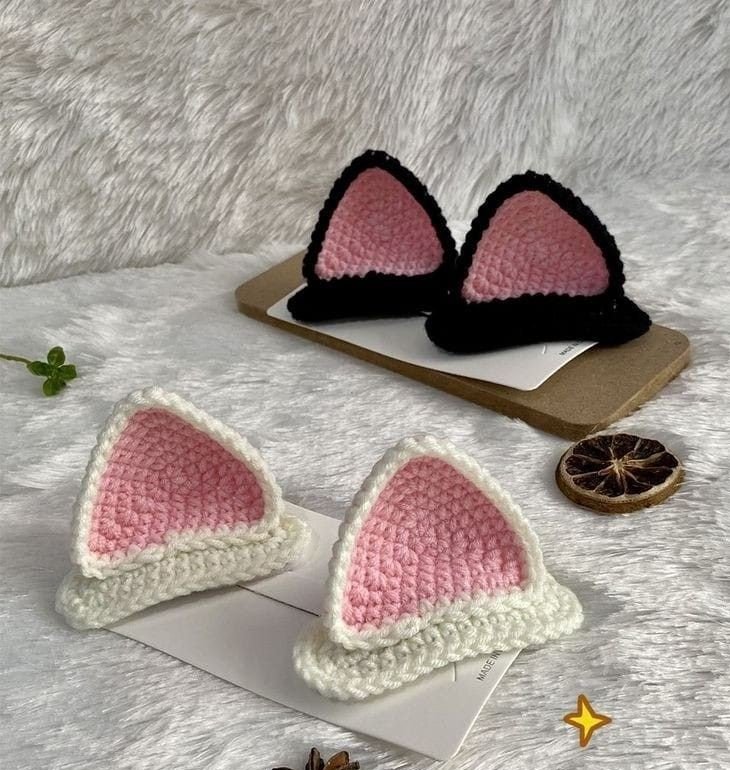
The “inner ear” detail is a popular modification in many a Crochet Cat Ear Hair Clip- Pattern. This usually involves crocheting a smaller triangle in a contrasting color—like light pink—and sewing it onto the front of the main ear. This layered approach adds a realistic touch and makes the crochet cat ear appear more three-dimensional and expressive, perfect for cosplay or children’s fashion.
Another advanced technique found in a Crochet Cat Ear Hair Clip- Pattern is working in the back loops only (BLO). Doing this at the base of the ear can create a natural fold or a flat surface that makes it much easier to glue the piece onto the hair clip. It provides a “hinge” of sorts that helps the ear sit at the correct angle once it is placed on the head.
Understanding tension is the final piece of the puzzle when following a Crochet Cat Ear Hair Clip- Pattern. Unlike a blanket where a loose drape is desirable, a hair clip needs consistent, tight tension. If you find your crochet work is too loose, try pulling your yarn a bit tighter or dropping down half a hook size to ensure the cat ear remains perky and upright throughout its lifespan.
3. Step-by-Step Assembly of the Crochet Cat Ear Hair Clip- Pattern
Once you have finished the crochet portion of the Crochet Cat Ear Hair Clip- Pattern, the assembly phase begins. Start by weaving in all your loose ends using a tapestry needle. Ensure the “tail” from the magic ring is pulled tight and knotted securely, as this is the most visible point of the cat ear and needs to look perfectly pointed and finished.
If your Crochet Cat Ear Hair Clip- Pattern is a 3D design, now is the time to add your stuffing. Use only a small amount; overstuffing can distort the triangular shape and make the ear look more like a horn. You want just enough poly-fill to give the fabric some body. Once stuffed, you can whip-stitch the bottom closed to create a flat, stable base for the clip.
The next step in the Crochet Cat Ear Hair Clip- Pattern is preparing the metal clip. It is highly recommended to “muffle” the clip by gluing a thin strip of matching yarn or ribbon along the top surface. This provides a better grip for the glue when you attach the crochet ear and prevents the metal from peeking through the stitches, resulting in a more polished look.
Apply a generous but controlled amount of hot glue to the base of your crochet piece. Press it firmly onto the prepared hair clip, making sure it is centered. In a professional Crochet Cat Ear Hair Clip- Pattern, the orientation matters—ensure the “front” of the ear is facing the direction the wearer will be looking. Hold it in place for at least 30 seconds to allow the glue to set.
For added durability, some makers like to add a few anchor stitches with a needle and thread, sewing the crochet base directly to the holes in the hair clip if they are available. While glue is usually sufficient for casual wear, these extra stitches ensure that the Crochet Cat Ear Hair Clip- Pattern remains intact even if the bag is tossed in a purse or worn by active children.
Finally, check the symmetry of your pair. A Crochet Cat Ear Hair Clip- Pattern is almost always made in sets of two. Hold them side-by-side to ensure they are the same height and width. If one looks slightly different, you can often “mold” the crochet with your fingers or use a bit of steam from an iron to block the fabric into the desired shape before the glue fully cures.
4. Customizing and Marketing Your Crochet Cat Ear Hair Clip- Pattern
Personalization is what makes the Crochet Cat Ear Hair Clip- Pattern so popular in the crafting community. You can add “fluff” to the tips of the ears by brushing the yarn with a clean pet brush or a velcro strip. This breaks up the fibers and creates a realistic, fuzzy look that mimics the tufts found on breeds like Maine Coons or Lynx, adding a high-end feel.
Incorporating beads or charms is another great way to elevate your Crochet Cat Ear Hair Clip- Pattern. A small bell attached to the base of one ear or a tiny satin bow can transform a simple hair accessory into a statement piece. These small details are what allow you to charge a premium if you decide to sell your finished crochet creations at craft fairs or online shops.
For those looking to sell their work, packaging your Crochet Cat Ear Hair Clip- Pattern results is key. Placing the clips on a custom-branded cardstock backing makes them look like professional retail products. Because they are small and lightweight, they are incredibly cheap to ship, making them an ideal item for an Etsy shop or an Instagram-based boutique.
You can also adapt the Crochet Cat Ear Hair Clip- Pattern for different seasons. Imagine cat ears made with sparkly “tinsel” yarn for New Year’s Eve, or using orange and black for a quick Halloween costume. By simply changing the yarn type, the same basic pattern can be used to create an endless variety of products throughout the calendar year.
If you are a content creator, sharing your version of the Crochet Cat Ear Hair Clip- Pattern on social media can drive a lot of engagement. Short-form videos showing the “boxing” of the ears or the satisfying click of the hair clip are very popular. Use hashtags like #crochetcatears and #handmadehairclips to reach a wider audience of fellow crafters and potential customers.
Lastly, consider offering the Crochet Cat Ear Hair Clip- Pattern as a digital download. Many people love the look of these clips but want the satisfaction of making them themselves. Providing a clear, well-photographed PDF pattern is a great way to generate passive income while helping others discover the joy of creating their own crochet cat ear accessories.
FAQ: Frequently Asked Questions about Crochet Cat Ear Hair Clips
What is the best yarn for a Crochet Cat Ear Hair Clip- Pattern?
The best yarn is typically a category 3 (DK) or category 4 (Worsted) weight. Cotton is highly recommended because it is less “fuzzy” than wool and holds the triangular shape of the cat ear much better over long periods of time.
How do I make sure the ears don’t flop over?
To keep the ears upright, use a smaller crochet hook to create a tighter fabric. You can also insert a small piece of felt or plastic canvas inside the ear before sewing it closed to provide an internal skeleton for the crochet work.
Can I use this pattern for other animals?
Yes! The basic Crochet Cat Ear Hair Clip- Pattern can be easily modified. For fox ears, use orange yarn with black tips. For bear ears, simply round off the top of the pattern instead of making a sharp point. The possibilities are endless!
What kind of glue should I use to attach the clip?
A high-temperature hot glue gun is the most common tool. However, for a more permanent bond, many crafters swear by E6000 or a specialized jewelry glue. Always make sure the fabric is clean and dry before applying any adhesive.
Is this project suitable for a complete crochet beginner?
Absolutely. As long as you know how to make a chain, a single crochet, and an increase, you can successfully follow a Crochet Cat Ear Hair Clip- Pattern. It is a great way to practice working in the round on a small, manageable scale.
How long does it take to finish one pair?
An experienced crocheter can usually finish a pair of cat ears in about 30 to 45 minutes, including the assembly time. This makes it an excellent “instant gratification” project for those with busy schedules.
Conclusion
In this article, we have explored the wonderful world of the Crochet Cat Ear Hair Clip- Pattern, covering everything from the initial yarn selection to the final assembly and marketing tips. We learned that the secret to a great cat ear lies in the tension of the stitches, the choice of a sturdy hook, and the precision of the increases used to create that iconic feline shape.
Whether you are using a magic ring to start or adding “inner ear” details for a pop of color, the Crochet Cat Ear Hair Clip- Pattern remains a versatile and beloved project for the global crochet community.