In this comprehensive Crochet Cat Head Motif – Tutorial, we are exploring one of the most charming and versatile designs in the world of fiber arts. Whether you are a dedicated feline lover or a crafter looking for the perfect embellishment for your next project, learning how to create a handmade crochet cat face is a rewarding skill. This motif captures the playful essence of our favorite pets and can be used to personalize everything from baby blankets to denim jackets, making it a must-have pattern in your digital library.
The beauty of a Crochet Cat Head Motif – Tutorial lies in its simplicity and the room it leaves for individual creativity. By varying your yarn colors, stitch tension, and finishing details, you can replicate specific breeds like a Siamese, a Tabby, or even a tuxedo cat. This tutorial focuses on creating a clean, symmetrical base that serves as a canvas for embroidery and 3D details, ensuring that your finished work looks professional and holds its shape over time.
Following a Crochet Cat Head Motif – Tutorial is an excellent way for beginners to practice working in the round while mastering increases and decreases. Beyond the technical benefits, these small crochet appliqués are perfect for using up your yarn stash, as they require very little yardage. As we progress through this guide, we will discuss the best materials to use, the step-by-step construction of the head and ears, and how to add those expressive facial features that bring your yarn cat to life.
1. Selecting the Best Yarn and Tools for Your Cat Motif
The first step in any successful Crochet Cat Head Motif – Tutorial is gathering the right supplies to ensure a high-quality finish. For an appliqué that will be sewn onto clothing or accessories, a mercerized cotton yarn is highly recommended. Cotton provides incredible stitch definition, which is vital when you want the tiny ears and facial contours to stand out clearly. If you prefer a softer feel for a blanket, a high-quality acrylic blend can also work, provided it isn’t too “fuzzy” to obscure the details.
Choosing the correct crochet hook size is the next priority for your cat head project. Typically, using a hook that is one size smaller than what is recommended on the yarn label will result in a tighter, firmer fabric. This is a secret tip for Crochet Cat Head Motif – Tutorial success because a denser fabric prevents the stuffing (if you choose to make it 3D) from peeking through and makes the surface easier to embroider later. A 3.5mm (E/4) hook is often the “sweet spot” for standard DK weight yarns.
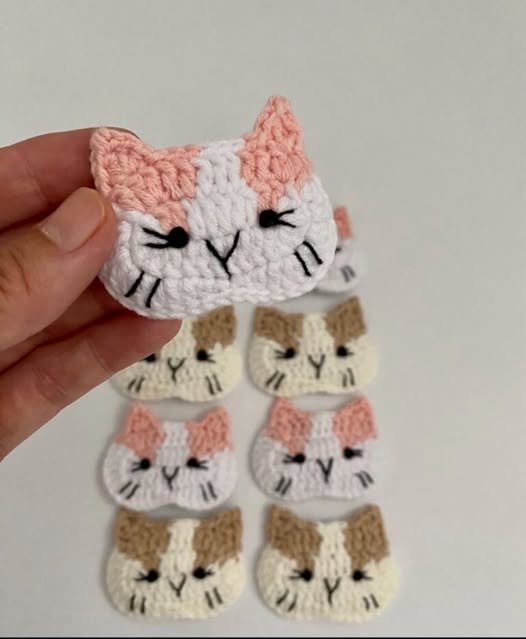
Color selection plays a huge role in the “personality” of your crochet cat. While traditional colors like black, white, ginger, and grey are popular, don’t be afraid to experiment with whimsical shades like pastel pink or mint green for a more “kawaii” aesthetic. In this Crochet Cat Head Motif – Tutorial, we recommend having at least two shades of the same color to create depth, perhaps a lighter shade for the inner ears or the snout area to give the motif a more realistic appearance.
Don’t overlook the importance of notions such as sharp embroidery scissors, a sturdy yarn needle, and high-contrast stitch markers. When you are working in a spiral to create the head, it is very easy to lose track of where your round begins. Using a marker ensures that your increases are placed symmetrically, which is the difference between a perfectly round cat head and one that looks slightly lopsided. Preparation is the key to an enjoyable crafting session.
For the facial details, you will need small amounts of embroidery floss or thin black yarn for the whiskers, nose, and mouth. Some crafters prefer using plastic safety eyes, but if you are making this for a small child or a pet toy, embroidered eyes are much safer. In this Crochet Cat Head Motif – Tutorial, we will emphasize the use of a sharp needle to pierce through the crochet stitches, allowing for more precise placement of the cat’s features.
Lastly, consider the surface where you will attach your finished Crochet Cat Head Motif. If you are planning to turn these into a garland or a set of coasters, you might want to have some fabric stiffener or a steam iron handy. Blocking your motifs once they are finished ensures they lie perfectly flat and look uniform. Having all these tools ready before you start will make the process of following this tutorial much smoother and more professional.
2. Crafting the Perfect Circle for the Cat’s Face
To begin the construction phase of the Crochet Cat Head Motif – Tutorial, you will start with a magic ring (also known as a magic circle). This technique is essential because it allows you to pull the center of the head completely closed, leaving no visible hole. Inside the ring, you will typically work 6 to 8 single crochets, which serves as the foundation for the entire face. Maintaining a consistent tension here is vital for a smooth start.
As you move into the second and third rounds, you will follow a standard increase pattern (2 stitches in every stitch) to expand the circle. The goal for a Crochet Cat Head Motif – Tutorial is to create a flat disc that doesn’t “wave” or “bowl.” If the edges start to ruffle, your tension might be too loose; if it starts to cup like a bowl, you may need to check your stitch count to ensure you aren’t missing any increases.
In the middle rounds of the face, we often switch to half-double crochets if we want a slightly larger motif without adding too many extra rows. This adds a nice texture to the crochet fabric and speeds up the process. During this stage of the Crochet Cat Head Motif – Tutorial, it is helpful to visualize where the eyes will eventually go, as this helps you maintain the symmetry of your stitches as the circle grows to its final diameter.
Once you reach the desired size—usually about 2 to 3 inches for a standard appliqué—you will perform a slip stitch to level off the round. This creates a clean “top” for the head where the ears will be attached. For those following this Crochet Cat Head Motif – Tutorial to make a larger item, like a potholder, you simply continue the increase pattern until you reach the necessary width before moving on to the ear section.
One of the best SEO-friendly crochet tips is to always count your stitches at the end of every round. Even one extra stitch can shift the placement of the ears later in the Crochet Cat Head Motif – Tutorial. A symmetrical base is the most important part of the project because it determines the overall balance of the cat’s expression. If the circle is perfect, the rest of the features will fall into place naturally.
Before moving to the next step, take a moment to weave in the starting tail from your magic ring. It is much easier to secure this now while the piece is flat. In this Crochet Cat Head Motif – Tutorial, we recommend weaving the tail in a circular motion at least twice to ensure that the center of the cat’s face never unravels, especially if the item will be frequently washed or handled.
3. Adding the Iconic Pointed Ears
The most defining feature of this Crochet Cat Head Motif – Tutorial is undoubtedly the ears. To create those signature feline points, we work directly into the edge of the finished circle. You will typically use a sequence of stitches with increasing heights, such as a single crochet, half-double, and double crochet, followed by a picot stitch or a chain-2 at the very peak to create a sharp point.
Symmetry is the biggest challenge when adding ears in a Crochet Cat Head Motif – Tutorial. You must ensure that there is an equal number of stitches between the two ears across the top of the head. A common mistake is placing them too close together, which can make the motif look more like a bear, or too far apart, which loses the “cat” identity. Using your stitch markers to plan the “start” and “stop” points of each ear is highly recommended.
For a more realistic look, some variations of the Crochet Cat Head Motif – Tutorial suggest working a “row 2” on the ears using a slightly smaller hook or a different color of yarn. This creates an inner ear effect that adds a wonderful 3D quality to your handmade appliqué. It is these small, thoughtful details that make your work stand out on social media platforms and craft marketplaces.
If you are making a flat motif, you will finish each ear by slip-stitching back down to the main head. However, if you want your ears to have a bit of a “curve,” you can work into the front loops only of the main head. This technique is a favorite among those who follow this Crochet Cat Head Motif – Tutorial because it creates a natural ridge that helps the ears stand upright without the need for stiffening agents.
Throughout this Crochet Cat Head Motif – Tutorial, remember that cats have many different ear shapes. For a “Scottish Fold” look, you could fold the tips down and secure them with a tiny stitch, or for a “Lynx” look, you could add small tufts of yarn to the points. Customizing the ears is the fastest way to change the character of your crochet project and make it truly unique to your style.
After both ears are completed, you should have a recognizable silhouette of a cat. Do not fasten off your yarn immediately; instead, consider working a round of slip stitches all the way around the entire head and ears. This “border” round hides any gaps between the ears and the head, giving your Crochet Cat Head Motif a clean, professional finish that is much easier to sew onto other fabrics.
4. Embroidering the Face and Finishing Touches
The final and most creative part of the Crochet Cat Head Motif – Tutorial is adding the facial features. This is where your cat gets its “soul.” We recommend starting with the nose, usually an inverted triangle made with pink or black embroidery floss placed right in the center of the circle. From the bottom point of the triangle, two curved lines can be stitched to create a classic “W” shaped cat mouth.
When it comes to the eyes, placement is everything. In this Crochet Cat Head Motif – Tutorial, we suggest placing the eyes on the same horizontal line as the top of the nose triangle, but spaced further apart. If you place them too high, the cat looks surprised; too low, and it looks like a kitten. If you are using yarn for the eyes, a French knot is a fantastic stitch to create a small, sparkling pupil effect.
Whiskers are the “finishing touch” that truly completes the Crochet Cat Head Motif – Tutorial. Use a very thin thread and make long, straight stitches coming out from the snout area. Two or three whiskers on each side are usually enough. The key here is to keep your stitches loose enough so they don’t pull on the crochet fabric, but tight enough that they stay straight and don’t snag during use.
If you want to add a bit of “blush” to your cat’s cheeks, you can use a small amount of actual pink makeup or a fabric marker. Gently dabbing a tiny bit of color just below the eyes adds a “kawaii” or “Chibi” charm to your handmade crochet motif. This technique is very popular in the amigurumi community and works perfectly for these flat appliqués as well.
Once the embroidery is finished, turn your Crochet Cat Head Motif over and securely knot all your thread ends. Since this is an appliqué, the back will be hidden, but you still want it to be neat so it doesn’t create a “lump” when sewn down. This Crochet Cat Head Motif – Tutorial emphasizes a clean finish so that your project looks as good from the side as it does from the front.
Finally, give your cat motif a light steam with an iron. This “sets” the stitches and ensures the ears are pointing exactly where you want them. You have now completed the Crochet Cat Head Motif – Tutorial! You can now use this adorable feline face as a patch, a keychain, or even join several together to make a whimsical cat-themed scarf. Your creativity is the only limit to how you use this versatile pattern.
FAQ – Frequently Asked Questions
1. What is the best yarn for a Crochet Cat Head Motif – Tutorial?
The best choice is mercerized cotton yarn (DK weight). It offers the best stitch definition and prevents the motif from becoming too fuzzy, which is important for seeing the facial details and the sharp points of the ears.
2. Can I make this motif 3D instead of flat?
Yes! To make a 3D version, simply crochet two identical heads using this Crochet Cat Head Motif – Tutorial, place them back-to-back, and sew them together while adding a small amount of polyester fiberfill before closing the final gap.
3. How do I make the cat’s eyes look more realistic?
Instead of a solid color, try using a small circle of green or yellow yarn and then embroidering a vertical black line in the center. This creates a “cat-eye” pupil that looks much more lifelike than a simple round dot.
4. Is this project suitable for beginners?
Absolutely. This Crochet Cat Head Motif – Tutorial focuses on basic stitches like single crochet and increasing. It’s a fantastic “first project” for someone learning to work in the round because it is small and provides instant gratification.
5. How do I attach the motif to a piece of clothing?
The best method is to use a whip stitch or a blanket stitch with a matching thread. Make sure to sew through the “border” slip stitches we added in step 3 to ensure the attachment is secure and the edges don’t curl up over time.
6. Can I use this pattern to make a dog instead?
While this is a Crochet Cat Head Motif – Tutorial, you can easily adapt it! To make a dog, simply change the pointed ears to long, floppy rectangles and add a slightly larger, rounder nose. The base circle technique remains exactly the same.
Conclusion
In this Crochet Cat Head Motif – Tutorial, we have journeyed through the entire process of creating a charming, feline-inspired appliqué. We started with selecting the best cotton yarns and hooks, moved into the geometry of the magic ring and circular base, and mastered the art of adding symmetrical pointed ears.
We also explored the delicate world of embroidery to add personality through eyes, noses, and whiskers. This project is a perfect example of how a few simple stitches can be transformed into a piece of art that brings joy to any garment or home accessory.