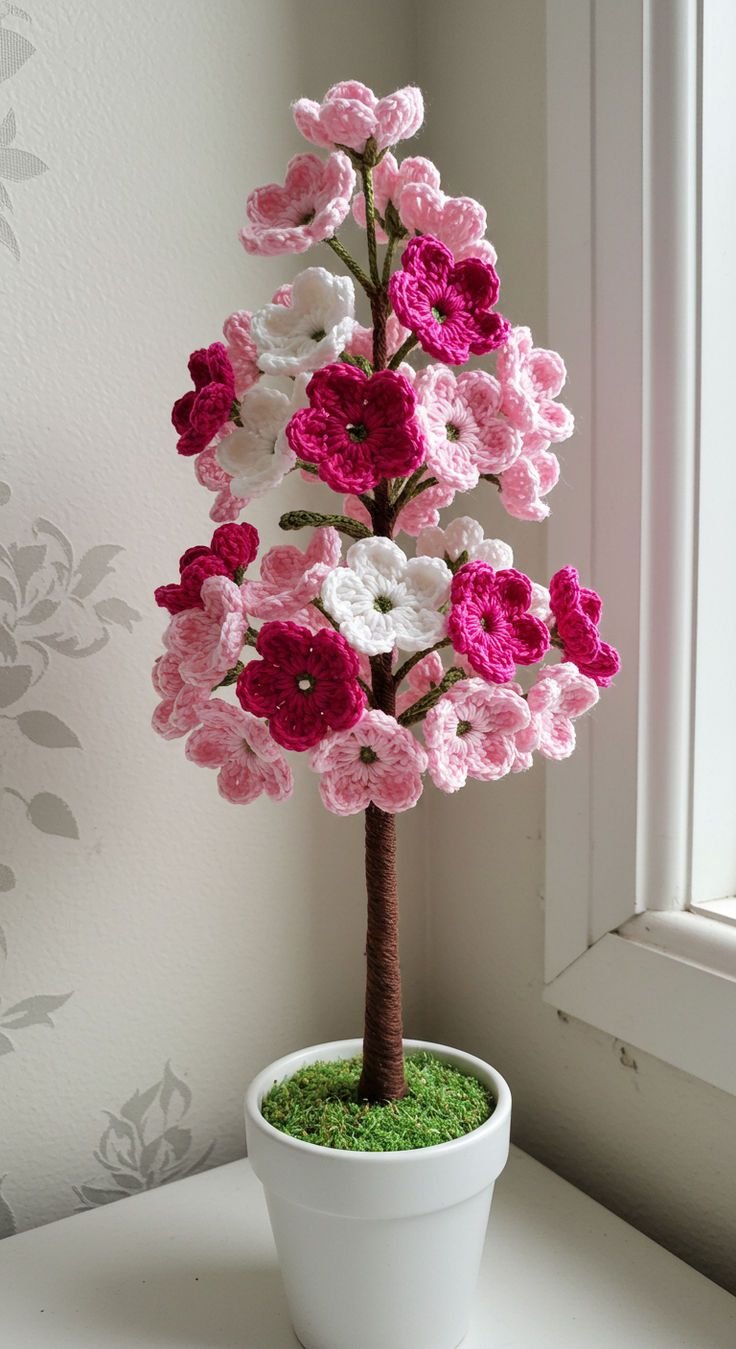
Have you ever gazed upon a majestic cherry blossom tree in full bloom, captivated by its fleeting beauty? Now, you can capture that magic and bring it into your home with your very own handcrafted Crochet Cherry Blossom Tree – Pattern. This detailed guide will walk you through the steps to create your own stunning miniature, a lasting tribute to the delicate elegance of the sakura.
Imagine the satisfaction of seeing your creation come to life, from tiny crocheted blossoms to a gracefully twisting trunk. This pattern offers a unique opportunity to combine your love for crochet with the timeless charm of cherry blossoms. Whether you’re an experienced crocheter looking for a new challenge or a beginner eager to learn, this project is sure to bring joy and a sense of accomplishment.
Join us on this creative journey as we delve into the world of Crochet Cherry Blossom Trees – Patterns. In this article, we’ll explore the essential materials, the step-by-step process of creating your own masterpiece, and the joy of personalizing your creation. Let’s begin crafting a miniature piece of nature’s artistry that you can cherish for years to come.
1. Essential Materials and Tools
Before you embark on your creative journey, it’s crucial to gather the necessary materials and tools. These items will form the foundation of your Crochet Cherry Blossom Tree – Pattern, ensuring that your creation is both beautiful and durable. Having everything on hand from the start will make the crafting process smoother and more enjoyable.
First and foremost, you’ll need a selection of high-quality yarns in various shades of pink and green, along with brown or grey for the trunk. The texture and weight of the yarn will significantly impact the final look and feel of your tree, so choose wisely. We recommend using a soft, cotton or wool blend yarn for a realistic and delicate finish.
In addition to yarn, a collection of crochet hooks in appropriate sizes will be essential. The specific sizes will depend on the weight of the yarn you choose. Make sure to have a few different sizes on hand to accommodate different parts of the pattern, such as the delicate blossoms and the sturdier branches.
You’ll also need a sharp pair of scissors for cutting yarn and trimming threads. A tapestry needle is crucial for weaving in loose ends and attaching different parts of the tree, ensuring a neat and polished look. Don’t forget a small amount of fiberfill stuffing for the trunk, giving it a soft and realistic shape.
A small terracotta pot or a decorative base will serve as the foundation for your tree. You can also add some floral wire to the branches for stability and to help shape them. Finally, a few tiny beads or sequins can be used to add a touch of sparkle and detail to your blossoms, making them truly unique.
By meticulously gathering all these essential materials and tools, you’ll be well-prepared to begin your Crochet Cherry Blossom Tree – Pattern with confidence. Each element plays a vital role in bringing your miniature masterpiece to life, so take the time to select the highest quality items for a truly exceptional result.
2. Crafting the Foundation: The Trunk and Branches
The foundation of your Crochet Cherry Blossom Tree – Pattern is the trunk and branches, which provide the structure and support for your delicate blossoms. This stage requires careful attention to detail and a touch of creativity to create a natural and organic look. Let’s delve into the steps involved in crafting this essential component.
To begin, you’ll start with the trunk, which is typically crocheted using brown or grey yarn. The pattern will guide you through creating a solid base, often using simple single or half-double crochet stitches. As you progress, you’ll gradually taper the trunk upwards, mimicking the shape of a real tree. Remember to stuff the trunk lightly with fiberfill to give it substance.
Once the main trunk is complete, it’s time to start adding the branches. These branches are typically crocheted directly onto the trunk, radiating outwards in a natural and balanced manner. The pattern will specify the length and placement of each branch, but you can also exercise your creativity to create a unique and personalized tree shape.
As you create each branch, you’ll notice how the tree begins to take shape, mirroring the intricate structure of a real cherry blossom tree. Don’t be afraid to experiment with different branch lengths and angles to achieve a natural and dynamic look. Remember, the key is to create a harmonious and visually appealing structure.
While crocheting the branches, you can incorporate floral wire for extra stability and to allow you to shape them according to your preference. This will ensure that your branches can hold the weight of the blossoms and maintain their form over time. Take your time to carefully manipulate the wire within the crocheted branches for a seamless finish.
As you near the completion of the trunk and branches, take a moment to admire your work. You’ve successfully built the framework for your Crochet Cherry Blossom Tree – Pattern, paving the way for the delicate blossoms that will soon adorn its branches. This foundation is a testament to your skill and dedication.
With the trunk and branches firmly in place, you’re now ready to transition to the next exciting phase: creating the delicate cherry blossoms that will truly bring your tree to life. This process requires patience and precision, but the final result is incredibly rewarding. Let’s explore the steps to create these intricate blooms.
3. Blossoming Beauty: Creating the Cherry Blossoms
The true magic of your Crochet Cherry Blossom Tree – Pattern lies in the delicate blossoms that will adorn its branches. Each tiny bloom is a work of art, contributing to the overall beauty and elegance of your creation. In this section, we’ll guide you through the process of creating these exquisite flowers.
To create the cherry blossoms, you’ll work with shades of pink yarn, meticulously following the pattern’s instructions. These blossoms typically involve a combination of simple crochet stitches, such as chain stitches, single crochet, and double crochet. The intricate pattern will carefully guide you through creating the delicate petals, giving each bloom its distinct and lifelike appearance.
As you meticulously crochet each blossom, you’ll notice the subtle variations in shape and size, mimicking the natural imperfections found in real flowers. This attention to detail adds to the realism and charm of your creation. Don’t be discouraged if your first few blossoms aren’t perfect – with practice, you’ll master the art of creating consistent and beautiful blooms.
Once you have a collection of crocheted blossoms, it’s time to attach them to the branches of your tree. This stage requires patience and precision, as you carefully position each bloom to create a visually pleasing and natural arrangement. The pattern will provide guidance on placement, but you can also exercise your creativity to achieve a balanced and harmonious look.
Use a tapestry needle and a small amount of matching yarn to securely attach each blossom to the branches. Make sure to weave in any loose ends carefully to ensure a neat and polished finish. As you add more blossoms, you’ll witness the transformation of your tree, from bare branches to a vibrant and blooming masterpiece.
With each blossom you add, your Crochet Cherry Blossom Tree – Pattern gains depth and character. The intricate details of each bloom come together to create a stunning visual impact, truly capturing the essence of a cherry blossom tree in full bloom. Take pride in your craftsmanship and enjoy the process of bringing this miniature wonder to life.
4. Adding Final Touches and Personalization
With the delicate blossoms carefully attached to your Crochet Cherry Blossom Tree – Pattern, it’s time to add the final touches that will truly make your creation unique. This stage allows you to infuse your personal style and creativity, transforming a generic pattern into a one-of-a-kind masterpiece. Let’s explore some ways to personalize your tree.
One of the easiest ways to add a personal touch is through the choice of yarn colors. While the classic pink and green is always a beautiful combination, don’t be afraid to experiment with different shades of pink, white, or even unexpected colors like lavender or light blue. This allows you to create a tree that complements your existing decor or reflects your personality.
Consider incorporating different textures into your creation. For example, you could use a fuzzy yarn for the leaves to create a more realistic effect, or add a touch of sparkle with metallic yarn for the blossoms. These small details can significantly impact the overall look and feel of your tree.
Adding tiny embellishments like beads, sequins, or even miniature birds can further personalize your Crochet Cherry Blossom Tree – Pattern. These delicate details add a touch of whimsy and charm, making your tree truly unique. Exercise your creativity and let your imagination run wild with different embellishments.
The choice of pot or base for your tree is another way to express your personal style. You can use a rustic terracotta pot, a sleek modern vase, or even a vintage teacup. Personalize the pot with paint, ribbons, or other decorative elements to match your aesthetic.
Consider the placement of your tree within your home. A windowsill, a bookshelf, or a coffee table are all great spots to display your miniature masterpiece. Ensure that the placement highlights the delicate details of your tree and brings joy to your space.
Finally, don’t forget to take pride in your creation. Each stitch, each bloom, and each personal touch represents your dedication and craftsmanship. Share your creation with friends and family, and enjoy the beauty and joy that your handcrafted Crochet Cherry Blossom Tree – Pattern brings to your life.
Frequently Asked Questions (FAQ)
1. Is this pattern suitable for beginners?
Yes, while some experience with basic crochet stitches is helpful, this pattern is designed with clear instructions and step-by-step guidance, making it accessible even for beginners. Start with the simpler elements and gradually work your way up to the more intricate details.
2. How long does it take to complete the Crochet Cherry Blossom Tree?
The completion time varies depending on your skill level and how much time you can dedicate to the project. Generally, it takes several hours to complete, spread over a few days or weeks. Enjoy the process and don’t rush through the steps.
3. Can I customize the size of the tree?
Absolutely! You can customize the size of your Crochet Cherry Blossom Tree – Pattern by adjusting the weight of the yarn and the size of the crochet hook. Experiment with different yarn and hook combinations to create a larger or smaller tree that fits your preference.
4. Where can I find the pattern for this tree?
You can find various Crochet Cherry Blossom Tree – Patterns online through crochet blogs, websites, and marketplaces like Etsy. Make sure to choose a pattern that aligns with your skill level and desired style.
5. What type of yarn is best for this project?
We recommend using a soft, cotton or wool blend yarn for the blossoms to achieve a delicate and realistic look. For the trunk and branches, a slightly sturdier acrylic or wool blend yarn in brown or grey is suitable.
6. Can I make this tree as a gift?
Yes, a handcrafted Crochet Cherry Blossom Tree makes a thoughtful and unique gift for friends and family. Personalize it with their favorite colors or add special touches to make it even more meaningful.
Conclusion
In this comprehensive guide, we’ve explored the enchanting world of crafting your very own Crochet Cherry Blossom Tree – Pattern. We’ve delved into the essential materials, the step-by-step process of creating the trunk and branches, the art of crafting delicate blossoms, and the joy of adding personal touches. By following these guidelines, you can create a unique and beautiful miniature masterpiece that captures the timeless elegance of the cherry blossom tree.
We hope this article has inspired you to embark on this creative journey and experience the satisfaction of bringing a piece of nature’s beauty to life with your own hands. Remember to take your time, enjoy the process, and let your creativity flourish. The finished tree will not only serve as a beautiful decoration but also as a symbol of your skill and dedication to the art of crochet.