If you’re looking for a cute and practical crochet project to brighten up your table, the Crochet Chick Coasters – Pattern is exactly what you need. These cheerful little coasters are not only functional but also a charming way to add personality to your home decor—especially around springtime or Easter.
With just a bit of yarn and creativity, you can craft these adorable chicks that bring smiles and protect your surfaces.The Crochet Chick Coasters – Pattern is perfect for beginners and seasoned crafters alike.
It’s a small project that’s easy to complete in one sitting, and it helps build confidence with basic crochet stitches. Best of all, it’s an eco-friendly alternative to disposable coasters and makes a lovely handmade gift for friends, family, or coworkers.
In this detailed guide, we’ll walk you through everything from materials to stitching techniques and finishing touches. Whether you’re creating them for your kitchen, a craft fair, or a seasonal centerpiece, this project is sure to become one of your favorites. Let’s dive into this delightful crochet adventure and bring some handmade joy to your table.
1. Materials You’ll Need for Crochet Chick Coasters
Before you begin working on the Crochet Chick Coasters – Pattern, it’s essential to gather all the necessary materials. Having the right supplies on hand makes the process smoother and more enjoyable, especially for beginners.
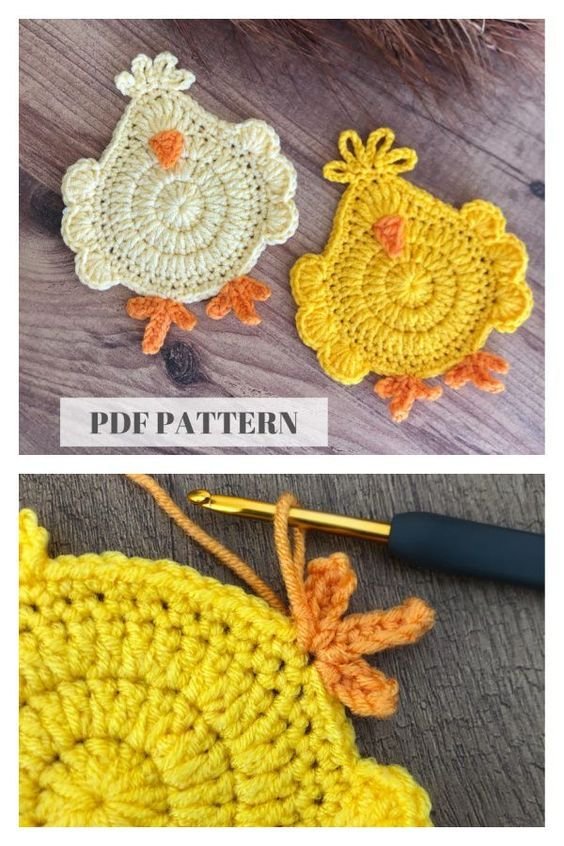
Start with worsted weight cotton yarn. Cotton is preferred because it’s absorbent and holds its shape well, making it ideal for coasters. You’ll need yellow for the chick’s body, orange for the beak and feet, and black or white for the eyes. You can also add a fun twist by using pastel or variegated yarn.
Use a 4.0 mm (G-6) or 4.5 mm crochet hook. This size helps create dense, flat stitches that provide the durability and structure needed for a coaster. A larger hook might make the piece too loose, while a smaller one could make it stiff.
A yarn needle is necessary for weaving in loose ends and sewing on facial features. Opt for a blunt-tip needle with a large eye to easily thread your yarn and avoid snagging the stitches.
You’ll also need scissors to cut yarn and trim excess ends. It’s helpful to keep a small, sharp pair in your craft bag for precision cutting.
For optional features like eyes, you can use black safety eyes or small black buttons. If you’re making the coaster for a child or want it to be completely flat, embroidered eyes using black yarn are a safer choice.
Finally, a stitch marker can be helpful if you’re working in rounds and want to keep track of the beginning of each round—especially useful if you’re new to crocheting in the round.
2. How to Crochet the Chick Coaster: Step-by-Step Instructions
Now that you have your supplies ready, let’s start crafting the Crochet Chick Coasters – Pattern. This pattern uses simple stitches like single crochet (sc), half double crochet (hdc), and slip stitch (sl st), making it perfect for any skill level.
Begin with a magic ring and work 6 single crochets into the ring. Pull it tight and join with a slip stitch. This forms the center of your coaster. You’ll now start working in rounds to build up the circular base of the chick’s body.
In each round, increase the number of stitches evenly. For example, Round 2 would have 2 single crochets in each stitch (12 total), Round 3 alternates 1 single crochet then 2 in the next stitch (18 total), and so on. Stop increasing when the diameter reaches about 4–5 inches.
To make the chick’s wings, work small oval shapes separately and sew them onto either side of the circle. These can be created by chaining a few stitches and working rows of sc and hdc to form a curved edge.
For the feet and beak, use orange yarn to make tiny triangles or “V” shapes. You can sew or crochet these directly onto the coaster using slip stitches. These details bring the chick to life, so have fun with their placement.
Create the eyes using either small black buttons, embroidered circles with black yarn, or even small pieces of felt sewn or glued in place. Adding white yarn specks in the eyes gives the chick a lively, animated expression.
Finally, weave in all loose ends securely and gently press your coaster flat using a warm iron and pressing cloth. This step helps your coaster look polished and lay flat on any surface.
3. Personalizing Your Chick Coasters
One of the joys of working with the Crochet Chick Coasters – Pattern is the opportunity to customize each one to reflect your personal style or match a seasonal theme. Personalization turns a simple project into a thoughtful gift or a memorable keepsake.
Play with color variations. While yellow is traditional for chicks, there’s no rule against pink, blue, green, or even rainbow chicks! Use variegated yarn for a marbled look or pastels for a soft, spring-themed aesthetic.
Add accessories like tiny bows, flowers, or hats made from leftover yarn. These fun touches make each chick coaster unique and are great if you’re making a set with different personalities.
You can embroider small initials or names on the back of each coaster to give as personalized gifts. This is especially charming for baby showers, Easter baskets, or party favors.
For holiday versions, consider turning your chick into a themed character. Add bunny ears for Easter, a witch hat for Halloween, or a Santa hat for Christmas. These seasonal versions are popular at craft fairs.
Mix and match shapes. Turn your basic chick round into an egg shape or a slightly oval base for a more whimsical design. Adjusting the stitch count slightly allows for easy reshaping.
If you’re selling your coasters, offer sets in different themes or colors. People love variety and often buy more when there’s a visible distinction between items in a set.
4. Common Mistakes to Avoid When Crocheting Coasters
Although the Crochet Chick Coasters – Pattern is beginner-friendly, there are a few common mistakes that can impact the final result. Recognizing and avoiding these will help ensure a clean, professional-looking finish.
Using the wrong yarn type is a common error. Cotton yarn is ideal for coasters due to its absorbency and heat resistance. Acrylic can look nice but may melt under hot cups or slide on smooth surfaces.
Ignoring gauge or stitch count can lead to coasters that are too large, too small, or uneven. While exact sizing isn’t critical, consistency is key if you’re making a set. Count your stitches each round to stay on track.
Loose stitching can make your coaster floppy or too porous to be effective. Keep your tension consistent and adjust your hook size if needed to ensure a tight, dense stitch pattern.
Forgetting to block or flatten your coaster after finishing is another common issue. Blocking helps the piece lay flat and gives it a finished, polished appearance. It’s an easy step that makes a big difference.
Overloading with embellishments may compromise the coaster’s functionality. While details like bows or eyes are cute, make sure they’re flat and securely attached so cups won’t tip or snag.
Finally, don’t skip weaving in your ends properly. If you leave them too short or don’t secure them, they may come undone after washing or with regular use. Take time to finish well—it’s worth it.
FAQ – Frequently Asked Questions
Q: What yarn is best for Crochet Chick Coasters?
A: Cotton yarn is the best option. It’s durable, absorbent, and won’t melt under heat, making it perfect for holding hot mugs and cups.
Q: Can beginners follow the Crochet Chick Coasters – Pattern?
A: Absolutely! This pattern uses basic stitches and techniques, making it ideal for beginners. Plus, it’s a small project, so it’s great for practice.
Q: Are these coasters washable?
A: Yes, especially if you use cotton yarn. You can hand wash or machine wash on a gentle cycle, then lay flat to dry for best results.
Q: How long does it take to make one chick coaster?
A: On average, it takes 30–45 minutes to complete one coaster, depending on your speed and the level of detail you add.
Q: Can I sell the coasters I make using this pattern?
A: Yes, handmade items made from free patterns are typically allowed for resale. Just be sure to credit the pattern if required and follow the designer’s terms.
Q: Can I make these coasters into appliqués or decorations?
A: Definitely! You can attach them to tote bags, pillows, or wall hangings, or even turn them into festive bunting for a spring-themed party.
Conclusion
Creating your own Crochet Chick Coasters – Pattern is a fun, creative, and rewarding way to combine functionality with charm. These little chicks bring warmth and joy to any table setting, and the simple pattern makes them accessible for beginners and enjoyable for experienced crocheters alike.
Whether you’re crafting for yourself, making seasonal decorations, or preparing gifts for loved ones, these coasters are sure to impress. With endless customization options, each coaster becomes a tiny work of art—and a practical one, too.