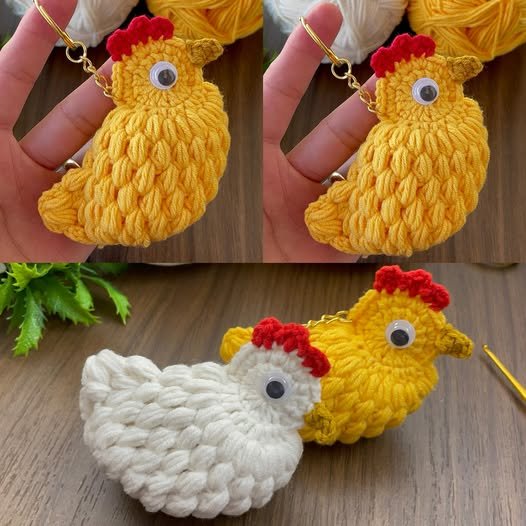
The crochet chick keychain is a delightful and fun project that has become increasingly popular among crafters.
This cute, miniature chick is perfect for adding a personal touch to your keys, bags, or accessories.
If you love working with crochet and enjoy creating small, adorable items, this crochet chick keychain is the ideal project for you.
Whether you’re an experienced crocheter or a beginner looking to try something new, this pattern is simple enough to follow while still yielding a charming result.
Creating a crochet chick keychain is a wonderful way to practice and refine your crochet skills. It requires a few basic crochet techniques, but the results are rewarding. By following the pattern, you can create a unique keychain that could make a perfect gift for friends and family, or simply as a fun accessory for yourself. In this article, we will go over everything you need to know to make your very own crochet chick keychain, from the materials you’ll need to the steps required to complete the project.
Whether you are crafting this project for Easter, a spring celebration, or simply because you enjoy crocheting small, cute items, this crochet pattern offers endless possibilities. With a little bit of yarn, a crochet hook, and some time, you’ll have a perfect little chick keychain that can brighten up any bag or set of keys.
1. Materials Needed for the Crochet Chick Keychain – Crochet Pattern
Before you start crocheting your crochet chick keychain, it’s important to gather all the necessary materials. While this is a relatively small and simple project, having the right supplies will ensure that you can create a neat and professional-looking keychain. Here’s what you’ll need to get started:
- Yarn: The main yarn you’ll need is a yellow yarn, as it will form the body of the chick. Choose a soft yarn like worsted weight yarn, which is comfortable to work with and gives the chick a nice texture. You can also use orange yarn for the beak and feet, and some black yarn for the eyes.
- Crochet Hook: A standard 3.5mm or 4mm crochet hook should work well for this pattern. If you prefer to use a larger or smaller hook, you can adjust accordingly, but make sure the yarn is compatible with the hook size you select.
- Safety Eyes: To give your chick character, use small black safety eyes. These are easy to attach and provide a professional look to your crochet chick keychain. If you don’t have safety eyes, you can also embroider the eyes using black thread.
- Polyester Fiberfill: This is used to stuff the chick and give it a nice rounded shape. It’s important to stuff your chick firmly, so it retains its shape and appears sturdy on your keychain.
- Keychain Ring: Finally, you’ll need a keychain ring or clasp. This is what will allow you to attach your finished chick to your keys, bag, or any other accessory.
Once you have gathered these materials, you’re ready to start crocheting your chick! The pattern itself is simple, and with these basic supplies, you’ll be able to bring this adorable little chick to life.
2. Step-by-Step Guide to Making the Crochet Chick Keychain
Now that you have all the necessary materials, it’s time to start crocheting your crochet chick keychain. The following steps will guide you through the process, from creating the chick’s body to attaching the keychain ring:
- Start with a Magic Ring: Begin by making a magic ring with your yellow yarn. This will form the center of the chick’s body. If you’re new to magic rings, simply wrap the yarn around your fingers, then pull through the loops to tighten the circle.
- Work in the Round: Crochet single crochet (sc) stitches into the magic ring. Continue working in the round, increasing your stitch count gradually to form the chick’s body. Typically, you’ll need to increase by adding two single crochet stitches into each stitch for the first few rounds.
- Shape the Body: As you continue to crochet, you’ll gradually decrease your stitches to help form the rounded shape of the chick. Make sure to stuff the chick with polyester fiberfill as you go to help it maintain its shape.
- Crochet the Beak and Feet: For the chick’s beak and feet, switch to orange yarn. The beak is usually a simple triangle shape made by crocheting a few rows of single crochet stitches and then decreasing the stitches at the tip. The feet are made in a similar manner, but slightly larger and with more rows.
- Attach the Eyes: If you are using safety eyes, attach them before finishing the chick’s body. Place them about halfway up the chick’s face, ensuring they are evenly spaced. If you’re embroidering the eyes, use black thread to stitch two small dots for the eyes.
- Finish and Attach the Keychain Ring: Once your chick is complete, attach the keychain ring to the top of the chick. You can crochet a small loop of yarn to create a hanger for the ring, or you can directly attach the ring to the top of the chick’s body.
Once you’ve completed these steps, your crochet chick keychain will be ready to use or give as a gift. The whole process can be completed in just a couple of hours, making it a quick and enjoyable project.
3. Tips and Tricks for Perfecting Your Crochet Chick Keychain
While making the crochet chick keychain is a relatively simple project, there are several tips and tricks that can help you achieve the best results. Here are some ideas to help you perfect your keychain:
- Keep the Tension Consistent: Consistent tension will give your chick a uniform look. If your stitches are too tight, the fabric will become stiff and difficult to work with. If the stitches are too loose, the chick may have holes where the stuffing shows through.
- Use Stitch Markers: When working in the round, it can be easy to lose track of where your rounds start and end. Use a stitch marker to mark the beginning of each round, so you don’t get confused.
- Stuff Lightly: Be careful not to overstuff your chick. If you pack it too tightly, it may become too stiff, making it difficult to sew on the keychain ring or make any necessary adjustments.
- Experiment with Colors: While the chick’s body is typically yellow, feel free to experiment with different color combinations. For example, you can make the chick’s body a different shade or add colorful yarn for the beak and feet.
- Add Extra Details: For an added personal touch, consider embellishing your chick with small crochet accessories like a bow or a tiny scarf. These additions can make your keychain even more special.
- Perfect Your Sewing: When attaching small pieces like the feet, beak, or eyes, be sure to sew them on securely. This will help ensure that your chick keychain is sturdy and can withstand regular use.
By following these tips, you can improve your crocheting technique and ensure that your crochet chick keychain turns out beautifully.
4. Why the Crochet Chick Keychain – Crochet Pattern is a Perfect Project
The crochet chick keychain is a perfect project for a variety of reasons. Whether you’re an experienced crocheter or just starting out, this small project allows you to practice essential crochet techniques, while creating a fun and functional item.
- Great for Beginners: If you’re new to crochet, the crochet chick keychain – crochet pattern is an excellent starting project. The simple stitches and small size make it easy to complete, and you’ll get immediate gratification from finishing it in a short time.
- Perfect Gift: The finished keychain makes a great gift for friends and family, especially during the spring and Easter season. It’s small, cute, and practical, making it a thoughtful present for anyone who loves crochet or enjoys cute accessories.
- Portable Project: Because of its small size, the crochet chick keychain is an ideal project for crocheting on the go. You can easily carry the materials in a small bag and work on it whenever you have free time, making it perfect for trips or commutes.
- Personalize It: One of the best things about this crochet pattern is how easily it can be personalized. You can change up the colors, add accessories, or even create a whole collection of different animals, making this a versatile pattern.
- Boosts Your Crochet Skills: Completing this project can help you refine your skills, particularly when it comes to working with small stitches and tight crochet. The more you practice, the more confident you’ll become in your abilities.
- Fun and Rewarding: Most importantly, the crochet chick keychain is just plain fun to make! The process of watching your chick come to life stitch by stitch is incredibly rewarding, and the finished product is something you can proudly display or use every day.
FAQ
1. What kind of yarn should I use for the crochet chick keychain?
For the crochet chick keychain, worsted weight yarn works best because it is easy to work with and gives the chick a good texture. You’ll need yellow for the body, orange for the beak and feet, and black for the eyes.
2. How long does it take to make a crochet chick keychain?
On average, it takes about 1-2 hours to complete a crochet chick keychain. The pattern is quick and simple, making it a perfect project for a few hours of crafting.
3. Can I make this pattern without a keychain ring?
Yes! While the keychain ring is what makes it functional as a keychain, you can easily skip this step if you just want to make a small crocheted chick for other purposes.
4. Is the crochet chick keychain pattern suitable for beginners?
Absolutely! The crochet chick keychain is a great project for beginners. It uses simple crochet techniques, and the small size makes it manageable even for those just starting to learn crochet.
5. Can I make other animals with the same pattern?
Yes! The crochet chick keychain pattern is very adaptable, and you can easily make other animals by changing the color and design of the features. Experiment with different colors and shapes to create a whole zoo of cute keychains!
6. How can I make my chick keychain stand out more?
You can add additional details like bows, scarves, or even crochet small flowers to give your crochet chick keychain a unique touch. Personalizing it with different colors or accessories makes each keychain special.
Conclusion
The crochet chick keychain – crochet pattern is a fun, quick, and adorable project that is perfect for crocheters of all skill levels. With a few simple materials and some basic crochet techniques, you can create a charming keychain that makes a wonderful gift or a personal accessory. From the magic ring to the final keychain attachment, each step of this process is an enjoyable and rewarding experience.
If you enjoyed this guide, please share your thoughts, ask questions, or leave any suggestions for future crochet projects. We’d love to hear your feedback and see how your crochet chick keychain turns out!