Creating a Crochet Chicken is a fun and creative project for anyone who loves crochet, whether you’re a beginner or an advanced crocheter.
This adorable crochet chicken can be used as a decorative piece for your home, a keychain, or even a toy for kids.
The beauty of this pattern lies in its simplicity, while still producing an impressive, realistic result. With a few basic crochet techniques and materials, you’ll be able to make a charming little chicken that will add a fun, handmade touch to any space or collection.
The Crochet Chicken – pattern typically uses basic crochet stitches, making it a perfect project for those who are new to crocheting. As you work through the pattern, you’ll learn how to create the distinct features of a chicken, such as its body, wings, comb, and beak. The flexibility of this pattern also allows you to use a variety of colors to make your chicken unique. From bright, cheerful yellow to a more muted color scheme, you have endless options for customization.
In this article, we will walk you through the entire process of crocheting a chicken using the Crochet Chicken – pattern. Whether you want to make a small, cute chicken for decoration or a larger one as a gift, we’ll provide you with step-by-step instructions, helpful tips, and creative ideas for customization. Let’s get started with the materials you’ll need for this project.
1. Materials Needed for the Crochet Chicken Pattern
Before you begin crocheting your chicken, it’s essential to gather the necessary materials. Here’s a list of everything you’ll need for the Crochet Chicken – pattern:
- Yarn: The main material for this project is yarn. For a classic chicken look, you’ll want to choose a soft yarn in colors like yellow, white, or orange. You’ll also need some red yarn for the comb and beak. The yarn weight should be medium (worsted weight) for the best results. This will provide structure while keeping your chicken soft and cuddly.
- Crochet Hook: Select the appropriate crochet hook size for your chosen yarn. For worsted weight yarn, a 4mm (G-6) or 5mm (H-8) crochet hook will work best. Check the yarn label for recommended hook sizes to ensure your stitches are tight enough to avoid gaps in your work.
- Polyester Fiberfill: To give your chicken a fluffy and three-dimensional appearance, you’ll need some polyester fiberfill or another stuffing material. This will help fill out the body and give it a soft, huggable texture.
- Yarn Needle: After completing your chicken, you’ll need a yarn needle to weave in the loose ends of yarn. It’s also useful for attaching the wings, comb, and beak to the body.
- Stitch Markers: Stitch markers are a helpful tool for keeping track of your rounds when working in the round, especially for beginners. These markers help prevent mistakes and make it easier to maintain consistent stitching.
- Scissors: A good pair of scissors is essential for cutting the yarn at the end of your project.
Once you have these materials ready, you’re set to start crocheting your own chicken using the Crochet Chicken – pattern!
2. Step-by-Step Guide to Crocheting the Chicken
Now that you have all your materials, let’s dive into the step-by-step guide to creating your crochet chicken. The process involves several stages, starting with the body and finishing with the beak and comb. Here’s how to make your crochet chicken:
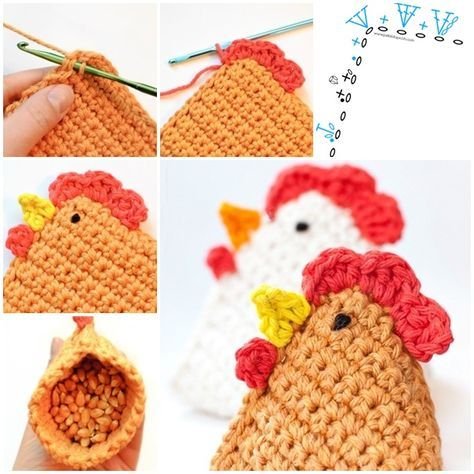
- Create the Body: Start by making a magic ring. Once the ring is complete, crochet six single crochet (sc) stitches into the ring. Continue working in the round, increasing the stitch count as you go to shape the body. Keep crocheting in a spiral until you reach the desired size for the chicken’s body.
- Shape the Head: After finishing the body, you’ll begin creating the head by working with a smaller stitch count. You can crochet the head separately and then attach it to the body once it’s finished. The head is worked in rounds, and you’ll want to make sure it’s proportionate to the body.
- Attach the Wings: The wings are made separately by crocheting two small pieces in the shape of ovals. Once you’ve completed both wings, you can sew them onto the body at the appropriate spots using your yarn needle.
- Make the Beak: To crochet the chicken’s beak, create a small triangle shape using a contrasting color, like orange. Sew the beak onto the front of the head, ensuring it is centered and facing outward.
- Add the Comb: The comb is the fleshy, red part on top of a chicken’s head. To make the comb, crochet a series of small stitches in red yarn and sew it onto the top of the head, following the natural shape of a comb.
- Stuff the Chicken: Once the head, wings, and other features are in place, gently stuff the chicken with polyester fiberfill to give it shape and dimension. Be sure not to overstuff, as you want your chicken to remain soft and flexible.
By following these steps, you’ll end up with a cute and cuddly crochet chicken that’s sure to impress! The process is simple and straightforward, making this project suitable for both beginners and experienced crocheters.
3. Tips for Perfecting Your Crochet Chicken
To ensure your Crochet Chicken – pattern turns out looking its best, here are some helpful tips to keep in mind as you crochet:
- Maintain Consistent Tension: One of the key factors in achieving a neat and professional-looking crochet piece is to maintain consistent tension. Try to keep your stitches even throughout the entire process for a smooth finish.
- Use a Stitch Marker: When working in the round, a stitch marker can be a lifesaver. It helps you keep track of your rounds, making it easier to follow the pattern and prevent mistakes.
- Adjust the Size of Your Chicken: If you want to make a larger or smaller chicken, you can adjust the size of the body and head by increasing or decreasing the number of stitches and rounds. You can also experiment with different yarn weights for different results.
- Add Detail with Embellishments: You can personalize your crochet chicken by adding extra details such as eyes, feathers, or small embellishments. Use different yarn colors to add interest and texture to your project.
- Use a Firm Stuffing: For a more defined shape, use a firm stuffing like polyester fiberfill to give your chicken structure. This will help maintain its shape and make it stand up more easily.
- Practice Makes Perfect: If you’re new to crocheting or to this pattern specifically, don’t be discouraged if your first chicken doesn’t turn out perfect. Crocheting takes practice, and with each attempt, you’ll improve your skills.
By following these tips, you can make sure your crochet chicken turns out exactly how you want it!
4. Creative Ideas for Using Your Crochet Chicken
Once you’ve completed your crochet chicken, there are countless ways you can use it! Here are some creative ideas for incorporating your finished chicken into various projects:
- Create a Farmyard Set: Make a collection of crochet animals, including cows, pigs, and sheep, to create your own crochet farmyard scene. Your chicken can be the star of the show!
- Add it to a Crochet Blanket: Incorporate the crochet chicken into a larger crochet project, such as a farm-themed blanket or a cute nursery throw. You can attach your chicken as an applique or make multiple chickens for a fun, colorful design.
- Make a Keychain: Turn your crochet chicken into a keychain by adding a keyring to it. It makes a fun and quirky accessory to carry around.
- Gift it as a Toy: Crochet chickens make great gifts for children. They’re soft, huggable, and can be used as toys for imaginative play.
- Decorate Your Home: Add a touch of rustic charm to your home by placing your crochet chicken on a mantel or bookshelf. It can also be part of a cute Easter or springtime display.
- Use it for Holiday Decorations: Crochet chickens can be a great addition to your seasonal décor. Place them around your home during holidays like Easter, or add them to your autumn-themed decorations for a fun farmyard vibe.
The crochet chicken is a versatile and charming creation that can be incorporated into countless projects. Let your imagination run wild and come up with your own creative ways to use your new crocheted friend!
FAQ
1. How long does it take to crochet a chicken? On average, it will take about 1 to 2 hours to crochet a simple chicken, depending on your experience and how quickly you work.
2. Can I use a different type of yarn? Yes, you can use any yarn that you like, but be sure to choose a yarn that is soft and easy to work with, such as worsted weight yarn, for the best results.
3. Can I make a larger crochet chicken? Absolutely! You can adjust the size of your crochet chicken by increasing the number of stitches or rounds. This will create a larger, more detailed chicken.
4. How do I make eyes for the chicken? You can crochet small black circles for the eyes, or you can use safety eyes for a more professional look. Alternatively, you could sew on fabric eyes for a unique touch.
5. What if my stitches are uneven? If you notice uneven stitches, try adjusting your tension or using a smaller crochet hook. If necessary, rip out the stitches and start again to ensure consistency.
6. How do I make the wings stand out? To make the wings stand out, you can make them slightly larger or add a different texture by using a different yarn. Sewing them on securely will also help them stay in place.
Conclusion
The Crochet Chicken – pattern is a simple yet charming project that brings a touch of rustic charm to your crochet collection. By following the easy-to-understand steps in this article, you can create your own crochet chicken that’s perfect for any occasion. Whether you plan to use it as a decorative piece, a toy, or a gift, this adorable crochet creation will surely be a hit! Don’t forget to leave a comment with your thoughts and suggestions – we’d love to hear from you!