If you’re looking for a quick, festive, and fun project this holiday season, the CROCHET CHRISTMAS TREE EARRINGS – PATTERN might just be your perfect pick. These adorable little accessories are not only easy to make but also bring a handmade charm to your holiday outfits. They’re lightweight, colorful, and customizable—making them ideal for gifting or wearing to parties and events.
What makes the CROCHET CHRISTMAS TREE EARRINGS – PATTERN so popular is its blend of creativity and practicality. With just a bit of yarn, a hook, and some jewelry findings, you can whip up a batch of tree-shaped earrings in no time. It’s a wonderful way to use up leftover yarn while crafting something unique and eye-catching.
In this article, we’ll walk you through everything you need to know: materials, basic steps, styling ideas, and variations to personalize your own crochet Christmas earrings. Whether you’re a crochet newbie or an experienced crafter, this tutorial will help you create wearable art that spreads holiday cheer.
1. Materials and Tools Needed
Before you begin your CROCHET CHRISTMAS TREE EARRINGS – PATTERN, it’s essential to gather the right materials. Because this is a small-scale project, you won’t need much—making it budget-friendly and beginner-accessible.
Start with lightweight cotton or acrylic yarn. Choose green for the tree base, but feel free to add sparkle with metallic yarns or variegated yarns that include reds, greens, or golds. Fine yarn works best to ensure your earrings are light and comfortable.
You’ll also need a small crochet hook, typically in the 2.0 mm to 3.5 mm range, depending on your yarn weight. The goal is to create tight stitches so your trees hold their shape well.
For hardware, purchase a few sets of earring hooks—also called fishhook findings. You’ll need jump rings to attach your crochet pieces to the hooks, and a pair of needle-nose pliers to open and close the rings securely.
Don’t forget embellishments! Tiny beads, miniature pom-poms, buttons, or star charms make adorable “ornaments” for your Christmas tree earrings. You can sew them on or attach them with glue, depending on your preference.
Lastly, keep a yarn needle on hand for weaving in ends and shaping the tree. A small pair of scissors will help tidy up any loose strands, and optional fabric stiffener or blocking can help your earrings stay perfectly shaped.
Once you’ve got everything ready, you’re just a few rows away from finishing your first festive pair!
2. Step-by-Step Instructions for the Pattern
Now that your materials are ready, it’s time to start crocheting your CROCHET CHRISTMAS TREE EARRINGS – PATTERN. The design can vary from simple to intricate, but we’ll walk through a beginner-friendly version that looks great and works up quickly.
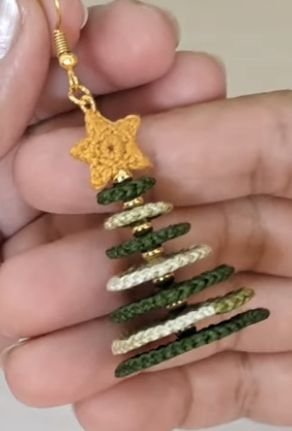
Start by creating a magic ring, which forms the base of your tree. Chain 1 or 2 to begin, then work several single crochets (sc) into the ring. This will serve as the top point of the tree. Pull the ring tight and fasten it.
Next, begin increasing your rows to form the tree’s triangular shape. For example, in the second row, work two single crochets into each stitch from the previous row. As you continue, alternate between single and double crochets to create texture.
Each new row will be slightly wider, mimicking the layered look of a real Christmas tree. You can stop at three or four rows, depending on how large you want the earrings to be. Typically, 1.5 to 2 inches tall is a great size for wearability.
Once your tree is complete, fasten off your yarn and weave in the ends neatly. If the piece curls or feels too soft, lightly block it or use a dab of fabric stiffener to firm it up.
To add decorations, sew or glue tiny beads along the rows, mimicking ornaments or garlands. A small yellow bead or star charm can serve as the tree topper, giving it that classic Christmas touch.
Finally, use your pliers to attach a jump ring to the top of the tree. Then attach the earring hook. Repeat the same steps to make your second earring, and just like that—you’ve finished your set!
3. Customizing Your Crochet Christmas Earrings
The real joy of the CROCHET CHRISTMAS TREE EARRINGS – PATTERN is how easily it can be personalized. From yarn choices to shape modifications, there’s so much room to make these earrings your own.
Experiment with color variations. While green is traditional, you could make white “snow-covered” trees, gold for a glam look, or multicolor stripes for something quirky and fun. Metallic threads add a sparkle that’s perfect for evening wear.
Try changing up the tree shape. A simple triangle works well, but you can also crochet a more detailed pine silhouette by using shell stitches or layering small scalloped rows.
Use different embellishments to suit your style. Sequins and glitter glue add shine, while felt appliqués or miniature bows offer a playful finish. You could even embroider tiny snowflakes with white thread for added detail.
Consider incorporating holiday themes beyond Christmas. Use the same base pattern to make other festive motifs like stars, snowmen, or even gift boxes with ribbon embroidery.
Play with the size and thickness by changing yarn weights. Lace or thread yarn creates a more delicate earring, while DK yarn gives a chunkier, cozier look.
Finally, you can use your tree motifs in other accessories. Turn them into brooches, keychains, bag charms, or even use them in garlands or ornaments. The versatility of this small pattern is part of its wide appeal.
4. Tips for Selling or Gifting Crochet Tree Earrings
If you’re thinking about turning your CROCHET CHRISTMAS TREE EARRINGS – PATTERN into a small business or gifting project, here are some tips to make them stand out and appeal to others.
First, focus on presentation. Package your earrings on custom earring cards with a holiday design. You can even print your business name or a festive message to make the gift feel extra special.
Offer variety in color and size to cater to different preferences. Not everyone loves bold green, so having some in white, silver, or pastel options gives your customers or recipients more to choose from.
Create sets or bundles. Combine your earrings with a matching necklace, bracelet, or holiday ornament. These small bundles make excellent stocking stuffers and gift sets.
Make sure your materials are skin-friendly. Opt for nickel-free or hypoallergenic earring hooks to avoid skin irritation, especially if you’re selling your creations at craft fairs or online.
Use social media and craft platforms like Etsy, Instagram, and Pinterest to showcase your work. High-quality photos of your crochet earrings on models or styled flat lays can draw attention and inspire potential customers.
Lastly, consider offering a DIY kit that includes the pattern, yarn, hooks, and findings. These are great for other crafters looking for a holiday activity and can also generate extra income from one single design.
FAQ – CROCHET CHRISTMAS TREE EARRINGS – PATTERN
Q1: Is this pattern suitable for beginners?
Yes, this CROCHET CHRISTMAS TREE EARRINGS – PATTERN is beginner-friendly. It uses basic stitches like single crochet and works up quickly with minimal materials.
Q2: What type of yarn is best for these earrings?
Lightweight cotton or acrylic yarn is ideal. Cotton provides better structure, while acrylic can add softness and variety in colors.
Q3: How long does it take to make one pair?
Typically, it takes about 30 to 45 minutes to complete a pair, making it a quick and satisfying project.
Q4: Can I wash the earrings?
Yes, but it’s best to spot clean gently by hand, especially if beads or glue are involved. Avoid soaking or machine washing.
Q5: Can I sell earrings made from this pattern?
Yes, handmade items from this pattern can be sold, especially at holiday markets and online. Just be sure to credit the original pattern designer if required.
Q6: Are these heavy to wear?
Not at all. When made with the right yarn and hook size, these earrings are lightweight and comfortable for all-day wear.
Conclusion
The CROCHET CHRISTMAS TREE EARRINGS – PATTERN is a delightful way to bring creativity, holiday cheer, and a personal touch to your accessories this season. From gathering materials and crocheting the base to adding your own unique style and finishing touches, this project offers both joy and satisfaction.
Whether you’re making them for yourself, gifting to loved ones, or selling at a craft fair, these festive earrings are sure to spread smiles and compliments. They’re fast, fun, and endlessly customizable—perfect for any crafter looking to make the season a bit more special.
We’d love to hear what you think! Have you tried this pattern? Do you have tips, color ideas, or custom designs to share? Leave a comment below
with your honest opinion and any suggestions—you just might inspire someone else’s next project!