Crochet collar – Pattern enthusiasts often find that a handmade accessory is the quickest way to elevate a standard outfit from ordinary to extraordinary. Whether you are looking to add a vintage touch to a simple sweater or want to create a statement piece for a formal dress, mastering the art of the crochet collar – pattern is a rewarding journey for any crafter. This timeless accessory has seen a massive resurgence in modern fashion, blending Victorian elegance with contemporary “cottagecore” aesthetics that dominate social media feeds today.
The beauty of working with a crochet collar – pattern lies in its versatility and the relatively small amount of yarn required to complete a project. Unlike full-sized garments, a crochet collar can often be finished in a single afternoon, making it an ideal gift or a satisfying “palette cleanser” between larger knitting or crocheting tasks. By selecting different weights of yarn, such as delicate lace weight or sturdier cotton, you can completely change the structural integrity and the “vibe” of the finished piece.
To ensure your project looks professional, it is essential to focus on stitch definition and tension. Using a crochet collar – pattern provides you with a blueprint for success, but your choice of crochet hook size and material will ultimately dictate how the fabric drapes around the neck. In this comprehensive guide, we will explore the essential techniques, materials, and stylistic choices that will help you create a stunning, high-quality crochet collar that looks like it came straight off a boutique shelf.
1 Understanding the Basics of a Crochet Collar – Pattern
Every successful project begins with a clear understanding of the crochet collar – pattern instructions and the terminology used within the craft. Most patterns will specify the gauge, which refers to the number of stitches and rows per inch; keeping your gauge consistent is vital so the collar fits comfortably around the neck without being too tight or overly loose. You should also familiarize yourself with the foundation chain, as this serves as the base for the entire structure of your crochet collar.
Choosing the right fiber is the next step in bringing your crochet collar – pattern to life. For a crisp, vintage look, mercerized cotton is highly recommended because it holds its shape well and offers a slight sheen that highlights intricate lacework. If you prefer a softer, more bohemian feel, a bamboo blend or a lightweight alpaca yarn can provide a beautiful drape that feels gentle against the skin throughout the day.
The crochet hook you select must complement your yarn choice to achieve the desired effect outlined in the crochet collar – pattern. Generally, a smaller hook creates a denser, more structured fabric, while a larger hook produces an airy, open-work design. Always check the pattern recommendations, but don’t be afraid to experiment with a swatch to see how the stitches interact with your specific hand tension and yarn brand.
In a standard crochet collar – pattern, you will encounter several basic stitches such as the double crochet (dc), treble crochet (tr), and the picot stitch. The picot stitch is particularly popular in collar designs because it creates those tiny, decorative points along the edge that give the piece a finished, professional appearance. Learning to read crochet charts can also be incredibly helpful, as many collar patterns use visual diagrams to show the repetition of lace motifs.
Shape is another critical element to consider when following a crochet collar – pattern. Some designs are Peter Pan collars, which are rounded and sit flat against the chest, while others might be mandarin style or even large, dramatic statement collars that extend over the shoulders. Understanding how increases work within the rows will help you manage how the collar flares out, ensuring it lies perfectly flat against your shoulders without bunching.
Finally, always remember that a crochet collar – pattern is a flexible guide that allows for personal expression. You can easily modify the length of the foundation chain to adjust the neck size or repeat certain rows to make the collar wider. This adaptability is what makes crochet such a beloved medium; you are not just following instructions, you are engineering a custom piece of wearable art tailored specifically to your measurements.
2 Essential Materials and Tools for Your Crochet Project
To begin your crochet collar – pattern, you need more than just yarn; you need a curated set of tools that ensure precision and ease of use. A high-quality ergonomic crochet hook can prevent hand fatigue, especially when working on the fine, repetitive movements required for lace patterns. Additionally, having a set of stitch markers is indispensable for keeping track of the beginning of rows or marking where specific lace repeats start and end.
The yarn weight is perhaps the most significant factor in how your crochet collar – pattern turns out. Most traditional patterns call for Size 10 crochet thread, which is thin and produces a delicate, heirloom-quality result. However, modern interpretations often use Sport weight or DK weight yarn for a bolder, more chunky look that pairs perfectly with denim jackets or casual t-shirts, proving that the crochet collar is a versatile accessory for any wardrobe.
Don’t forget the importance of blocking tools, which are often overlooked by beginners. After you finish the stitches of your crochet collar – pattern, the fabric might look a bit crumpled or uneven. Blocking mats, T-pins, and a steam iron (or spray bottle) are used to stretch and pin the collar into its final shape, allowing the lace motifs to open up and the edges to lie perfectly crisp and straight.
Fastenings are the “jewelry” of your crochet collar. While many crochet collar – pattern designs include a simple crochet tie made of chains, you might prefer a more polished look using buttons, pearls, or even a satin ribbon. If you choose a button, ensure you create a buttonhole during the crocheting process or leave a gap in the lace that is the appropriate size for your chosen closure.
A sharp pair of embroidery scissors and a tapestry needle (or yarn needle) are required for the finishing touches of your crochet collar – pattern. You will need to weave in your ends securely so that the collar can withstand washing and wear without unraveling. Using a needle with a large eye but a blunt tip ensures you can thread the yarn easily without splitting the delicate fibers of your finished crochet work.
Lastly, keeping a measuring tape nearby is crucial for checking your progress against the crochet collar – pattern specifications. You should measure the neck circumference frequently to ensure the piece fits the intended wearer. Having a dedicated project bag to keep all these tools together will ensure that your crochet collar journey remains organized and enjoyable from the first chain to the final stitch.
3 Step-by-Step Techniques for Intricate Lace Designs
When you dive into a crochet collar – pattern, you will often find that the “magic” happens in the lace repeats. To create those beautiful holes and patterns, you will use chain spaces (ch-sp) and skipped stitches. The key to a professional look is maintaining consistent tension so that every “window” in the lace is the same size, which creates a symmetrical and pleasing aesthetic across the entire crochet collar.
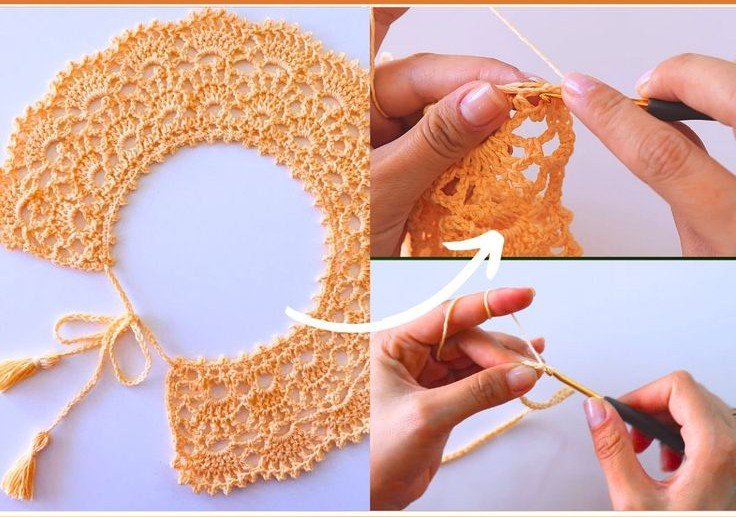
One popular technique used in many a crochet collar – pattern is the shell stitch. By working multiple long stitches (like double or triple crochets) into a single base stitch, you create a fan-like shape that mimics the curves of a flower petal. When these shells are stacked or staggered across rows, they create a wavy, feminine border that is synonymous with classic crochet collar designs found in vintage fashion magazines.
Another advanced but rewarding technique is Irish Crochet, which often features raised elements like crochet roses or leaves sewn onto a mesh background. While a basic crochet collar – pattern might be flat, incorporating textured stitches or post stitches (working around the stem of the stitch rather than the top) can add 3D depth to your accessory. This makes the crochet collar stand out as a piece of high-fashion couture.
The edging is where you can truly customize your crochet collar – pattern. Even if the main body of the collar is simple, a decorative border like crab stitch (reverse single crochet) or a row of fringe can change the entire dynamic. Many crafters like to add a contrasting color for the final row of their crochet collar to make the pattern “pop” and draw attention to the intricate handiwork involved.
Reading a crochet collar – pattern requires patience, especially when dealing with multi-row repeats. It is helpful to use a row counter or a mobile app to keep track of where you are. If you find yourself getting lost in the lace motifs, try placing a stitch marker at every 10th stitch; this simple trick makes it much easier to spot errors early on, saving you from having to “frog” (unravel) hours of hard work.
Finally, consider the joining technique if your crochet collar – pattern is made of individual motifs (like small stars or circles) rather than worked in continuous rows. You can use the join-as-you-go method, which connects the pieces while you crochet the final round of each motif, or you can sew them together at the end using a whip stitch. Both methods result in a beautiful, cohesive crochet collar that looks like a single piece of fabric.
4 Styling and Caring for Your Finished Crochet Collar
Once you have completed your crochet collar – pattern, knowing how to style it is the key to making it a staple in your wardrobe. A white lace collar looks stunning over a black crew-neck dress, creating a high-contrast, sophisticated look. For a more casual vibe, try wearing a colorful crochet collar over a simple t-shirt and jeans; the handmade texture adds a layer of “personality” that mass-produced clothing often lacks.
Because your crochet collar is a delicate, handmade item, proper care is essential to ensure it lasts for years. Always refer to the care instructions for the yarn you used in your crochet collar – pattern. Generally, hand-washing in cool water with a gentle wool wash is the safest method. Avoid wringing the collar, as this can distort the delicate lace stitches and ruin the structural integrity of the piece.
After washing, lay your crochet collar flat on a clean towel and gently press out excess water. To maintain the shape you worked so hard on during the crochet collar – pattern process, you should re-block the item periodically. Pinning it back into shape while damp and letting it air dry will “set” the stitches again, making the collar look brand new and crisp every time you wear it.
Storage is also an important consideration for your hand-crocheted accessories. Instead of hanging the crochet collar, which can cause it to stretch out over time due to gravity, store it flat in a drawer or a small box. If you used natural fibers like wool or cotton, placing a small lavender sachet nearby can help protect your crochet collar from moths while keeping it smelling fresh and clean.
If your crochet collar – pattern resulted in a very delicate piece, you might consider starching it. Using a fabric stiffener or a traditional starch spray can help the collar maintain its “stand-up” quality, which is particularly useful for Victorian-style collars or designs with large, dramatic points. This adds a level of formality to the piece, making it suitable for weddings, parties, or theatrical costumes.
Ultimately, the most important part of finishing your crochet collar – pattern is wearing it with confidence. Handmade fashion is a testament to your skill, patience, and creativity. Whether you are following a vintage pattern or a modern crochet design, your finished collar is a unique expression of your personal style. Share your work with the crochet community online to inspire others to take up this beautiful and rewarding craft.
FAQ – Frequently Asked Questions
1. What is the best yarn for a crochet collar – pattern?
The best yarn depends on the desired look. For a traditional, delicate appearance, use Size 10 crochet thread or Lace weight cotton. For a modern, chunky look, DK or Sport weight yarn works beautifully. Cotton is usually preferred because it offers excellent stitch definition and is easy to wash.
2. Is a crochet collar – pattern suitable for beginners?
Yes! Many crochet collar – patterns are designed specifically for beginners. Look for patterns that use basic stitches like single crochet, double crochet, and chains. Since the project is small, it is a great way to practice increasing and basic lace techniques without the commitment of a large garment.
3. How do I make sure the collar fits perfectly?
Before starting your crochet collar – pattern, measure the neck of the person who will wear it. You can adjust the size by adding or subtracting stitches from the foundation chain. Make sure to follow the pattern’s stitch multiple (e.g., “multiple of 6 + 1”) so the lace design remains symmetrical.
4. How long does it take to finish a crochet collar?
Depending on the complexity of the lace and your skill level, a crochet collar can take anywhere from 2 to 6 hours. It is an excellent “weekend project” that provides instant gratification compared to larger items like blankets or sweaters.
5. Can I add beads to my crochet collar – pattern?
Absolutely! Adding beads can make your crochet collar look incredibly elegant. You can thread the beads onto your yarn before you start and slide them into place as you work the stitches, or sew them on afterward once the crochet collar is complete.
6. Do I need to block my crochet collar every time I wash it?
To maintain the professional “boutique” look, it is highly recommended to block the collar after every wash. This ensures the lace motifs stay open and the edges don’t curl. However, if you prefer a softer, more “lived-in” look, you can simply lay it flat to dry.
Conclusion
In this article, we have explored the intricate and beautiful world of the crochet collar – pattern, covering everything from the basic stitches and essential tools to advanced lace techniques and styling tips.
We’ve learned that whether you use delicate cotton thread or modern wool blends, the key to a successful crochet collar lies in consistent tension, proper blocking, and a bit of creative flair. By following a well-structured pattern, you can create a timeless accessory that adds a touch of handmade elegance to any outfit.