This Crochet Cross-Tutorial is designed to help you create a timeless symbol of faith and beauty through the meditative art of yarn work. Whether you are looking to make a meaningful gift, a holiday ornament, or a delicate bookmark, learning how to master a Crochet Cross-Tutorial is a rewarding journey for crafters of all skill levels. By following this guide, you will learn how to combine basic stitches into a structured, elegant form that carries deep personal significance.
The beauty of a Crochet Cross-Tutorial lies in its versatility and the way it allows for creative expression through different yarn weights and hook sizes. From tiny, intricate lace designs using thread crochet to larger, sturdier versions made with worsted weight cotton, the possibilities are endless. In this article, we will break down the essential techniques, materials, and steps needed to ensure your finished project looks professional and holds its shape for years to come.
Understanding the fundamentals of a Crochet Cross-Tutorial requires patience and a focus on stitch consistency. Before we dive into the specific steps, it is important to gather high-quality materials, such as mercerized cotton yarn, which provides excellent definition for the chains, single crochets, and double crochets that form the arms of the cross. Let’s explore the detailed process of bringing this spiritual and artistic project to life.
1. Essential Materials for Your Crochet Cross-Tutorial
To begin your Crochet Cross-Tutorial, the most critical choice you will make is your fiber content. Most experts recommend using a size 10 crochet thread or a fingering weight cotton yarn because these materials don’t stretch easily, ensuring your cross maintains its crisp, geometric lines. If you are a beginner, a slightly thicker DK weight yarn might be easier to handle as you learn the placement of each stitch.
Your crochet hook size must correspond directly to the yarn you’ve chosen to achieve the right gauge. For thread, a 1.5mm to 2.25mm steel hook is standard, whereas for thicker yarns, a 3.5mm (E) hook works wonders. Using a hook that is slightly smaller than what the yarn label suggests can help create a tight tension, which is vital for preventing the filling or gaps from appearing in your Crochet Cross-Tutorial.
Beyond the yarn and hook, you will need a few basic notions to finish the job correctly. A sharp pair of craft scissors and a tapestry needle (or yarn needle) are essential for weaving in your ends securely. Since a cross has specific angles, having stitch markers on hand can help you identify where the “arms” of the cross begin, ensuring your symmetry is perfect.
Don’t forget the importance of stiffening agents if you plan to hang your cross. Many crafters use a mixture of white glue and water or a commercial fabric stiffener to give the finished piece a wood-like rigidity. This is a secret tip often mentioned in any professional Crochet Cross-Tutorial to ensure the lace doesn’t flop or curl over time.
Lighting and ergonomics also play a role in your success. Because crochet crosses often involve fine details, working in a well-lit area will reduce eye strain. Using an ergonomic crochet hook can prevent hand fatigue, allowing you to focus on the intricate slip stitches and picots that often decorate the edges of a high-quality Crochet Cross-Tutorial design.
Lastly, keep a measuring tape nearby. While the exact size of your cross is a matter of personal preference, maintaining a consistent stitch count is what separates a homemade look from a professional-grade heirloom. By preparing these materials in advance, you set yourself up for a smooth and enjoyable crafting experience as you follow along with this Crochet Cross-Tutorial.
2. Mastering the Basic Stitches and Techniques
The heart of every Crochet Cross-Tutorial is the foundation chain. This initial row of loops determines the height of your cross. You will typically start by creating a slip knot and chaining a specific number of stitches. Accuracy here is paramount; if your foundation chain is too loose, the base of your cross will look sloppy, so aim for a uniform tension.
Once your chain is ready, the single crochet (sc) and double crochet (dc) become the building blocks of the structure. In a standard Crochet Cross-Tutorial, the vertical bar is worked first, often using turning chains to transition between rows. Learning how to identify the front loop and back loop of your stitches will allow you to add texture and depth to the piece.
The “arms” of the cross require a technique called increasing or simply joining new yarn to the sides of the vertical bar. In this Crochet Cross-Tutorial, we emphasize the importance of the slip stitch join. This method allows you to add the horizontal elements seamlessly without creating bulky knots that might ruin the aesthetic appeal of your finished religious symbol.
Another advanced technique used in a Crochet Cross-Tutorial is the picot stitch. This creates a small, decorative point on the tips of the cross, giving it a gothic or vintage look. To make a picot, you usually chain three and then slip stitch into the first chain. It’s a simple addition that elevates the entire handmade project to something much more sophisticated.
Managing your yarn tension is perhaps the most “human” element of the craft. If you are stressed, your stitches will be tight; if you are relaxed, they may be too loose. A good Crochet Cross-Tutorial encourages you to take breaks and check that your mid-section of the cross isn’t bowing. Consistency is what creates that beautiful, flat surface ideal for blocking.
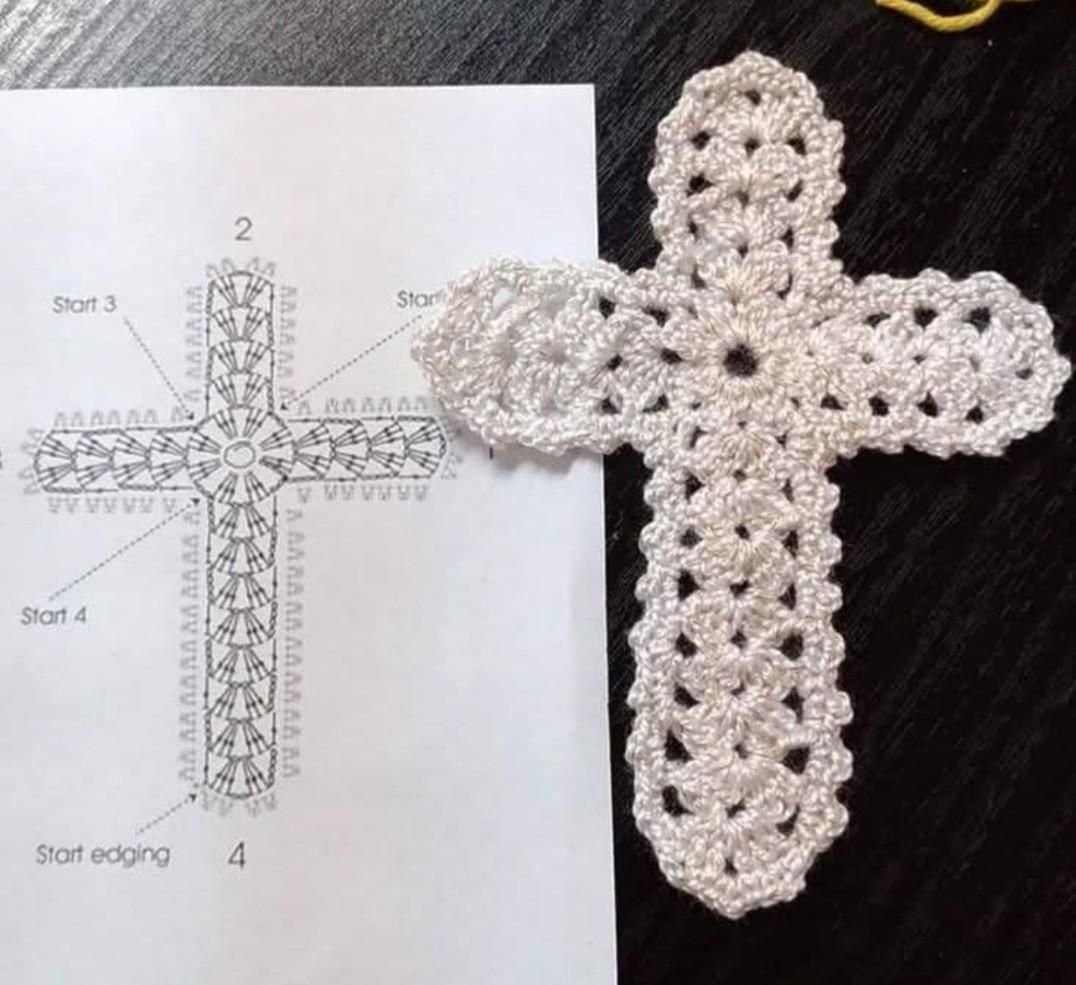
Finally, understanding how to read a crochet pattern or symbol chart is a massive advantage. Many Crochet Cross-Tutorial resources use abbreviations like ch (chain), st (stitch), and sl st (slip stitch). Familiarizing yourself with these standardized terms ensures that you can follow any variation of the cross, from a simple Latin cross to an ornate Celtic design.
3. Step-by-Step Construction of the Cross Body
To begin the actual construction in this Crochet Cross-Tutorial, you will work the long vertical piece first. Start by chaining 21. Turn and work a double crochet into the fourth chain from the hook. This creates the bottom “foot” of the cross. Continue working dc stitches across, ensuring you don’t skip any chains, as this would cause the cross to lean.
After completing about six rows of the vertical bar, it is time to create the horizontal span. In this Crochet Cross-Tutorial, we use the side-join method. Fasten off your yarn and count five stitches down from the top. Reattach your yarn with a slip stitch and chain 8. This creates the first arm. You will then work back across the main body to create the second arm on the opposite side.
The intersection where the arms meet the body is the most critical point of the Crochet Cross-Tutorial. To ensure stability, use cluster stitches or work multiple stitches into the same space to fill the “bridge.” This prevents a hole from forming in the center of the cross. A well-constructed center is the hallmark of a high-quality crochet lace piece.
Once the arms are established, you will work one or two rows of half-double crochets (hdc) around the entire perimeter. This “border” row acts as a frame for your Crochet Cross-Tutorial project. It smooths out any jagged edges from the row ends and provides a clean edge for you to add decorative shells or fringe if you desire a more ornate look.
As you reach the corners of the arms, you must perform corner increases (usually three stitches into one corner space). This prevents the corners from curling inward. A common mistake in a Crochet Cross-Tutorial is neglecting these corners, which results in a rounded, circular shape rather than a sharp, defined cross shape. Keep your edges crisp for the best result.
The final step in the body construction is the fastening off process. Cut your yarn, leaving a 6-inch tail. Pull the tail through the last loop to secure it. In this Crochet Cross-Tutorial, we recommend using a invisible join technique for the final stitch to make the start and end points completely indistinguishable to the naked eye.
4. Finishing Touches and Blocking Your Work
No Crochet Cross-Tutorial is complete without the blocking process. Blocking is the act of wetting your crochet piece and pinning it into the desired shape while it dries. Because crochet stitches are flexible, your cross might look a bit “wonky” right off the hook. Using stainless steel pins and a foam blocking mat, stretch the arms and vertical bar until they are perfectly straight.
For those who want a permanent, stiff result, this Crochet Cross-Tutorial suggests a stiffening bath. Submerge your cross in a mixture of equal parts water and liquid starch. Squeeze out the excess gently—never wring the fabric, as this distorts the delicate fibers. Lay it flat on a piece of plastic wrap, pin it into shape, and let it air dry for at least 24 hours.
Once dry, your cross will be rigid and hold its form beautifully. You can now add embellishments. Some crafters like to sew a small pearl or bead into the center of the cross for extra elegance. Others might use a metallic thread to surface-stitch a border, adding a shimmering effect that catches the light, a popular tip in many Crochet Cross-Tutorial circles.
Attaching a hanging loop is the next step if you intend for this to be an ornament. Simply join your yarn at the top center of the cross, chain 15, and slip stitch back into the same space. This creates a sturdy loop. If you are using the piece as a bookmark, you might prefer to leave the top plain and add a tassel to the bottom for a classic look.
Maintenance of your handmade crochet item is also important. If the cross becomes dusty, a light puff of cool air or a very gentle dabbing with a damp cloth is all it needs. Avoid high heat or washing machines, as these will destroy the stiffening agent and the stitch definition you worked so hard to achieve in this Crochet Cross-Tutorial.
Finally, take a moment to admire your work. You have transitioned from a simple ball of string to a beautiful, geometric piece of art. Sharing your progress on social media using hashtags like #CrochetCross or #YarnArt can connect you with a community of makers. We hope this Crochet Cross-Tutorial has inspired you to continue exploring the limitless world of crochet patterns.
FAQ – Frequently Asked Questions
What is the best yarn for a crochet cross?
The best yarn is usually mercerized cotton (size 10 thread). It has a beautiful sheen, excellent stitch definition, and does not pill or stretch, which is essential for maintaining the cross’s shape.
How do I make my crochet cross stiff?
You can use commercial fabric stiffener, a sugar-water solution, or a mix of white glue and water. Apply the solution, pin the cross to a board in the correct shape, and let it dry completely.
Can a beginner follow this Crochet Cross-Tutorial?
Yes! While it looks intricate, a cross is mostly made of basic stitches like chains and double crochets. The key is to take it slow and count your stitches carefully to maintain symmetry.
How long does it take to crochet a cross?
Depending on your speed and the complexity of the pattern, a simple cross can take anywhere from 30 minutes to two hours. Adding decorative borders or blocking will add to the total time.
What can I use a crochet cross for?
These are popular as Baptism gifts, Easter decorations, Christmas tree ornaments, or bookmarks. They can also be framed as wall art or used as motifs for larger crochet blankets.
Conclusion
In this Crochet Cross-Tutorial, we have covered everything from selecting the perfect cotton thread to the final blocking and stiffening techniques. We explored the essential crochet stitches like the double crochet and the picot, and we learned how to construct a balanced, symmetrical form that stands the test of time. By focusing on tension and quality materials, you have created a piece that is both a work of art and a symbol of devotion.
Whether you made this for yourself or as a gift for a loved one, the effort put into each stitch reflects the care and heart of a true artisan. We hope this guide has been clear and helpful for your crafting journey.