The Crochet Daisy Coaster – Tutorial is the perfect weekend project for anyone looking to add a touch of handmade charm to their home decor. These cheerful accessories are more than just functional items; they bring a bright, floral aesthetic to your coffee table while protecting your surfaces from moisture. Learning how to create a Crochet Daisy Coaster – Tutorial is a rewarding experience because the results are instantaneous, making them excellent gifts for friends or inventory for your craft stall.
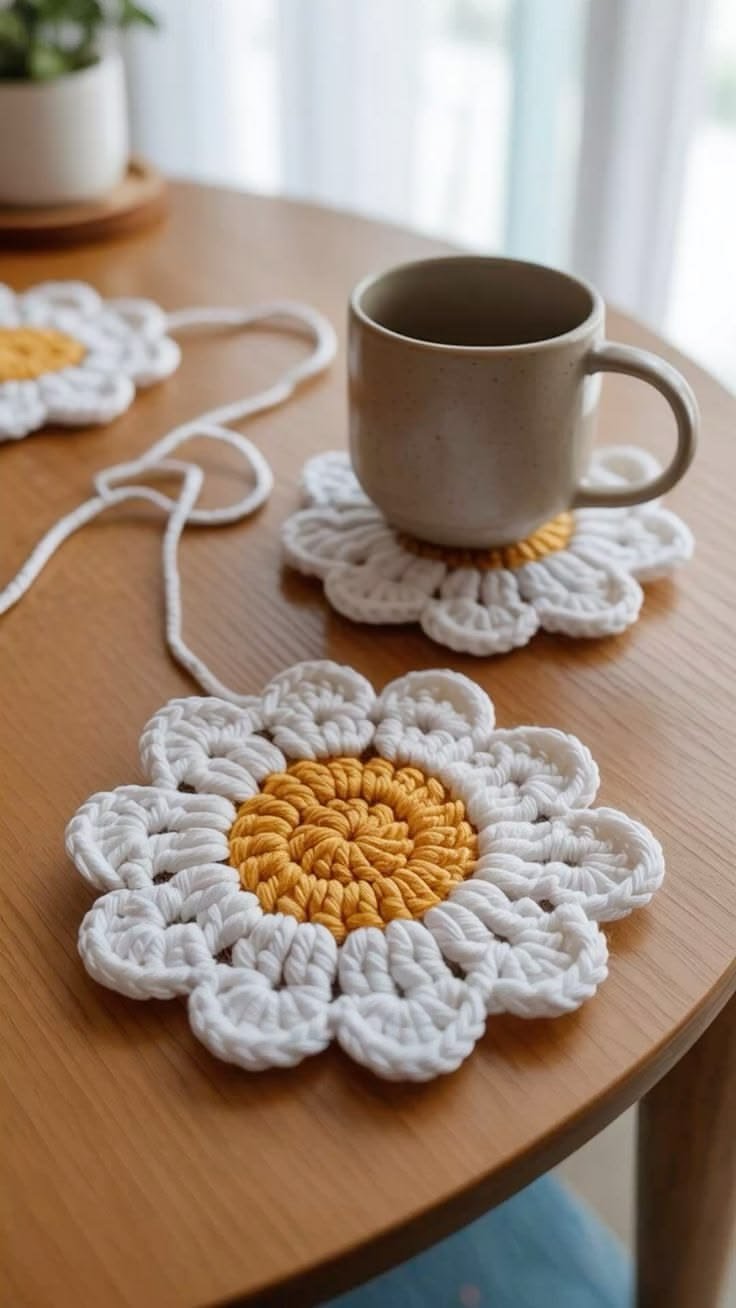
When you dive into a Crochet Daisy Coaster – Tutorial, you are engaging in a mindful activity that combines basic stitches with beautiful color transitions. Whether you prefer a classic white and yellow daisy or a more bohemian palette with muted tones, the versatility of this pattern is unmatched. Using a Crochet Daisy Coaster – Tutorial allows you to practice working in the round and mastering the puff stitch or cluster stitch, which gives the flower its signature 3D texture.
Quality and durability are key when making household items, so following a structured Crochet Daisy Coaster – Tutorial ensures your finished product is flat and sturdy. Cotton yarn is typically the preferred choice for this project due to its absorbency and heat resistance. By mastering this Crochet Daisy Coaster – Tutorial, you will gain the confidence to explore more complex floral motifs and expand your repertoire of functional crochet art.
1. Choosing Materials for Your Crochet Daisy Coaster – Tutorial
Selecting the right supplies is the foundational step of any successful Crochet Daisy Coaster – Tutorial. For the best results, look for 100% mercerized cotton yarn in medium weight (worsted or DK). This type of yarn provides excellent stitch definition and ensures your daisy petals remain crisp and defined even after multiple washes.
You will also need a crochet hook that matches your yarn weight, typically ranging from 3.5mm to 4.5mm (G hook). Using a slightly smaller hook than recommended on the yarn label can help create a tight tension, which is vital for coasters so they don’t allow liquid to seep through the gaps.
Color selection is where your Crochet Daisy Coaster – Tutorial truly comes to life. You will need a vibrant yellow for the flower center and a contrasting color, usually white or cream, for the outer petals. Having a pair of sharp embroidery scissors and a yarn needle nearby will make finishing your project much smoother.
Stitch markers can be incredibly helpful during this Crochet Daisy Coaster – Tutorial, especially for beginners. Since you will be working in a circle, marking the first stitch of each round prevents confusion and ensures your flower stays symmetrical. This simple step saves time and avoids the frustration of frogging your work.
Don’t forget the importance of a flat work surface and good lighting when following a Crochet Daisy Coaster – Tutorial. Being able to clearly see your stitch placement in the center ring ensures that the subsequent rounds of petals are evenly spaced. Preparation is half the battle in creating a professional-looking handmade coaster.
Finally, consider the environment where you will use your Crochet Daisy Coaster – Tutorial creations. If they are intended for outdoor use, choosing UV-resistant cotton can help maintain the brightness of your colors. Once you have your yarn, hook, and notions ready, you are prepared to begin the actual stitching process.
2. Master the Center and Petal Stitches
The core of this Crochet Daisy Coaster – Tutorial begins with the magic ring or a small chain loop. The magic ring is often preferred because it allows you to pull the center tight, leaving no hole in the middle of your flower. Inside this ring, you will typically work 12 double crochet stitches to form the golden heart of the daisy.
After finishing the center, the next phase of the Crochet Daisy Coaster – Tutorial involves joining your petal color. This is usually done with a slip stitch into any of the stitches from the first round. Creating the petals often requires cluster stitches or puff stitches, which give the coaster its lovely floral volume and soft feel.
To create a classic petal in this Crochet Daisy Coaster – Tutorial, you might use a combination of treble crochets and chain spaces. This creates a “loop” effect that mimics the delicate shape of a real daisy. Ensure your tension is consistent across all petals so the coaster lies perfectly flat on your table.
The Crochet Daisy Coaster – Tutorial emphasizes the importance of the “join” at the end of the petal round. A seamless join or an invisible finish is the secret to a high-end look. By pulling the yarn through the first petal’s top, you hide the start and end points of your work, making the floral design appear continuous.
If your coaster starts to “bowl” or curve upwards, this Crochet Daisy Coaster – Tutorial suggests checking your stitch count. Every petal must have the exact same number of stitches to maintain a circular geometry. Adding an extra chain between petals can sometimes help the piece lay flatter if your crochet style is naturally tight.
Throughout the Crochet Daisy Coaster – Tutorial, remember that the “wrong side” of the work should be kept neat. As you switch colors from the center to the petals, weaving in ends as you go is a great habit. This ensures that once the final stitch is made, your crochet project is nearly ready for use.
3. SEO Tips for Crafting Bloggers and Creators
If you are sharing your own Crochet Daisy Coaster – Tutorial online, understanding Search Engine Optimization is crucial. Use high-quality images with descriptive alt-text that includes your primary keywords. This helps search engines understand that your content is a valuable resource for people looking for a free crochet pattern.
Structure your Crochet Daisy Coaster – Tutorial with clear headings, just like this article. Search engines favor content that is easy to read and navigate. Including a step-by-step guide with bullet points can improve your “time on page” metric, as users will stay longer to follow the technical instructions of the crochet project.
Internal linking is another powerful strategy for your Crochet Daisy Coaster – Tutorial. Link to your other related posts, such as a crochet flower guide or a beginner’s hook size chart. This creates a web of information that establishes your authority in the fiber arts niche and keeps readers engaged with your brand.
Keywords like “easy crochet tutorial,” “handmade home decor,” and “cotton yarn projects” should be naturally integrated into your Crochet Daisy Coaster – Tutorial. Avoid keyword stuffing; instead, write for humans first and search engines second. A humanized tone builds trust with your audience, which is a key factor for Google AdSense approval.
Don’t overlook the power of video content within your Crochet Daisy Coaster – Tutorial. A short clip demonstrating the trickier stitches can significantly boost engagement. Even if you prefer writing, adding a video tutorial link or embed makes your article a multi-sensory learning tool for different types of crafters.
Lastly, ensure your Crochet Daisy Coaster – Tutorial is mobile-friendly. Most crafters look at patterns on their phones or tablets while they work. Fast loading speeds and responsive design are essential for a good user experience, which ultimately leads to higher rankings and more organic traffic to your blog.
4. Care and Customization of Your Finished Coasters
Once you have completed the Crochet Daisy Coaster – Tutorial, knowing how to care for your items will keep them looking new. Since they are made of cotton, they can usually be machine washed on a gentle cycle. However, hand washing in cool water and laying them flat to dry is the best way to preserve the flower’s shape.
Blocking is a professional tip often mentioned in a Crochet Daisy Coaster – Tutorial. By pinning your damp coaster into a perfect circle and letting it dry, you set the stitches in place. This gives the daisy petals a uniform look and ensures the center is perfectly centered, elevating the handmade quality.
Customization is the most exciting part of the Crochet Daisy Coaster – Tutorial. You aren’t limited to white and yellow! Try making a “Sunken Treasure” daisy with teal petals and a bronze center, or a “Midnight Bloom” with purple and black. Changing the yarn texture to a fuzzy alpaca blend can also turn a coaster into a decorative appliqué.
You can also scale this Crochet Daisy Coaster – Tutorial to create larger items. By using a thicker yarn and a larger hook, the same pattern can become a trivet for hot pots or even a decorative place mat. The logic of the stitches remains the same, proving how versatile a simple crochet pattern can be.
For those who enjoy selling their crafts, the Crochet Daisy Coaster – Tutorial provides a high-margin item. Packaging them in sets of four with a simple twine ribbon creates an irresistible gift set. Adding a small “Handmade with Love” tag adds a personal touch that buyers in the craft community truly appreciate.
We hope this Crochet Daisy Coaster – Tutorial inspires you to pick up your hook and start creating. The beauty of crochet is that every stitch is a reflection of your creativity. Whether you are a seasoned pro or a total beginner, making a daisy coaster is a joyful way to spend your time and improve your crochet skills.
FAQ – Frequently Asked Questions
What is the best yarn for a Crochet Daisy Coaster – Tutorial?
The best choice is 100% cotton yarn. Cotton is absorbent, which is necessary for a coaster to pick up condensation from drinks. It also handles heat well and maintains its shape better than acrylic yarn, which can stretch or melt if a hot mug is placed on it.
How long does it take to finish one coaster?
For most intermediate crafters, a single coaster from this Crochet Daisy Coaster – Tutorial takes about 20 to 30 minutes. Beginners might take up to an hour as they learn the petal stitch placement and color changes. It is a very fast and satisfying project!
Can I use this pattern to make a blanket?
Yes! You can use the Crochet Daisy Coaster – Tutorial as a “motif.” By making many individual daisies and joining them together using a join-as-you-go technique or sewing them with a yarn needle, you can create a stunning and colorful floral throw blanket.
Why is my coaster curling at the edges?
Curling usually happens if your tension is too tight or if you missed a few increase stitches in the rounds. To fix this, try using a slightly larger hook or ensure you are adding the correct number of chains between petals as instructed in the Crochet Daisy Coaster – Tutorial.
Is this project suitable for absolute beginners?
Absolutely. This Crochet Daisy Coaster – Tutorial uses basic stitches like the double crochet and slip stitch. While the petal clusters might require a little practice, it is an excellent way for beginners to transition from working in rows to working in the round.
Conclusion
In this Crochet Daisy Coaster – Tutorial, we have covered everything from selecting the perfect cotton yarn to mastering the intricate petal stitches that give the daisy its iconic look.
We explored how to optimize your craft projects for the web and how to properly care for your finished handmade accessories. By following these steps, you now have the knowledge to create beautiful, functional pieces of art that bring a sense of nature and warmth into any living space.