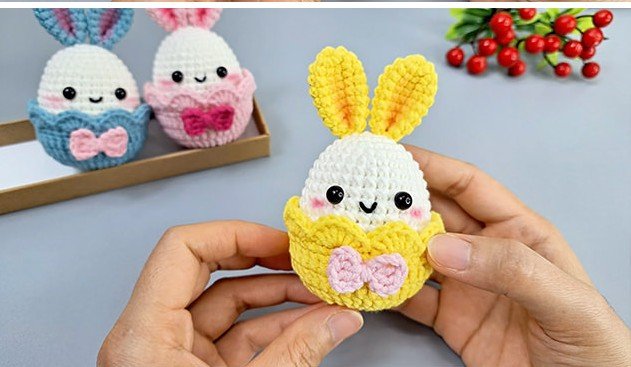
The Crochet Easter Bunny Egg – Pattern is one of the most charming and delightful projects you can undertake to celebrate the arrival of spring and the festive Easter season. Combining the classic shape of an egg with the whimsical features of a long-eared rabbit, this specific pattern has become a staple in the fiber arts community for those looking to add a handmade touch to their holiday décor. By following a Crochet Easter Bunny Egg – Pattern, you are not just making a toy; you are creating a versatile ornament that can be used for egg hunts, table centerpieces, or even as adorable “pocket pals” for children.
The magic of a Crochet Easter Bunny Egg – Pattern lies in its simplicity and the speed with which a finished piece can be produced. Unlike larger amigurumi projects that might take days to complete, these small egg-shaped bunnies are perfect for using up scrap yarn from your stash while allowing you to practice essential shaping techniques. A well-designed Crochet Easter Bunny Egg – Pattern will guide you through the process of creating a seamless ovoid body, adding tiny embroidered details, and attaching characteristic bunny ears that give the project its distinct personality and flair.
In this comprehensive guide, we will explore every technical and creative aspect of the Crochet Easter Bunny Egg – Pattern. We will break down the two primary components: the Crochet Easter Bunny Egg, which is the physical three-dimensional plushie, and the Pattern, which refers to the instructional blueprint containing stitch counts and assembly directions. Whether you are a beginner looking for a manageable holiday craft or an expert seeking a quick and addictive “market prep” item, mastering the Crochet Easter Bunny Egg – Pattern will provide you with endless hours of creative satisfaction and a basket full of handmade joy.
1. Essential Materials and Preparation for the Crochet Easter Bunny Egg – Pattern
Before you dive into your Crochet Easter Bunny Egg – Pattern, selecting the right yarn is the most important decision you will make. For a soft, toy-like finish, a 100% cotton yarn or a high-quality acrylic blend in DK weight is usually recommended. Cotton provides the structural integrity needed to keep the egg shape crisp, while acrylic offers a fuzzier, “fur-like” texture that suits a bunny theme. Most versions of the Crochet Easter Bunny Egg – Pattern work best with pastel shades like mint green, soft lavender, and pale lemon to reflect the traditional colors of the Easter season.
The hook size you choose will determine the density of your stitches, which is vital for amigurumi. When working on a Crochet Easter Bunny Egg – Pattern, it is standard practice to use a hook that is one or two sizes smaller than what the yarn label suggests, such as a 2.5mm or 3.0mm hook. This creates a tight fabric that prevents the polyester fiberfill stuffing from peeking through the holes, ensuring your Crochet Easter Bunny Egg looks professional and stays durable over time.
Speaking of stuffing, the “pouf” of your Crochet Easter Bunny Egg – Pattern comes from high-quality polyester fiberfill. It is important to stuff the egg firmly but not so much that the stitches stretch out of shape. A well-stuffed Crochet Easter Bunny Egg should feel springy and hold its ovoid form even when squeezed. Some crafters even add a small pouch of dried lavender or plastic pellets at the base of the pattern to give the bunny a pleasant scent or extra weight for standing upright.
Safety eyes are another crucial component of the Crochet Easter Bunny Egg – Pattern. Typically, 6mm or 8mm plastic safety eyes are used to give the bunny a cute, expressive look. However, if you are making the Crochet Easter Bunny Egg for a child under the age of three, it is highly recommended to skip the plastic parts and instead use black embroidery thread to sew on the eyes. This modification to the pattern ensures the toy is safe for all ages without sacrificing any of its adorable charm.
Stitch markers are indispensable when following a Crochet Easter Bunny Egg – Pattern. Since these items are almost always worked in a continuous spiral without joining rounds, it is incredibly easy to lose your place. Placing a marker in the first stitch of every round according to the pattern instructions will save you from the headache of miscounting. This simple habit ensures that the increases and decreases of your Crochet Easter Bunny Egg stay perfectly aligned for a symmetrical result.
Lastly, you will need a sharp yarn needle and embroidery floss to finish your Crochet Easter Bunny Egg – Pattern. The needle is used to sew the ears onto the body and to weave in any remaining yarn tails. The embroidery floss allows you to add a tiny pink “Y” shape for the nose and perhaps some delicate whiskers. These final details are what truly bring the Crochet Easter Bunny Egg – Pattern to life, transforming a simple crochet shape into a character with a soul.
2. Technical Stitches and Shaping in the Pattern
The foundation of nearly every Crochet Easter Bunny Egg – Pattern is the Magic Ring (or Magic Circle). This technique allows you to start the top of the egg with a hole that can be pulled completely shut, creating a seamless start. If you are new to the pattern, practicing the magic ring is essential, as it prevents the stuffing from falling out of the top of your Crochet Easter Bunny Egg and provides a much cleaner aesthetic than the traditional “chain-2” start.
The primary stitch used throughout the Crochet Easter Bunny Egg – Pattern is the single crochet (sc). This stitch is short, dense, and sturdy, making it the gold standard for 3D crochet objects. To create the iconic egg shape, the pattern will instruct you to perform a series of “increases” (two single crochets in one stitch) at the beginning to widen the top, followed by several rounds of “even” stitching to create the middle body of the Crochet Easter Bunny Egg.
Decreasing is where the lower half of the Crochet Easter Bunny Egg – Pattern takes shape. Most modern patterns utilize the “invisible decrease” (inv dec) technique. Unlike a standard decrease, the invisible version is worked only in the front loops of the stitches, making the reduction of the circumference almost impossible to see. This technical refinement in the pattern is what gives the Crochet Easter Bunny Egg its smooth, store-bought appearance and prevents unsightly bumps or gaps in the fabric.
The ears are usually worked as separate pieces in the Crochet Easter Bunny Egg – Pattern. Depending on the style you prefer, the pattern might call for long, floppy ears or short, pointy ones. These are often started with a small chain or a tiny magic ring and increased slowly. Attaching the ears symmetrically is perhaps the most challenging part of the Crochet Easter Bunny Egg assembly, but using pins to hold them in place before sewing according to the pattern will ensure a perfect look.
Tension control is a subtle but vital skill when executing a Crochet Easter Bunny Egg – Pattern. If your tension fluctuates, the egg will look lumpy or tilted. Keeping a consistent grip on your yarn ensures that every round of the Crochet Easter Bunny Egg is uniform. If you find your hands getting tired, take frequent breaks; a relaxed hand produces much smoother stitches, which is especially important when following a pattern that relies on precise geometric shapes like an egg.
Reading the Crochet Easter Bunny Egg – Pattern properly involves understanding the “stitch count” provided at the end of each round, usually in parentheses. For example, a round might end with “(18)”. Always count your stitches before moving to the next step of the pattern. If you have 17 or 19 instead of 18, your Crochet Easter Bunny Egg will not curve correctly. Taking the time to verify your count ensures the structural integrity of the Crochet Easter Bunny Egg – Pattern from start to finish.
3. Creative Customization for Your Crochet Easter Bunny Egg
One of the best things about the Crochet Easter Bunny Egg – Pattern is how easy it is to customize. While the standard design is lovely, you can experiment with “textured” yarns like chenille or velvet to make a jumbo, super-soft version of the Crochet Easter Bunny Egg. These bulkier yarns will require a much larger hook, but the basic pattern remains the same, resulting in a huggable plushie that is perfect for Easter morning gift baskets.
You can also incorporate colorwork into your Crochet Easter Bunny Egg – Pattern. Try making a “striped” egg by changing colors every two rounds, or use a variegated yarn that does the color-switching for you. This adds a layer of visual interest to the Crochet Easter Bunny Egg without requiring you to learn complex new stitches. A striped pattern can make your bunnies look like they are wearing little sweaters, adding to the whimsy of the holiday.
Accessorizing your Crochet Easter Bunny Egg – Pattern is where your personality can really shine. Consider crocheting a tiny flower to tuck behind one of the bunny’s ears, or tie a thin silk ribbon around the neck of the Crochet Easter Bunny Egg to create a bow. Some crafters even use their pattern skills to make a tiny “basket” for the bunny to hold, turning the single motif into a complete festive scene.
Face embroidery offers a world of expression for your Crochet Easter Bunny Egg – Pattern. By changing the position of the eyes or the curve of the mouth, you can make your bunny look sleepy, surprised, or incredibly happy. Some advanced versions of the Crochet Easter Bunny Egg include felted rosy cheeks or tiny eyelashes. These small artistic choices make each item you create from the pattern a unique individual with its own character.
If you are making a set of these for a family, consider using the Crochet Easter Bunny Egg – Pattern to create “personalized” bunnies. You can embroider an initial on the back of the Crochet Easter Bunny Egg or choose each person’s favorite color for the body. This turns a simple holiday pattern into a cherished keepsake that family members will look forward to bringing out year after year as part of their Easter traditions.
Finally, you can adapt the Crochet Easter Bunny Egg – Pattern into different functional items. By adding a keychain ring to the top, you turn the Crochet Easter Bunny Egg into a festive bag charm. Alternatively, you can omit the stuffing and leave the bottom open to create a “chocolate egg cover.” This clever use of the pattern allows you to hide a real treat inside the Crochet Easter Bunny Egg, making it a double surprise for the lucky recipient.
4. Troubleshooting and Storing Your Crochet Easter Bunny Egg
A common issue when working on a Crochet Easter Bunny Egg – Pattern is the “pointy top” syndrome. This happens if the initial increases are too aggressive or if the magic ring isn’t pulled tight enough. To avoid this, make sure your pattern follows a gradual increase schedule. If the top of your Crochet Easter Bunny Egg looks like a cone rather than an egg, try starting with more stitches in the magic ring to flatten the curve according to the pattern logic.
If you see gaps between your stitches where the stuffing is visible, your hook is likely too large for the yarn you chose for the Crochet Easter Bunny Egg – Pattern. To fix this, drop down a half-millimeter in hook size. A tight, dense fabric is the hallmark of a high-quality Crochet Easter Bunny Egg, and it ensures the longevity of the toy. If you’ve already finished the pattern and see gaps, you can try using a lining of matching colored hosiery inside the Crochet Easter Bunny Egg before stuffing.
Sometimes the ears of the Crochet Easter Bunny Egg – Pattern won’t stand up as they should. If you want upright ears, you can insert a small piece of pipe cleaner or floral wire inside the ear before sewing it to the Crochet Easter Bunny Egg. However, if safety is a concern for a child’s toy, simply use a stiffer cotton yarn for the ears in your pattern to provide natural structural support without the need for internal wires.
Symmetry is often the hardest part of the Crochet Easter Bunny Egg – Pattern. If the eyes or ears look “off,” don’t be afraid to pull out the stitches and try again. Use a ruler to measure the distance from the center of the Crochet Easter Bunny Egg to each eye. Most experienced crafters spend just as much time on the “finishing” stage of the pattern as they do on the actual crocheting, as this is what determines the final quality of the Crochet Easter Bunny Egg.
Maintaining your Crochet Easter Bunny Egg is relatively simple. Since they are small and usually made of durable yarn, most can be spot-cleaned with a damp cloth and mild soap. If you followed a Crochet Easter Bunny Egg – Pattern using 100% cotton, you might even be able to machine wash it on a delicate cycle in a mesh bag. Always air dry your Crochet Easter Bunny Egg to prevent the stuffing from clumping or the yarn from shrinking and ruining the pattern shape.
When the holiday is over, store your Crochet Easter Bunny Egg in a cool, dry place. Avoid squashing them under heavy boxes, as this can permanently deform the fiberfill and ruin the egg shape you worked so hard to achieve with the Crochet Easter Bunny Egg – Pattern. Placing them in a sealed plastic bin with a bit of tissue paper will keep them dust-free and ready to hop back into your home decor when the next Easter season rolls around.
Frequently Asked Questions (FAQ)
How long does it take to complete one Crochet Easter Bunny Egg – Pattern?
For an intermediate crocheter, a single Crochet Easter Bunny Egg usually takes about 60 to 90 minutes from the first stitch to the final embroidery. This makes the pattern ideal for creating multiple gifts in a single weekend.
What is the best yarn weight for this pattern?
Most designers recommend a DK (weight 3) or Worsted (weight 4) yarn. These weights provide a good balance between ease of handling and a finished Crochet Easter Bunny Egg size that fits perfectly in the palm of your hand.
Can I make this Crochet Easter Bunny Egg – Pattern without a magic ring?
Yes. You can chain 2 and work your first round of stitches into the second chain from the hook. However, the pattern will have a small hole at the top, which you will need to sew shut manually to keep the Crochet Easter Bunny Egg stuffing secure.
Are safety eyes necessary for the bunny?
Not at all. While safety eyes give a shiny, “toy” look to the Crochet Easter Bunny Egg, embroidery is a safer alternative for babies. You can also use small black beads or felt circles if the Crochet Easter Bunny Egg – Pattern is intended for adult decoration.
Why is my egg shape looking more like a ball?
An egg is taller than it is wide. If your Crochet Easter Bunny Egg looks like a sphere, you likely need to add more “even” rounds in the middle of your pattern before you start the decrease rounds. This extra height is what creates the elongated ovoid shape.
Can I sell the finished items I make from this pattern?
Most designers allow you to sell finished Crochet Easter Bunny Egg products made from their pattern, provided you give credit to the original creator. Always check the specific “terms of use” included with the Crochet Easter Bunny Egg – Pattern you are following.
Conclusion
The Crochet Easter Bunny Egg – Pattern is a wonderful project that combines the technical rewards of amigurumi with the festive spirit of springtime. In this article, we have covered everything from selecting the right cotton yarns and small hooks to the importance of the magic ring and invisible decreases. We also discussed how to customize your Crochet Easter Bunny Egg with colors, accessories, and expressive embroidery, ensuring that your handmade creations are as unique as they are adorable.
By following the tips for troubleshooting and care, your finished projects will remain a cherished part of your holiday traditions for years to come. Whether you are filling baskets or decorating your mantle, the Crochet Easter Bunny Egg – Pattern is a fast, fun, and fulfilling way to celebrate. We would love to hear your thoughts—please leave your sincere opinion and any suggestions or creative twists you added to your bunnies in the comments below!