The Crochet flower bag – pattern has taken the handmade accessory world by storm, blending practicality and beauty in a single design.
Whether you’re heading to the market, packing for a beach day, or simply looking to add a cheerful handmade touch to your outfit, this pattern delivers a unique and eye-catching result.
With vibrant yarn colors and charming floral motifs, this bag is as fun to make as it is to use.
Unlike traditional crochet projects that focus on flat or repetitive designs, the crochet flower bag – pattern introduces dimensional, petal-like details that elevate your work to an art form. It’s the perfect blend of structure and decoration. Many crafters enjoy using this project to master joining techniques, color changes, and motif arrangements—making it not just a beautiful bag, but a valuable learning experience.
In this article, we’ll walk you through the essentials of making your own crochet flower bag, including recommended tools and materials, steps for creating the floral motifs, how to assemble your bag, and some creative customizations to make your bag truly one of a kind.
1. Understanding the Crochet Flower Bag – Pattern
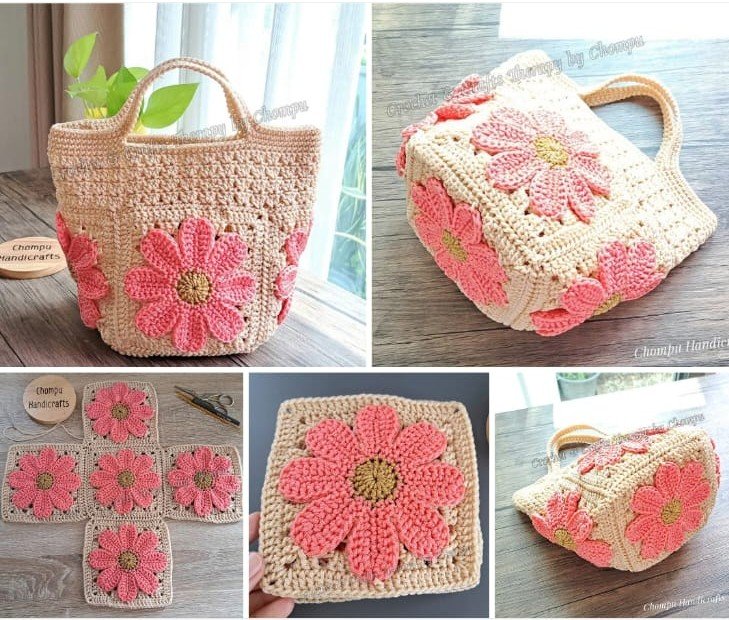
The Crochet flower bag – pattern centers around small flower motifs that are typically crocheted individually and then joined together to form the body of the bag. Each flower is made using a circular pattern that mimics petals, giving the entire bag a playful and textured appearance.
This type of pattern is excellent for using up yarn scraps, especially in contrasting or complementary colors. Many crafters enjoy creating colorful, bohemian-style bags with a mix of bold and pastel hues that reflect their personality.
A standard crochet flower bag might include 13 to 25 flower motifs, depending on the size of the bag and the size of the flowers. The motifs are then joined in a grid or circular layout, sometimes with additional filler motifs or solid sections to reinforce the structure.
Another reason this pattern is so popular is its flexibility. You can adjust the number of motifs, use different yarn weights, or even alternate between flowers and granny squares for a more eclectic look. This versatility makes it suitable for bags of all shapes and sizes—from small pouches to oversized totes.
Additionally, the pattern typically includes a strap or handle, which can be crocheted in a matching or contrasting style. Some versions also incorporate a drawstring closure, lining, or a button flap to increase functionality.
The best part? The crochet flower bag – pattern is highly beginner-friendly. If you know how to make basic stitches like chains, double crochets, and slip stitches, you can successfully complete this pattern with a bit of patience and creativity.
2. Materials and Tools for Your Crochet Flower Bag
To bring your crochet flower bag – pattern to life, you’ll need to gather the right materials and tools. Starting with the essentials will make the entire crafting process more enjoyable and organized.
First, choose your yarn. Cotton yarn is a top choice due to its durability, softness, and ease of washing. It also holds shape well, which is important when your bag will carry weight. For a more structured bag, consider using mercerized cotton or adding a strand of stronger yarn while working.
Next, select a crochet hook that matches your yarn weight. For worsted-weight yarn, a 4mm to 5mm hook is usually appropriate. Check the yarn label for recommended hook sizes and adjust based on your tension.
You’ll also need a pair of sharp scissors, a yarn needle for weaving in ends, and stitch markers to keep track of rounds or joins. Optional but helpful items include blocking tools and a fabric lining for added durability.
Depending on your chosen crochet flower bag – pattern, you might also need buttons, magnetic snaps, or a zipper if you want your bag to have a secure closure. These are especially useful if the bag will be used frequently or for carrying personal items.
Some patterns also recommend a light interfacing or fusible lining to give the bag more stiffness. This can be added between the crochet fabric and the fabric lining, if you choose to sew one.
Lastly, make sure you print or bookmark your chosen crochet flower bag – pattern to refer to during each stage of the project. Having clear visuals or diagrams can make the motif-joining process much easier to follow.
3. Step-by-Step: Creating and Assembling the Bag
Making a crochet flower bag involves creating individual floral motifs, joining them together, and then shaping the bag with additional crocheting and finishing techniques. Let’s break it down into manageable steps.
Start by making the flower motifs. These typically involve a magic ring, chain stitches, and double or treble crochets to form the petal shapes. Many patterns use two to three rounds for each flower. The center of the flower can be made in a different color to add contrast and visual appeal.
Once you’ve made your motifs, lay them out to determine your preferred arrangement. It helps to photograph your layout so you remember the order. This step is where your creativity shines—feel free to play with color and symmetry.
Join the motifs using slip stitch or whip stitch, depending on the desired texture. Some crafters prefer the raised seams of whip stitch, while others like the invisible join created by slip stitch. Work in rows or circles, depending on the shape of your bag.
After joining, crochet around the joined motifs to create the top edge of the bag. You might add a few rows of half-double crochet or double crochet to form a sturdy edge and to prepare a base for handles or straps.
For the strap, you can either crochet a simple chain and reinforce it with single crochets or use a wide band made with half-double or double crochet. Be sure to measure for comfort—especially if you’re making a shoulder or crossbody bag.
Finish by weaving in all loose ends and optionally blocking the bag to shape it. If you’re adding lining or hardware, now is the time to do so. The final result is a stunning handmade crochet flower bag that reflects your unique style and effort.
4. Customization and Styling Tips
One of the joys of using a crochet flower bag – pattern is how endlessly customizable it is. Here are some fun ways to make your bag uniquely yours while keeping functionality in mind.
Use gradient or ombré yarn for a seamless color transition between motifs. This works especially well when your bag has rows of flowers, as the gradual color shift creates a sophisticated look.
Add embellishments such as beads or buttons in the center of each flower. These decorative details can add a touch of sparkle or vintage flair to your finished project.
Try combining different motif shapes. Mix circular flower motifs with hexagons or squares for a patchwork-style look. Just make sure the edges line up well for joining.
Consider seasonal color themes. Bright yellows and pinks are perfect for spring or summer bags, while deeper burgundies and olive greens make a lovely autumn version. Let the season guide your palette.
Add a lining with pockets. A fabric lining adds durability and also gives you the option of internal compartments—great for organizing keys, phones, or makeup.
Experiment with strap styles. Leather straps, twisted yarn cords, or macramé handles can change the entire feel of your bag. Secure them with metal rings for a polished, high-end look.
FAQ – Crochet Flower Bag – Pattern
Q1: Is the crochet flower bag suitable for beginners?
Yes, the crochet flower bag – pattern is great for beginners who are familiar with basic stitches. Flower motifs are repetitive, making them easy to learn and perfect for practice.
Q2: How many motifs do I need for one bag?
It depends on the size and style, but most bags require between 13 to 25 flower motifs. Check your pattern for specifics.
Q3: Can I use different yarn types in one bag?
You can, but stick to yarns of similar weight and stretch to ensure even tension and consistent results across all motifs.
Q4: Should I line the bag?
Lining is optional but recommended if you plan to carry small or heavy items. It helps maintain the bag’s shape and prevents stretching.
Q5: How do I attach handles securely?
Crochet handles directly into the top row of stitches, or sew pre-made straps with reinforced backing for added strength.
Q6: Can I machine wash the crochet flower bag?
If made with cotton yarn, it can usually be machine washed on a gentle cycle. However, hand-washing is best to preserve shape and details.
Conclusion
The Crochet flower bag – pattern offers an ideal balance between beauty, utility, and creative freedom. It allows you to practice essential crochet skills while producing a practical and fashionable accessory that showcases your personality and craftsmanship.
From choosing your yarn colors to crafting delicate floral motifs, joining them with care, and adding finishing touches like linings and straps, this project has endless possibilities. It’s a satisfying endeavor that suits both new and experienced crocheters.
If you found this article helpful or have tried this pattern yourself, please share your honest opinion and suggestions below. We’d love to hear your thoughts and see how you’ve made the crochet flower bag – pattern your own!