A Crochet Flower Bracelet – Tutorial is the perfect way to combine your love for fiber arts with wearable fashion, creating a delicate accessory that adds a handmade touch to any outfit. This project is incredibly versatile, allowing you to experiment with different colors and yarn weights to match your personal style or create thoughtful gifts for friends and family. Because it requires very little material, making a crochet flower bracelet is also an excellent method for using up small amounts of leftover yarn from larger projects.
When you follow a Crochet Flower Bracelet – Tutorial, you are engaging in a mindful practice that results in a beautiful, tangible piece of jewelry. These bracelets are popular among all age groups, from children who love colorful “friendship” styles to adults looking for a bohemian or vintage-inspired aesthetic. The beauty of the crochet flower bracelet lies in its simplicity; even if you are relatively new to the craft, the repetitive nature of the stitches helps build confidence and consistency in your tension.
To ensure your success with this Crochet Flower Bracelet – Tutorial, it is important to focus on the details, such as choosing the right hook size for your chosen thread and mastering the slip stitch and double crochet techniques. By focusing on SEO-friendly crafting tips and high-quality materials, you can produce a professional-looking accessory that rivals store-bought jewelry. Let’s dive into the essential steps, materials, and creative variations that will make your crochet flower bracelet stand out as a unique piece of wearable art.
1. Choosing the Right Materials for Your Crochet Flower Bracelet
Selecting the proper yarn or embroidery floss is the first critical step in any Crochet Flower Bracelet – Tutorial. For a refined look, many crafters prefer mercerized cotton thread (size 10 or 20), as it offers a slight sheen and excellent stitch definition. This type of thread ensures that your crochet flower petals remain crisp and hold their shape over time without sagging.
The crochet hook size must correspond directly to the thickness of your thread to avoid loose, messy stitches. Typically, a steel crochet hook ranging from 1.5mm to 2.25mm is ideal for jewelry making. Using a hook that is too large will result in a flimsy crochet flower bracelet, while a hook that is too small might make the process difficult on your hands and eyes.
Don’t forget the jewelry findings that will turn your crochet piece into a functional bracelet. You will need a lobster claw clasp, some jump rings, and perhaps a small length of extension chain if you want the size to be adjustable. Incorporating these metal elements into your Crochet Flower Bracelet – Tutorial gives the finished product a high-end, boutique-quality appearance.
Color theory plays a massive role in the visual impact of your finished accessory. You might choose a monochromatic palette for an elegant, understated look, or bright, contrasting colors for a bold summer statement. Consider using a variegated yarn to create a “watercolor” effect across the petals of your crochet flower bracelet without having to switch balls of yarn constantly.
In addition to thread and hooks, you should have a sharp pair of embroidery scissors and a fine tapestry needle (or blunt needle) on hand. These tools are essential for weaving in your ends securely so they don’t pop out while the bracelet is being worn. A well-finished crochet flower bracelet should look just as neat on the back as it does on the front.
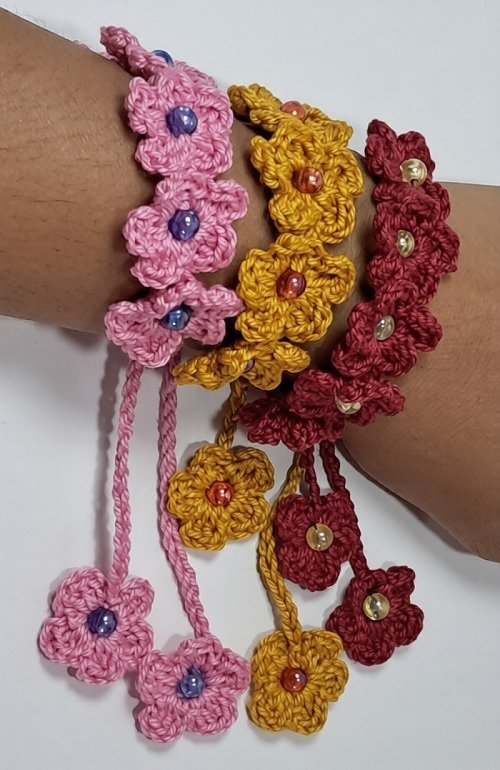
Lastly, consider adding seed beads or small pearls to the center of each flower for added texture and sparkle. This advanced crochet technique involves pre-stringing the beads onto your thread before you begin the Crochet Flower Bracelet – Tutorial. Adding embellishments is a fantastic way to customize your work and increase the value of the items if you plan to sell them.
2. Essential Stitches and Techniques for Flower Patterns
Before beginning the main body of the Crochet Flower Bracelet – Tutorial, you must be comfortable with the magic ring (or magic circle) technique. This method allows you to pull the center of your flower tight, leaving no visible hole in the middle of your petals. It is the foundation of most 3D crochet flowers and ensures a professional finish for your crochet flower bracelet.
The chain stitch (ch) serves as the “bridge” between different parts of your floral design. In this Crochet Flower Bracelet – Tutorial, chains are used to create the height needed for petals and to form the loops that will eventually become the bracelet straps. Mastering consistent chain tension is vital so that your crochet flower bracelet doesn’t end up twisting or bowing unevenly.
To give your petals volume, the double crochet (dc) and treble crochet (tr) are frequently utilized. By placing multiple stitches into a single space, you create the rounded or pointed shapes that define different flower species, such as daisies or roses. Learning how to transition smoothly between these stitches is a core component of a successful Crochet Flower Bracelet – Tutorial.
The slip stitch (sl st) is the unsung hero of jewelry making, used to join rounds and move the yarn across the work without adding height. In a crochet flower bracelet, you will use slip stitches to finish off petals and to attach individual floral motifs together. A tight slip stitch join ensures that your jewelry remains durable through daily wear and tear.
Another technique to explore is working in the back loops only (BLO). This creates a ribbed effect that can add depth to the center of your flowers, making them look more realistic. This textural crochet tip is a great way to elevate a basic Crochet Flower Bracelet – Tutorial into something truly artistic and multi-dimensional.
Finally, understanding blocking is essential for any thread-based project. Once you finish your crochet flower bracelet, the stitches might look a bit crumpled. Gently wetting the piece and pinning it into the desired shape until it dries—a process known as wet blocking—will ensure your crochet flower petals lay perfectly flat and look their absolute best.
3. Step-by-Step Construction of the Flower Motif
To start your Crochet Flower Bracelet – Tutorial, begin with a magic ring and work six single crochets into the center. This creates a sturdy base for your petals. Once you tighten the ring, you have a perfect circle ready for the next round, which is where the floral shape of your crochet flower bracelet truly begins to take form.
For the petals, you will typically work a sequence like: (slip stitch, chain 2, 3 double crochets, chain 2, slip stitch) all into the same stitch. Repeating this around the circle will give you a classic five or six-petaled flower. This specific crochet stitch pattern is favored in many tutorials because it is easy to memorize and produces a very symmetrical crochet flower.
Once the first flower is complete, you have two options: you can either fasten off and make several individual flowers to sew together later, or you can use a continuous join method. The latter is often preferred in a Crochet Flower Bracelet – Tutorial because it results in fewer ends to weave in, making the crochet flower bracelet much stronger and more streamlined.
The “stems” or straps of the bracelet are usually made by extending a foundation chain from either side of the flower cluster. To make these straps more durable, you can work a row of slip stitches or single crochets back across the chain. This prevents the crochet flower bracelet from stretching too much over time when you put it on and take it off.
If you want a more intricate look, you can layer two different sized flowers on top of each other. This layered crochet technique creates a “pop-up” effect. In this Crochet Flower Bracelet – Tutorial, you would simply make a smaller flower in a contrasting color and stitch it to the center of the larger one before attaching the clasp.
Safety and comfort are key when finishing your piece. Ensure that the yarn ends are woven in at least an inch or two through the back of the stitches. Using a tiny drop of fabric glue on the final knot can provide extra security, ensuring that your crochet flower bracelet stays intact even with frequent movement and hand washing.
4. Customizing and Styling Your Finished Jewelry
Customization is what makes a Crochet Flower Bracelet – Tutorial so rewarding for the creator. You can easily adjust the length of the bracelet to fit a child’s wrist or a larger adult’s wrist by simply adding or subtracting stitches from the attachment chains. A custom-fit crochet flower bracelet is always more comfortable and looks more professional.
Think about the seasonal trends when choosing your colors. Pastel pinks, yellows, and greens are perfect for a spring crochet project, while deep burgundies and metallic threads can turn a crochet flower bracelet into a sophisticated accessory for a winter holiday party. Matching your jewelry to the season is a great way to keep your wardrobe fresh.
You can also turn the motifs from this Crochet Flower Bracelet – Tutorial into a matching set. Use the same pattern to create a crochet flower necklace or a pair of floral earrings. Wearing a coordinated set of handmade crochet jewelry creates a cohesive and “put-together” look that showcases your technical skills as a crafter.
For those who enjoy a more “boho-chic” style, try incorporating natural elements like wooden beads or small charms between the flowers. This variation of the crochet flower bracelet appeals to those who love nature-inspired fashion. Adding a small metal “Handmade” tag near the clasp also adds a lovely personalized touch to your crochet tutorial results.
If you are making these for a gift or to sell, presentation is everything. Consider mounting your crochet flower bracelet on a piece of cardstock with a pretty design. Highlighting that it is a handmade eco-friendly accessory can be a great selling point for customers who value sustainable and artisanal products over mass-produced items.
Finally, don’t be afraid to experiment with different flower types. While this Crochet Flower Bracelet – Tutorial focuses on a standard petal design, you can adapt the techniques to create roses, sunflowers, or even tiny lavender sprigs. The possibilities for a crochet flower bracelet are truly endless, limited only by your imagination and your willingness to try new stitches.
FAQ: Frequently Asked Questions
How long does it take to complete a Crochet Flower Bracelet – Tutorial?
For a beginner, it might take about an hour to finish the first bracelet as you learn the pattern. However, once you become familiar with the stitch sequence, an experienced crafter can often complete a crochet flower bracelet in 20 to 30 minutes.
What is the best yarn for a crochet flower bracelet?
The best choice is usually mercerized cotton thread (size 10). It is durable, has a beautiful shine, and doesn’t “pill” like wool or acrylic yarn. This keeps your crochet flower looking new for a long time.
Can I wash my crochet flower bracelet?
Yes, but it is best to hand wash it in cool water with a mild detergent. Lay it flat to dry on a towel and reshape the petals while they are damp. This prevents the crochet jewelry from losing its shape or shrinking.
What if my bracelet is too itchy?
Using high-quality 100% cotton usually prevents itchiness. If you have very sensitive skin, avoid using metallic or “glitter” threads in your Crochet Flower Bracelet – Tutorial, as the plastic fibers in those yarns can sometimes be scratchy.
How do I attach a metal clasp to a crochet bracelet?
You can use a sewing needle and thread to sew the clasp directly onto the yarn ends, or use jewelry pliers to open a jump ring, slide it through the crochet stitch, and then close it around the clasp. The second method is generally more secure.
Do I need to be an expert to follow this Crochet Flower Bracelet – Tutorial?
Not at all! This project is considered beginner-friendly. As long as you know the basic stitches like the chain, single crochet, and double crochet, you can successfully create a beautiful crochet flower bracelet.
Conclusion
In this Crochet Flower Bracelet – Tutorial, we have explored everything from the initial selection of mercerized cotton thread to the final steps of attaching jewelry findings. We covered essential techniques like the magic ring, the importance of consistent tension, and how to customize your crochet flower with beads and different color palettes.
By following these steps, you have learned how to create a durable, stylish, and handmade accessory that is as fun to make as it is to wear. Whether you are crafting for yourself or creating a heartfelt gift, the crochet flower bracelet is a timeless project that celebrates the beauty of handmade art.