The Crochet Flower – Pattern is one of the most versatile and rewarding projects any crafter can undertake, offering a perfect blend of artistic expression and practical application. Whether you are a seasoned professional or a curious beginner, learning how to create a Crochet Flower tutorial allows you to add a personalized, handmade touch to everything from winter hats and scarves to home decor items like pillows and blankets. The beauty of a Pattern lies in its adaptability, as you can easily swap yarn weights or hook sizes to change the scale and texture of your finished floral piece.
Engaging with a Crochet Flower – Pattern provides a wonderful opportunity to master basic stitches while producing something visually stunning in a very short amount of time. Many enthusiasts find that working on a Crochet Flower tutorial serves as a meditative escape, allowing the repetitive motions of the hook and yarn to reduce stress while fostering creativity. Because these projects require very little material, they are also an excellent way to use up “scrap yarn” from larger endeavors, making your hobby more sustainable and cost-effective.
To achieve a professional look with your Crochet Flower – Pattern, it is essential to understand the fundamental techniques and terminology used in the craft. By following a structured Crochet Flower tutorial, you ensure that your petals remain symmetrical and your tension stays consistent throughout the process. In this guide, we will explore the essential steps, tools, and creative variations that will empower you to design a Pattern that stands out, ensuring your handmade creations are both durable and aesthetically pleasing for years to come.
1 Understanding the Basics of a Crochet Flower tutorial
Starting your journey with a Crochet Flower tutorial requires a few basic supplies that form the foundation of your work. You will primarily need a crochet hook, a skein of yarn in your favorite floral color, and a pair of sharp scissors to trim your ends. Selecting the right hook size is crucial, as it determines how tight or loose your stitches will be when following a specific Pattern.
A high-quality Crochet Flower – Pattern usually begins with either a sliding loop, often called a magic ring, or a small chain joined into a circle. This center serves as the “heart” of the flower where all your petals will eventually be anchored. Mastering this initial step is the secret to ensuring your Crochet Flower tutorial looks neat and professional without a large hole in the middle.
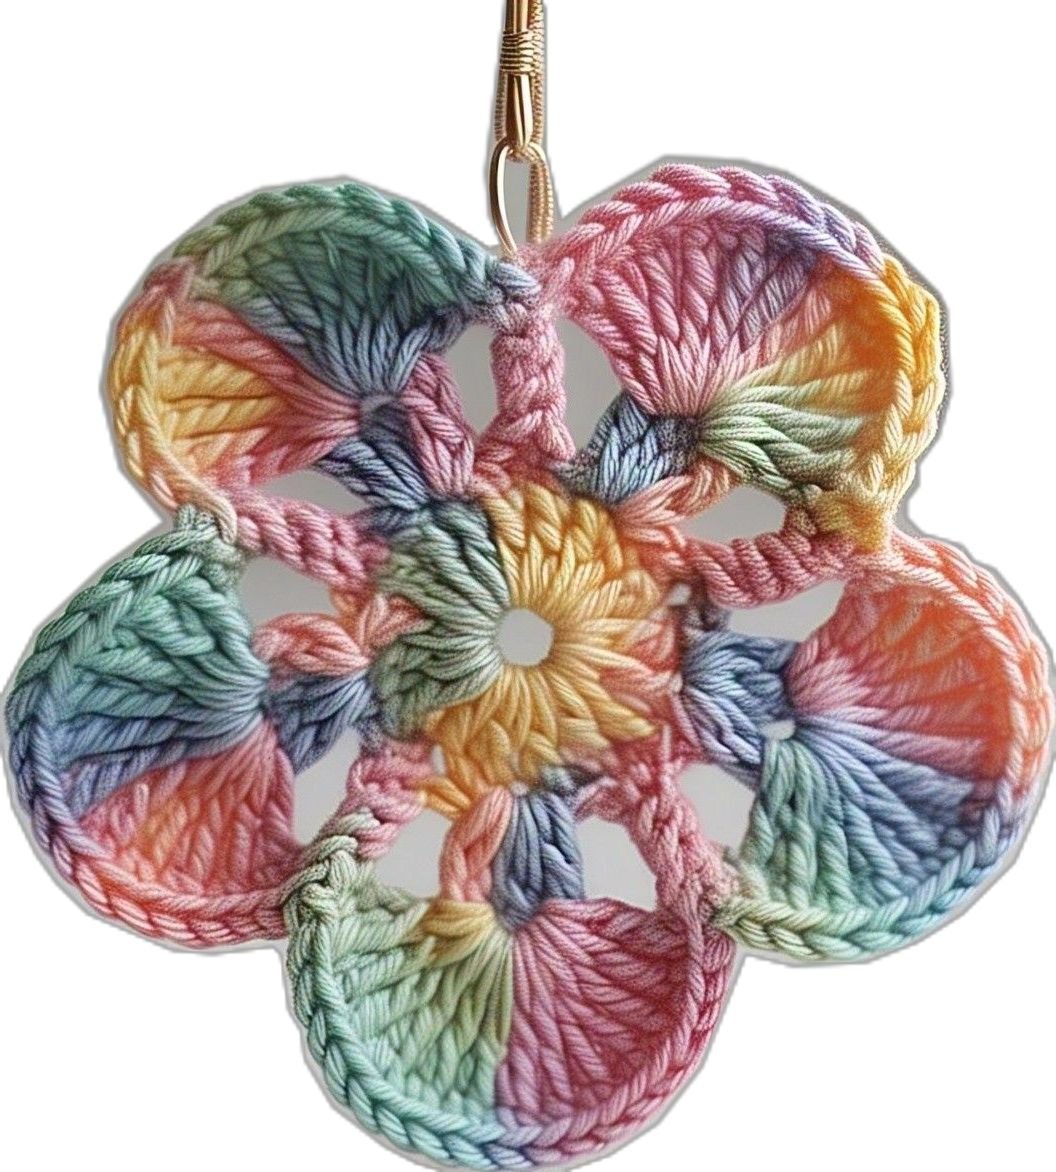
When you look at a Pattern, you will notice terms like double crochet, slip stitch, and chain. These are the building blocks of the Crochet Flower – Pattern that create height and shape. Using a Crochet Flower tutorial helps you visualize how these stitches stack on top of each other to form the rounded or pointed edges of a delicate petal.
The primary goal of a Crochet Flower tutorial is to teach you the rhythm of increasing stitches to create width. Most flowers follow a mathematical symmetry, meaning what you do for one petal, you will repeat several times around the center. This repetitive nature makes the Pattern easy to memorize after just a few practice rounds, turning you into a pro in no time.
Consistency in your tension is a major focus in any Crochet Flower – Pattern discussion. If you pull the yarn too tight, the flower may curl inward; if it is too loose, the petals might look floppy. Following a well-structured Crochet Flower tutorial will give you tips on how to hold your yarn comfortably to maintain an even look across the entire project.
Finally, finishing your Crochet Flower – Pattern involves “fastening off” and weaving in the loose yarn tails. A good Crochet Flower tutorial will emphasize that the back of your work should look almost as clean as the front. This attention to detail is what separates a simple hobbyist project from a piece of art that could be sold or gifted with pride.
2 Step by Step Guide to Your First Pattern
To begin the actual construction of your Crochet Flower – Pattern, start by creating a magic ring and work six single crochet stitches into the center. This creates a sturdy base for a six-petaled design, which is a classic choice for any Crochet Flower tutorial. Pull the tail of the yarn to tighten the circle, ensuring the center is snug and secure before moving to the next round.
The second round of your Pattern usually involves “growing” the center by adding more stitches or creating loops where the petals will sit. In a standard Crochet Flower tutorial, you might chain three and then slip stitch into the next stitch. Repeating this all the way around creates the skeletal structure that supports the volume of the Crochet Flower – Pattern petals.
Now it is time to add the “bloom” to your Crochet Flower – Pattern by working into the loops you just created. For each petal, you will typically work a sequence of stitches like a half-double crochet, three double crochets, and another half-double crochet. This specific Crochet Flower tutorial technique creates a beautiful, rounded curve that mimics the natural shape of a real garden flower.
As you move through the Pattern, ensure you are inserting your hook into the correct loops to maintain the 3D effect. Many advanced versions of a Crochet Flower tutorial will suggest working in the “back loops only” to create layers of petals. This adds depth to your Crochet Flower – Pattern, making it look more realistic and sophisticated for high-end fashion accessories.
If you want to experiment with your Crochet Flower tutorial, try using a variegated yarn that changes color automatically. This makes every Pattern unique, as the colors will land differently on each petal. It is a simple way to elevate a basic Crochet Flower – Pattern without needing to manually switch yarn colors and tie multiple knots throughout the process.
Once all petals are complete, the final step in the Pattern is to join the last stitch to the first with a slip stitch. This hidden join is a hallmark of a professional Crochet Flower tutorial. Cut your yarn, leaving a long tail if you plan to sew the Crochet Flower – Pattern onto a garment, or a short tail if you simply want to tuck it away.
3 Essential Tips for Optimizing Your Crochet Flower tutorial
One of the best ways to improve your Crochet Flower – Pattern results is to choose the right fiber for the job. Cotton yarn is often recommended in a Crochet Flower tutorial because it has excellent stitch definition and holds its shape well. If you use a fuzzy acrylic, the intricate details of your Pattern might get lost in the texture of the yarn.
Blocking your finished Crochet Flower – Pattern is a professional secret that many beginners overlook. A comprehensive Crochet Flower tutorial will suggest pinning your flower to a foam board and lightly steaming it. This “sets” the stitches, ensuring the petals of your Pattern lie perfectly flat and don’t curl up over time, which is vital for decor.
To make your Crochet Flower tutorial more interesting, consider adding a bead or a button to the center of your work. This simple addition hides the starting hole and adds a touch of sparkle to the Crochet Flower – Pattern. It is an easy way to customize a standard Pattern to match the specific style of a wedding, a nursery, or a holiday theme.
Understanding the “why” behind the stitches in a Crochet Flower – Pattern will help you troubleshoot issues on your own. If your flower looks lopsided, a Crochet Flower tutorial would tell you to count your stitches to ensure every petal has the exact same number. Precision is the key to a successful Pattern, especially when you are making a set of matching flowers.
Keep a notebook of the different versions of the Crochet Flower – Pattern you try. You might find that you prefer a five-petal version over a six-petal one, or that a specific hook size works better for your hand. Customizing a Crochet Flower tutorial to fit your personal style is part of the fun of being a creative fiber artist and designer.
Sharing your work is a great way to stay motivated while learning a new Pattern. Many online communities center around the Crochet Flower tutorial, where you can post photos of your Crochet Flower – Pattern and get feedback. Seeing how others interpret the same instructions can give you fresh ideas for color combinations and innovative uses for your finished pieces.
4 Creative Uses for Your Finished Crochet Flower – Pattern
The most common way to use a Crochet Flower – Pattern is as an embellishment for clothing. By following a Crochet Flower tutorial, you can create a dozen flowers to sew onto the hem of a child’s dress or the lapel of a denim jacket. This turns a simple Pattern into a statement piece of wearable art that is entirely unique to you.
Home decor is another fantastic outlet for your Crochet Flower tutorial skills. You can attach several flowers from your Crochet Flower – Pattern to a wire ring to create a “forever wreath” for your front door. Since the Pattern uses yarn, these flowers won’t wilt, providing a bright and cheerful pop of color that lasts throughout every season of the year.
Gift-giving becomes much more personal when you incorporate a Crochet Flower – Pattern. Instead of a plastic bow, use a flower made from a Crochet Flower tutorial to top a birthday present. The recipient can then keep the flower as a keychain or a brooch, making the Pattern a gift that keeps on giving long after the box is opened.
For those who love organization, a Crochet Flower tutorial can be used to make decorative paperclips or bookmarks. Simply glue your finished Crochet Flower – Pattern to a large clip or a ribbon. This small project is a great way to practice a new Pattern without committing to a large, time-consuming piece like a blanket or a sweater.
You can even scale up your Crochet Flower – Pattern to create functional items like coasters or dishscrubbies. By using a thicker, more durable yarn in your Crochet Flower tutorial, the petals provide the perfect surface for protecting your table. It is amazing how one single Pattern can be adapted for so many different rooms in your house.
Finally, consider using your Crochet Flower tutorial knowledge to contribute to charity. Many organizations accept donations of handmade items, and a cheerful Crochet Flower – Pattern attached to a chemo cap or a baby blanket can bring a lot of joy to someone in need. Mastering the Pattern allows you to use your talent to make a positive impact on the world around you.
Frequently Asked Questions (FAQ)
What is the best yarn for a Crochet Flower – Pattern?
For most projects, a category 4 (worsted weight) cotton or acrylic yarn is best. Cotton provides better “structure” for the petals, while acrylic offers more softness and a wider variety of colors for your Crochet Flower tutorial.
How long does it take to finish a Crochet Flower tutorial?
Depending on your skill level and the complexity of the Pattern, a single flower usually takes between 10 to 20 minutes. This makes it a perfect “quick-win” project for busy crafters.
Can I make the flower bigger or smaller?
Yes! To change the size of your Crochet Flower – Pattern, simply change your hook and yarn weight. Use a thin thread and a small hook for a tiny lace flower, or bulky yarn and a large hook for a giant floral pillow.
Do I need to be an expert to follow a Crochet Flower tutorial?
Not at all. Most floral patterns are beginner-friendly and only require knowledge of the basic stitches like the single crochet, double crochet, and slip stitch.
How do I attach the finished Pattern to other items?
You can sew the flower onto fabric using a yarn needle and a bit of leftover yarn, or you can use a hot glue gun if you are attaching it to non-fabric surfaces like a picture frame or a headband.
Conclusion
In this article, we have explored the wonderful world of the Crochet Flower – Pattern, covering everything from the essential tools and basic stitches to creative ways to display your finished work.
We learned that following a Crochet Flower tutorial is not just about making a craft; it is about developing a skill that allows for endless personalization and artistic growth. Whether you are using a Pattern to decorate your home, enhance your wardrobe, or create thoughtful gifts, the techniques shared here provide a solid foundation for your success.