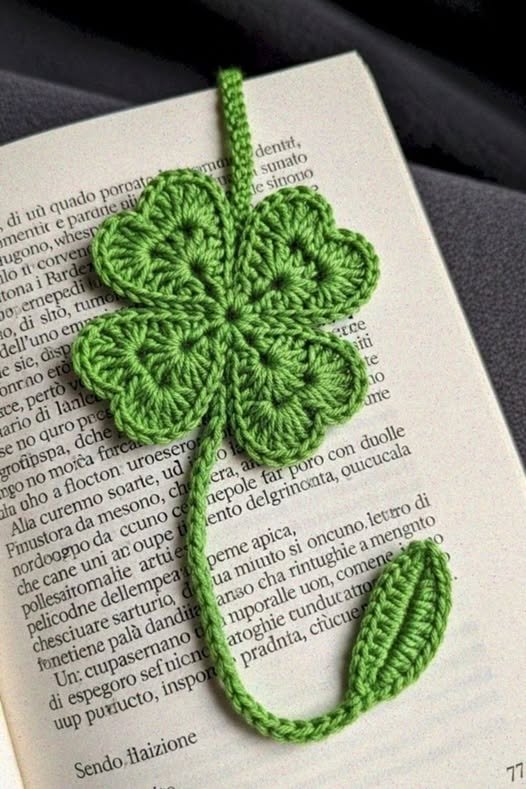
Creating a Crochet Four-Leaf Clover Bookmark – Pattern is one of the most charming ways to bring a touch of luck and handmade beauty to your reading collection. Whether you are an avid reader looking to organize your library or a crafter searching for the perfect quick gift, this specific Crochet Four-Leaf Clover Bookmark – Pattern offers a delightful balance of simplicity and symbolic meaning. In the world of fiber arts, small projects like these are essential for practicing tension and learning how to work in tight rounds without the commitment of a large garment.
The beauty of following a Crochet Four-Leaf Clover Bookmark – Pattern lies in its versatility and the minimal amount of supplies required to achieve a professional-looking result. You don’t need a massive yarn stash to get started; in fact, this Crochet Four-Leaf Clover Bookmark – Pattern is the ultimate “scrap buster,” allowing you to use those beautiful leftover green hues from previous projects. By choosing the right thread and hook, you can transform a simple piece of string into a durable, functional accessory that will keep your place in your favorite books for years to come.
As we dive into the specifics of this Crochet Four-Leaf Clover Bookmark – Pattern, we will explore the best materials to ensure your bookmark lies flat and the technical steps needed to create those perfect, rounded leaves. This guide is designed to be accessible for beginners while providing enough detail for advanced crocheters to customize their work. By mastering the Crochet Four-Leaf Clover Bookmark – Pattern, you are not just making a bookmark; you are crafting a symbol of faith, hope, love, and luck that fits right between the pages of a beloved novel.
1. Essential Materials for Your Crochet Four-Leaf Clover Bookmark – Pattern
The foundation of any successful Crochet Four-Leaf Clover Bookmark – Pattern starts with selecting the right yarn weight to ensure the finished product isn’t too bulky for a book’s spine. Most experienced crafters recommend using mercerized cotton thread or a super fine fingering weight yarn, as these materials provide the crisp definition needed for the clover’s leaves. A Crochet Four-Leaf Clover Bookmark – Pattern worked in bulky yarn might damage the binding of a delicate book, so sticking to thinner fibers is a smart choice for both aesthetics and functionality.
To accompany your fine thread, you will need a small crochet hook, typically ranging from 1.5mm to 2.5mm depending on your personal tension and the specific thread thickness. Using a hook that is slightly smaller than what the yarn label suggests can help your Crochet Four-Leaf Clover Bookmark – Pattern maintain its shape without the need for starching. This tight tension ensures that the “petals” of the clover remain distinct and do not flop over, giving your Crochet Four-Leaf Clover Bookmark – Pattern a high-quality, boutique finish.
Color selection is where you can truly make this Crochet Four-Leaf Clover Bookmark – Pattern your own, moving beyond traditional forest greens into vibrant limes or even variegated shades. Some makers choose to use a metallic embroidery floss alongside their yarn to give the Crochet Four-Leaf Clover Bookmark – Pattern a subtle shimmer, perfect for a special gift. Since clovers in nature often have slight color variations, using a hand-dyed yarn can add a realistic and artistic touch to your finished Crochet Four-Leaf Clover Bookmark – Pattern.
In addition to your hook and yarn, you will need a sharp pair of embroidery scissors and a fine tapestry needle to weave in your ends securely. Because a bookmark is handled frequently, the way you finish your Crochet Four-Leaf Clover Bookmark – Pattern is crucial; you want those ends to stay hidden even after months of use. Keeping these small tools nearby will make the process of completing your Crochet Four-Leaf Clover Bookmark – Pattern much more efficient and enjoyable from start to finish.
Don’t forget the importance of blocking mats and stainless steel pins if you want your clover to look absolutely perfect. While not strictly necessary for every project, blocking your Crochet Four-Leaf Clover Bookmark – Pattern allows you to open up the stitches and ensure the leaves are symmetrical. A quick steam or a light spritz of water while the Crochet Four-Leaf Clover Bookmark – Pattern is pinned down can transform a slightly curled clover into a flat, professional-grade bookmark.
Lastly, consider adding embellishments like a small tassel or a decorative bead to the end of the “stem” part of the bookmark. This adds a bit of weight, making it easier to find your page, and complements the overall aesthetic of the Crochet Four-Leaf Clover Bookmark – Pattern. Whether you prefer a minimalist look or something more ornate, the core Crochet Four-Leaf Clover Bookmark – Pattern serves as a perfect canvas for your personal creative expression and style.
2. Technical Stitches Used in the Crochet Four-Leaf Clover Bookmark – Pattern
To master the Crochet Four-Leaf Clover Bookmark – Pattern, you must be comfortable with working in a magic ring or a small foundation chain loop. This technique allows all four leaves to emerge from a single central point, creating the iconic clover shape that makes this Crochet Four-Leaf Clover Bookmark – Pattern so recognizable. If you are new to the magic ring, don’t worry—once you get the hang of it, it becomes the most reliable way to start any circular or floral-based crochet project.
The leaves themselves in a Crochet Four-Leaf Clover Bookmark – Pattern are usually constructed using a combination of half-double crochets (hdc) and double crochets (dc) to create height. By varying the height of the stitches within a single petal, you create that lovely heart-shaped dip at the top of each leaf. Following a Crochet Four-Leaf Clover Bookmark – Pattern carefully will show you exactly where to place your slip stitches to “pinch” the base of each leaf, ensuring they look like separate units rather than a solid blob.
The “fourth leaf” is what distinguishes this Crochet Four-Leaf Clover Bookmark – Pattern from a standard shamrock, and it requires careful spacing around the center ring. Maintaining consistent tension is key here, as you want all four leaves to be of equal size to maintain the symmetry of the Crochet Four-Leaf Clover Bookmark – Pattern. If one leaf looks larger than the others, it often means your grip on the yarn loosened, so keep an eye on your hook as you move through the repetitive sections of the pattern.
Transitioning from the flower head to the stem is a vital part of the Crochet Four-Leaf Clover Bookmark – Pattern instructions. This is typically done with a long chain stitch sequence that determines the actual length of the bookmark itself. You can customize the length of your Crochet Four-Leaf Clover Bookmark – Pattern to fit anything from a small pocket paperback to a large hardcover textbook simply by adding or subtracting chains in this final phase of construction.
For added durability, many versions of the Crochet Four-Leaf Clover Bookmark – Pattern suggest working a row of slip stitches back down the length of the chain. This creates a “corded” effect that prevents the bookmark from stretching out over time and makes it feel more substantial in your hand. It is a small extra step in the Crochet Four-Leaf Clover Bookmark – Pattern that significantly improves the longevity and quality of the final accessory.
Finally, understanding how to read crochet abbreviations is essential for following any written Crochet Four-Leaf Clover Bookmark – Pattern without confusion. Terms like “yo” (yarn over) and “sk” (skip) will appear frequently, especially when shaping the delicate curves of the clover leaves. Once you speak the language of the Crochet Four-Leaf Clover Bookmark – Pattern, you will find that the rhythm of the stitches becomes meditative, making this a perfect project for relaxing after a long day.
3. Step-by-Step Construction of Your Clover Bookmark
The first active row of your Crochet Four-Leaf Clover Bookmark – Pattern usually involves creating the center hub where everything connects. You will work several clusters into the magic ring, each representing a leaf, and then pull the ring tight to eliminate any gaps in the middle. This part of the Crochet Four-Leaf Clover Bookmark – Pattern requires a bit of dexterity, but it is the most rewarding moment when you see the four-leaf shape suddenly take form under your fingers.
After the center is secure, the Crochet Four-Leaf Clover Bookmark – Pattern directs you to build the “body” of each leaf using taller stitches. It is helpful to count your stitches out loud to ensure that each leaf has the exact same count of treble crochets or double crochets. Precision during this stage of the Crochet Four-Leaf Clover Bookmark – Pattern ensures that your clover looks balanced and professional, which is especially important if you plan on selling your bookmarks at craft fairs.
Once the four leaves are completed, you will perform a slip stitch into the very first stitch of the round to close the clover head. This is the moment where the Crochet Four-Leaf Clover Bookmark – Pattern transitions into the tail or stem section. Make sure your slip stitch is tight so there isn’t a visible “seam” where the leaves meet the stem. A clean transition is a hallmark of a well-executed Crochet Four-Leaf Clover Bookmark – Pattern that any book lover will appreciate.
When chaining the stem for your Crochet Four-Leaf Clover Bookmark – Pattern, hold your hook at a steady angle to keep the chain links uniform. If your chain is too tight, the bookmark might curl into a spiral; if it’s too loose, it won’t be strong enough to hold its place. Most people find that about 50 to 70 chains is the “sweet spot” for a standard Crochet Four-Leaf Clover Bookmark – Pattern, but you can adjust this according to your specific needs or the size of your yarn.
At the very end of the stem, the Crochet Four-Leaf Clover Bookmark – Pattern might call for a small “pompom” or a tiny leaf to act as a stopper. This ensures that the bookmark doesn’t slide completely through the book and adds a nice visual weight to the bottom. Finishing this part of the Crochet Four-Leaf Clover Bookmark – Pattern is a great way to use up the last few inches of your yarn and provides a satisfying conclusion to the crochet work.
The final step in your Crochet Four-Leaf Clover Bookmark – Pattern journey is the finishing work, which involves weaving in the starting and ending tails. Use your tapestry needle to run the yarn through the back of the stitches several times in different directions. This creates enough friction that the yarn won’t slip out, even with the frequent pulling and tugging a Crochet Four-Leaf Clover Bookmark – Pattern experiences during use. Now, your lucky bookmark is ready to be gifted or tucked into your current read!
4. Customizing and Selling Your Crochet Clover Creations
One of the best things about mastering the Crochet Four-Leaf Clover Bookmark – Pattern is the ability to customize it for different holidays and themes. While green is the classic choice for St. Patrick’s Day, you can use a Crochet Four-Leaf Clover Bookmark – Pattern in white or gold for a wedding favor or in pinks for a “lucky in love” Valentine’s theme. The design is so timeless that it adapts to almost any color palette, making your Crochet Four-Leaf Clover Bookmark – Pattern a versatile tool in your crafting arsenal.
You can also experiment with the “texture” of your Crochet Four-Leaf Clover Bookmark – Pattern by adding small details like surface slip stitches or embroidery. Imagine a Crochet Four-Leaf Clover Bookmark – Pattern where you’ve stitched the recipient’s initials into one of the leaves—it immediately becomes a cherished heirloom. Adding these personal touches to the basic Crochet Four-Leaf Clover Bookmark – Pattern is what sets handmade items apart from mass-produced plastic bookmarks found in stores.
For those interested in the business side of crafting, the Crochet Four-Leaf Clover Bookmark – Pattern is an incredibly profitable item due to its low material cost and high perceived value. Because you can finish one in under twenty minutes, you can build a large inventory of clovers in a single weekend. A well-made Crochet Four-Leaf Clover Bookmark – Pattern can be sold individually or as part of a “book lover’s gift set,” alongside a nice journal or a cozy candle, increasing your sales potential.
If you are sharing your work on social media, be sure to use high-quality photos that show the Crochet Four-Leaf Clover Bookmark – Pattern in action inside a book. Natural lighting helps highlight the stitch definition and the vibrant colors of the yarn, making your Crochet Four-Leaf Clover Bookmark – Pattern more appealing to potential buyers or fellow crafters. Clear photography combined with a well-written description can help your Crochet Four-Leaf Clover Bookmark – Pattern go viral in the online maker community.
Teaching others how to follow a Crochet Four-Leaf Clover Bookmark – Pattern is another great way to give back to the community and grow your own skills. You could host a “crochet-along” or a small workshop focusing specifically on this Crochet Four-Leaf Clover Bookmark – Pattern. There is something incredibly satisfying about watching a beginner complete their first Crochet Four-Leaf Clover Bookmark – Pattern and seeing the joy on their face when they realize they’ve created something functional and beautiful.
Finally, always remember to keep a record of your modifications to the Crochet Four-Leaf Clover Bookmark – Pattern in a dedicated notebook. Whether you changed the hook size or added an extra row of edging, these notes are invaluable for when you want to recreate your favorite version of the Crochet Four-Leaf Clover Bookmark – Pattern months later. Consistent documentation ensures that your “lucky” bookmarks remain high-quality and consistent, no matter how many times you revisit the design.
FAQ – Frequently Asked Questions
What is the best yarn for a Crochet Four-Leaf Clover Bookmark – Pattern?
The best choice is usually a size 10 mercerized cotton thread. It is thin enough to fit between book pages without bulging and strong enough to handle daily use without pilling or losing its shape.
How long does it take to complete this Crochet Four-Leaf Clover Bookmark – Pattern?
For most intermediate crocheters, a single Crochet Four-Leaf Clover Bookmark – Pattern takes between 15 and 30 minutes. It is a perfect “one-sitting” project that provides instant gratification.
Can I make the stem longer for large textbooks?
Absolutely! The Crochet Four-Leaf Clover Bookmark – Pattern is easily adjustable. Simply continue your foundation chain until it reaches your desired length before working your way back down with slip stitches.
Do I need to starch the clover leaves?
While not mandatory, using a bit of fabric stiffener or starch can help the leaves of your Crochet Four-Leaf Clover Bookmark – Pattern stay perfectly flat and prevent them from curling over time, especially if you use a softer yarn.
Is this Crochet Four-Leaf Clover Bookmark – Pattern suitable for total beginners?
Yes! As long as you know the basic stitches (chain, single crochet, double crochet), you can follow this Crochet Four-Leaf Clover Bookmark – Pattern. It is a great way to practice working in a circle.
How do I prevent the magic ring from coming undone?
The key is to weave in your starting tail very securely. After pulling the ring tight, use a needle to weave the yarn in a circle through the base of the stitches at least twice to lock it in place.
Conclusion
In this comprehensive guide, we have explored the intricate details of creating a Crochet Four-Leaf Clover Bookmark – Pattern, from the initial selection of fine cotton threads to the final finishing touches that ensure durability. We discussed the importance of using the correct hook size to maintain tension and how the combination of simple stitches like double and treble crochets creates the iconic heart-shaped leaves.
We also touched on how this Crochet Four-Leaf Clover Bookmark – Pattern can be customized with tassels, beads, or different colors to suit any occasion, making it a versatile and rewarding project for crafters of all levels. By following these steps, you now have the knowledge to create a beautiful, lucky charm that combines the art of crochet with the love of reading.