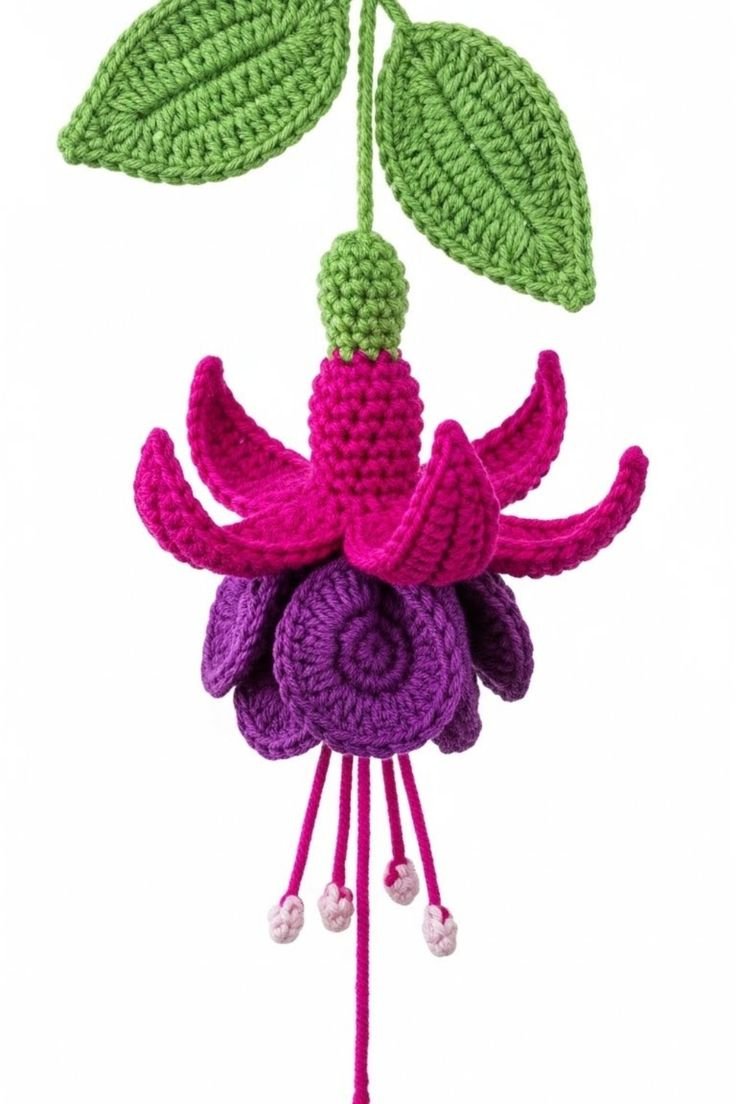
The Crochet Fuchsia flowers – Pattern is a breathtaking project that captures the elegant, drooping beauty of one of nature’s most sophisticated blooms, offering a unique challenge for those who love botanical-inspired art. These exotic flowers, known for their two-toned layers and long, delicate stamens, translate beautifully into the medium of yarn, allowing crafters to create everlasting spring decor. Whether you are looking to create a stunning hanging basket that never needs watering or a delicate floral embellishment for a summer shawl, mastering the Crochet Fuchsia flowers – Pattern will elevate your technical skills to new heights.
Working on a Crochet Fuchsia flowers – Pattern requires a blend of structural precision and artistic flair, as the flower is composed of several distinct parts: the sepal (the outer layer), the corolla (the inner petals), and the elongated reproductive organs. Because fuchsias naturally hang downward, the way you construct and join these parts is vital to achieving a lifelike “pendulous” effect. For many, this crochet project is a gateway into the world of 3D floral modeling, where the choice of hook and the tension of your stitches determine the “bloom” and drape of the final piece.
In this comprehensive guide, we will explore every technical aspect of the Crochet Fuchsia flowers – Pattern, from the selection of vibrant, high-contrast yarns to the assembly techniques that ensure your flowers look professional and botanically accurate. We will focus on creating a high-quality finish with excellent stitch definition and provide tips on how to display your handmade crochet flowers for maximum visual impact. By following these steps, you will transform simple threads into a lush, vibrant display that brings a touch of the garden into your home all year round.
1. Selecting the Ideal Materials for Your Crochet Fuchsia flowers – Pattern
The most critical decision when starting your Crochet Fuchsia flowers – Pattern is the choice of yarn fiber. To replicate the waxy, smooth texture of real fuchsia sepals and petals, a 100% mercerized cotton yarn is the gold standard. Mercerized cotton has a slight sheen that catches the light, much like a living flower, and it offers the structural integrity needed to prevent the delicate “tube” of the flower from collapsing under its own weight.
When considering the yarn weight for a Crochet Fuchsia flowers – Pattern, most enthusiasts prefer a fingering weight (Level 1) or a lace weight (Size 10 thread). Using a finer yarn allows you to capture the intricate details of the ruffled inner petals without making the flower look bulky or heavy. A lighter weight also ensures that when you hang your crochet fuchsia, it has the natural, graceful “swing” that makes this specific flower so iconic in gardens worldwide.
The crochet hook size must be matched precisely to your yarn to achieve a tight, crisp fabric. For a standard Crochet Fuchsia flowers – Pattern, a 2.0mm or 2.25mm (B) hook is typically ideal for fingering weight yarn. Using a slightly smaller hook than usual creates a dense stitch definition, which is essential for the sepals to “flare” outward correctly. If your stitches are too loose, the flower will lose its signature trumpet shape and look more like a flat motif.
Color theory plays a massive role in a successful Crochet Fuchsia flowers – Pattern. Real fuchsias are famous for their bold, contrasting colors—often featuring bright pink sepals with deep purple inner petals, or white sepals with red centers. Choosing high-contrast, saturated yarn colors will make your work pop and give it that unmistakable “tropical” look. Don’t be afraid to experiment with hand-dyed yarns that offer subtle color shifts to mimic the natural veins found in real petals.
Floral wire is an optional but highly recommended material for reinforcing the stem and the stamens of your Crochet Fuchsia flowers – Pattern. By crocheting over a thin gauge of wire, you can “pose” the flower, making the sepals curve upward and the stamens hang perfectly straight. This addition transforms a simple crochet applique into a professional-grade sculptural piece that can be used in bouquets or as a standalone piece of botanical fiber art.
Lastly, a sharp tapestry needle and a pair of fine embroidery scissors are essential for the “finishing” stage of your Crochet Fuchsia flowers – Pattern. Because this flower is made of multiple layers, you will have several yarn tails to weave in at the base. A clean, invisible finish is what separates a hobbyist’s work from a boutique-quality handmade flower, ensuring that the join between the stem and the bloom is seamless and durable for long-term display.
2. Constructing the Sepals and the Trumpet Base
The first stage of the Crochet Fuchsia flowers – Pattern is the creation of the sepal, which forms the outer “shield” and the upper tube of the flower. This is usually started with a Magic Ring to ensure a tight, closed top. You will work in continuous rounds to create a narrow cylinder, which represents the tube of the fuchsia. Maintaining consistent tension during these rounds is vital to keep the tube straight and professional before you transition into the flaring sepals.
To create the four distinct sepals that “burst” from the tube in a Crochet Fuchsia flowers – Pattern, you will transition from working in the round to working back and forth on small sections. Using graduated stitch heights—starting with a single crochet, moving to double and treble crochets, and then back down—creates the pointed, elegant shape of the sepal. This part of the crochet design requires careful stitch counting to ensure all four sepals are identical in size and curvature.
A key technique used in the Crochet Fuchsia flowers – Pattern to make the sepals “curl” upward is working in the back loops only (BLO) at the base of the flare. This creates a natural fold line in the fabric, encouraging the sepals to point toward the sky while the rest of the flower hangs down. Mastering this “hinge” technique is the secret to capturing the energetic, “dancing” look of a real fuchsia plant in your handmade crochet work.
The term Picot Stitch is often used at the very tip of each sepal in a Crochet Fuchsia flowers – Pattern to give it a sharp, realistic point. By chaining two or three and slip-stitching back into the first chain, you create a tiny decorative peak. This small detail adds a level of botanical accuracy that makes the crochet bloom look much more intricate, providing a high-end finish that is perfect for close-up photography or competition-level crafting.
During the construction of the base, you may encounter the term Standing Stitch. This is a great way to join new colors—like moving from the pink sepal yarn to the purple corolla yarn—without creating a bulky knot. A standing single crochet allows for a seamless transition, keeping the “throat” of the Crochet Fuchsia flowers – Pattern clean and tidy. This technical precision ensures that the interior of the flower looks just as beautiful as the exterior.
Finally, the Seamless Join is essential when finishing the sepal round. Instead of a standard slip stitch, which can leave a visible bump, the invisible join method uses a needle to mimic the top of a stitch. This ensures the edge of your Crochet Fuchsia flowers – Pattern is perfectly smooth, which is especially important if you are making multiple flowers for a fuchsia garland where every angle of the bloom will be visible to the viewer.
3. Crafting the Ruffled Corolla and Inner Petals
The “corolla” refers to the inner set of petals in a Crochet Fuchsia flowers – Pattern, which are often a contrasting color and have a more ruffled, delicate appearance. These petals are typically worked directly into the remaining loops of the base tube. Using a v-stitch or shell stitch in this section creates the volume and “fluffiness” that gives the fuchsia its full, lush look. The corolla should appear to emerge from within the sepals, creating a beautiful layered effect.
To achieve the “ruffle” that is so characteristic of a double-fuchsia Crochet Fuchsia flowers – Pattern, you will use heavy increases. By placing three or four stitches into every stitch of the previous round, the fabric is forced to wave and fold on itself. This ruffle technique adds a sense of luxury and depth to the flower, making it look like a “ballerina’s skirt,” which is a common nickname for this stunning crochet floral design.
The term Front Post Double Crochet (FPDC) can be used in more advanced Crochet Fuchsia flowers – Pattern versions to create “ribs” on the inner petals. This adds a 3D texture that mimics the natural veins of a flower, providing a realistic grip for the light and making the purple or red yarn look more vibrant. Adding texture to the corolla is an easy way to elevate a basic crochet flower into a piece of professional-grade fiber art.
Stitch Multiple is a term you should keep in mind if you want to adjust the “fullness” of your Crochet Fuchsia flowers – Pattern. If you want a “single” fuchsia (which has fewer inner petals), you would use a smaller multiple of stitches. If you want a “double” fuchsia, you increase the multiple. Understanding the math behind the petal repeats allows you to customize your garden, creating different varieties of fuchsias using the same basic pattern.
When working the corolla, the Yarn Over (YO) technique must be consistent to ensure all your double crochets are the same height. In a Crochet Fuchsia flowers – Pattern, where the petals are small and compact, even a minor variation in height can make the flower look lopsided. Taking your time to maintain a steady crochet rhythm results in a symmetrical, balanced bloom that looks store-bought and perfectly executed.
Lastly, the Fastening Off process for the corolla requires extra care. Since these petals are the most visible part of the flower’s center, you must weave in your ends very deeply into the tube of the Crochet Fuchsia flowers – Pattern. If a tail pops out, it can ruin the illusion of a real flower. Using a yarn needle to hide the thread inside the structural “trumpet” of the flower keeps the display looking pristine and “nature-made.”
4. Adding the Stamens and Final Display Techniques
The finishing touch of any Crochet Fuchsia flowers – Pattern is the set of long, dangling stamens that hang far below the petals. These are usually made by creating long foundation chains in a contrasting color, like a pale yellow or a bright red. To keep them from curling, you can work a row of slip stitches back up the chain. This creates a thin, sturdy “thread” that holds its shape and provides the verticality needed for a realistic crochet fuchsia.
To create the “anthers” (the pollen-heavy tips) in your Crochet Fuchsia flowers – Pattern, you can use a French Knot or a small 3-stitch popcorn stitch at the end of each stamen. This tiny pop of color is what draws the eye and gives the flower its finished, “complete” look. Using a slightly thicker thread for the anthers can add a nice bit of weight, helping the stamens hang straight down as they should in a botanical crochet project.
Reinforcement is key if you are making a large Crochet Fuchsia flowers – Pattern. You can use a bit of fabric stiffener on the stamens to ensure they don’t get tangled or frizzy over time. This is especially helpful if your fuchsia will be used as a bag charm or a keychain, where it will be handled frequently. Stiffening the yarn keeps the “anatomy” of your handmade flower crisp and well-defined for years of use.
If you are planning to display your Crochet Fuchsia flowers – Pattern in a hanging basket, consider making crochet leaves to accompany them. A simple oval leaf pattern with a “spine” created by a surface slip stitch adds the necessary greenery to make the fuchsias look like they are growing from a real plant. Grouping three or four flowers together at different heights creates a “cluster” that is a hallmark of the fuchsia’s natural growth habit.
The term Blocking is highly relevant for the sepals of the Crochet Fuchsia flowers – Pattern. After finishing, you should pin the sepals back and lightly steam them with an iron. This “sets” the curve, ensuring that your crochet flower stays “open” and vibrant rather than closing up. Blocking is the final step that transforms a crumpled piece of crochet into a magnificent, display-ready floral masterpiece.
Finally, consider the Attachment Method. Whether you are sewing your Crochet Fuchsia flowers – Pattern onto a hat or attaching it to a wire stem for a vase, use a strong, invisible thread or a matching yarn tail. Ensuring a sturdy connection at the “calyx” (the top green part of the flower) allows the fuchsia to hang with its natural, heavy-headed grace, completing the illusion of a real, blooming garden in your crochet collection.
FAQ: Frequently Asked Questions about the Crochet Fuchsia flowers – Pattern
1. Is the Crochet Fuchsia flowers – Pattern difficult for a beginner?
The Crochet Fuchsia flowers – Pattern is generally considered an intermediate project. While the stitches themselves (single, double, and treble crochet) are basic, the construction involves working in small rounds and managing multiple layers. However, a patient beginner can certainly succeed by following the step-by-step assembly carefully.
2. What is the best yarn for a realistic look?
For the most realistic result, use mercerized cotton thread (Size 10) or a fingering weight cotton. The sheen of mercerized cotton mimics the natural texture of the flower, and the thinness of the yarn allows for the delicate ruffles and points that make the Crochet Fuchsia flowers – Pattern so beautiful.
3. How do I stop the sepals from drooping?
If your sepals are too soft, try using a smaller hook size to create a tighter, stiffer fabric. You can also use a stiffening spray or a light dip in a water-and-glue mixture to “set” the sepals in an upward-curving position, which is a classic look for this floral pattern.
4. How long does it take to make one fuchsia?
Depending on the complexity and your speed, one Crochet Fuchsia flowers – Pattern usually takes between 45 minutes to 90 minutes. Because they are small and use very little yarn, they are the perfect “scrap-buster” project for using up leftover bits of high-quality cotton.
5. Can I make different varieties of fuchsias?
Yes! You can easily adapt the Crochet Fuchsia flowers – Pattern to make “single” or “double” varieties by changing the number of stitches in the inner corolla. You can also vary the length of the sepals to mimic the hundreds of different fuchsia species found in nature, making each handmade flower unique.
6. Do I need to use wire for the stamens?
Wire is not strictly necessary, but it helps if you want a very specific “pose.” For a standard hanging fuchsia, the weight of the yarn is usually enough to make the stamens hang down naturally. If you find they are curling, a quick steam blocking will usually straighten them out perfectly.
Conclusion
In this article, we have explored the intricate and rewarding process of following a Crochet Fuchsia flowers – Pattern. We covered everything from selecting the perfect mercerized cotton for its sheen and stitch definition to the technical mastery of the Magic Ring and graduated stitch heights used to create those iconic flaring sepals.
We also discussed the importance of the ruffled corolla and the dangling stamens that give the fuchsia its “ballerina” silhouette. Whether you are creating a single bloom for a brooch or a full hanging basket of everlasting flowers, the fuchsia remains one of the most elegant and technically satisfying projects in the world of botanical crochet.