Finding the perfect Crochet Hat Holder – Pattern is a game-changer for anyone who loves headwear but struggles with organized storage solutions. If you are a fan of wide-brimmed sun hats, fedoras, or even beanies, you know that keeping them in good shape can be a challenge; they often end up crushed in closets or taking up valuable shelf space. By choosing to create a Crochet Hat Holder – Pattern, you are opting for a stylish, vertical storage solution that turns your collection into a beautiful piece of wall art while ensuring your hats remain dust-free and unbent.
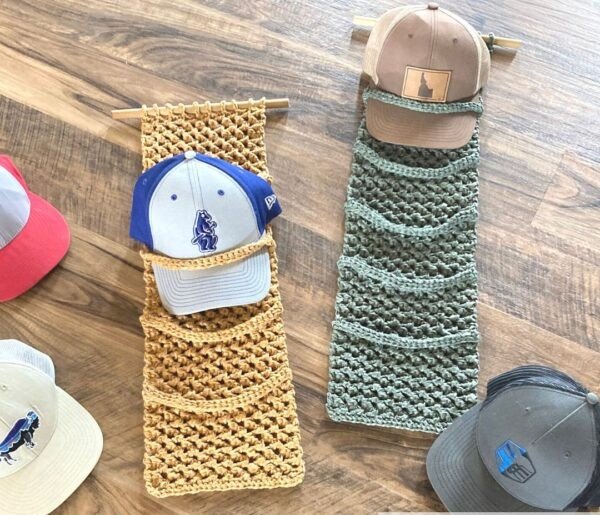
The versatility of a Crochet Hat Holder – Pattern lies in its simple yet effective design, which typically consists of a decorative macramé-style strap with loops or clips to hold the brims. This project is ideal for those who appreciate the “Boho-chic” aesthetic, as the natural texture of the yarn complements the organic materials of most hats. When you follow a dedicated Crochet Hat Holder – Pattern, you are not just making a utility item; you are mastering a series of stitches that provide both the strength to hold weight and the elegance to decorate a bedroom or entryway.
In this comprehensive guide, we will explore everything you need to know about the Crochet Hat Holder – Pattern, from selecting the most durable materials to the final assembly of the hanging loops. We will focus on the two core components: the Crochet Hat Holder, which is the finished textile organization tool, and the Pattern, which acts as your technical roadmap and instructional guide. Whether you are looking to declutter your home or create a thoughtful handmade gift, this Crochet Hat Holder – Pattern tutorial will provide the clarity and inspiration needed to complete a professional-grade project.
1. Choosing Durable Materials for Your Crochet Hat Holder – Pattern
The first step in starting your Crochet Hat Holder – Pattern is selecting a yarn that can handle the vertical tension of hanging items. Unlike a blanket or a scarf, a hat holder needs to be non-stretchy to prevent it from sagging over time under the weight of several hats. For this reason, many experts recommend using a 100% cotton cord or a sturdy macramé yarn when following your Crochet Hat Holder – Pattern, as these fibers offer the structural integrity required for home organization tools.
In addition to the yarn, the choice of crochet hook is vital for the success of your Crochet Hat Holder – Pattern. You generally want to use a hook that is slightly smaller than what is recommended on the yarn label. This creates a “tight gauge,” which results in a denser, stronger fabric that won’t warp. If you are using a 4mm cord, a 3.5mm or 4mm hook is usually perfect to ensure that the base of your Crochet Hat Holder remains firm and reliable for years of use.
Hardware is another element that distinguishes a high-quality Crochet Hat Holder – Pattern. You will likely need a wooden ring or a metal “D-ring” at the top to serve as the hanging point. This hardware must be integrated into the first few rows of your Pattern, allowing the yarn to be worked directly around the ring for maximum security. Using natural wood adds a beautiful, rustic touch to the finished Crochet Hat Holder, making it look like a high-end designer accessory.
Don’t forget about the “holding” mechanism in your Crochet Hat Holder – Pattern. Some designs use crochet loops where the hat brim is tucked through, while others utilize wooden clothespins or specialized clips that are crocheted into the structure. If you choose clips, ensure they have a smooth finish so they do not snag the delicate fibers of your hats. A well-designed Pattern will give you clear instructions on exactly where to place these attachment points for optimal balance.
Color selection for your Crochet Hat Holder – Pattern should ideally be neutral to allow your hats to be the star of the show. Shades like cream, beige, terracotta, or sage green are incredibly popular because they blend seamlessly with various interior design styles. However, if you have a vibrant hat collection, a dark charcoal or navy Crochet Hat Holder can provide a stunning contrast that highlights the colors of your accessories, turning your wall into a gallery.
Finally, ensure you have a few basic notions on hand before you dive into the Crochet Hat Holder – Pattern. A sharp pair of scissors, a large-eye yarn needle for weaving in thick ends, and a measuring tape are essential. Since this is a vertical project, measuring as you go is critical to ensure the loops are spaced evenly. By preparing your workspace with the right tools, the process of following the Crochet Hat Holder – Pattern becomes a relaxing and enjoyable creative experience.
2. Technical Stitches and Foundation of the Pattern
The foundation of a Crochet Hat Holder – Pattern often begins with the “sc over ring” technique. This involves making a series of single crochets directly over your wooden or metal ring, which creates a sturdy anchor for the rest of the strap. This is a crucial step in the Pattern, as it bears the weight of the entire assembly. A tight, even distribution of stitches around the ring will ensure that your Crochet Hat Holder hangs straight and looks professional from the very beginning.
Most Crochet Hat Holder – Pattern designs rely on a combination of basic stitches like the Single Crochet (sc) and the Double Crochet (dc) to create the main strap. To add visual interest, many patterns incorporate the “v-stitch” or a “mesh stitch”. These openwork designs are not only beautiful but also functional, as they allow the holder to be lightweight while maintaining vertical strength. Following the Pattern meticulously during these rows is key to keeping the width of the strap consistent.
One of the most important technical aspects of the Crochet Hat Holder – Pattern is managing “negative ease.” Since the weight of the hats will naturally pull the yarn downward, the Pattern may seem shorter than you expect while you are working on it. A good designer will account for this stretching in the Crochet Hat Holder – Pattern instructions. If you find your yarn is particularly stretchy, you may need to reduce the number of rows between the loops to maintain the desired final length.
Creating the loops or “hat pockets” is where the Crochet Hat Holder – Pattern gets creative. You might be instructed to create a long chain and slip stitch it back into the main strap to form a circular opening. These openings must be large enough to accommodate a variety of hat sizes but snug enough to keep them from falling out. The Pattern will provide specific stitch counts for these loops, ensuring that your Crochet Hat Holder is as functional as it is decorative.
For those who want a more textured look, a Crochet Hat Holder – Pattern might include Bobble Stitches or Popcorn Stitches along the edges. These raised elements add a three-dimensional quality to the strap, making it a statement piece even when no hats are being held. However, be mindful that these stitches use more yarn, so check your yardage requirements in the Pattern before starting if you plan to make a particularly long holder for a large collection.
The final rows of the Crochet Hat Holder – Pattern usually involve a decorative fringe or a tassel at the bottom. This adds weight to the holder, helping it to hang straight even when it is not fully loaded with hats. A well-executed fringe, as detailed in your Pattern, provides that classic bohemian finish that makes the Crochet Hat Holder look complete. Take the time to trim the fringe evenly, as this small detail makes a significant impact on the overall aesthetic.
3. Sizing and Balancing Your Crochet Hat Holder
Sizing your Crochet Hat Holder – Pattern depends entirely on the number of hats you intend to display. A standard holder typically accommodates three to five hats. When following the Pattern, you can easily customize the length by repeating the “loop section” as many times as needed. It is important to remember that for every hat you add, the tension on the top ring increases, so ensure your stitches in the early part of the Crochet Hat Holder – Pattern are extra secure.
Balance is a critical factor that many DIYers overlook when executing a Crochet Hat Holder – Pattern. If the loops are spaced too closely together, the hats will overlap and become crushed, which defeats the purpose of the organizer. A professional Pattern will usually suggest a spacing of about 8 to 12 inches between each holding point. This allows the brims of your hats to sit naturally without touching, preserving their shape and making the Crochet Hat Holder look tidy.
If you have very heavy hats, such as thick felt fedoras or leather hats, you may need to “double up” your yarn while following the Crochet Hat Holder – Pattern. Working with two strands of yarn held together creates a much thicker, more durable strap that can withstand higher weight limits. This modification is easy to do, but remember that it will also require a larger crochet hook and will use twice the amount of yarn specified in the original Crochet Hat Holder – Pattern.
For smaller spaces, you can adapt the Crochet Hat Holder – Pattern to be a “single-hat” mini holder. These are perfect for hanging on the back of a door or in a small corner. By focusing on just one beautifully decorated loop, you can turn a single favorite hat into a focal point of your room. The Pattern for a mini version is much faster to complete, making it a great “instant gratification” project for a weekend afternoon.
Wall placement also affects how you should size your Crochet Hat Holder – Pattern. If you are hanging it over a piece of furniture, you want to ensure the bottom of the holder (including the fringe) doesn’t drag. Measure the vertical space on your wall before you start the Pattern, and adjust the number of repeats accordingly. A perfectly sized Crochet Hat Holder looks intentional and fits the architecture of your home, enhancing the overall interior design.
Lastly, consider the “stretch test” as part of your sizing process. Once you have finished the main body of the Crochet Hat Holder – Pattern, hang it on a temporary hook and place your hats in the loops for an hour. This allows the yarn to settle into its final shape. If it stretches more than you like, you can easily go back and remove a few rows from the Pattern before finishing the fringe, ensuring the final result is exactly the height you intended.
4. Care, Maintenance, and Aesthetic Customization
Maintaining your Crochet Hat Holder – Pattern is relatively simple, but it does require some attention to keep it looking fresh. Since it hangs on the wall, it will eventually collect dust. A light dusting with a soft brush or a quick shake outside is usually enough. If you used cotton yarn as suggested in the Pattern, you can spot-clean the Crochet Hat Holder with a damp cloth and mild soap. Avoid soaking the entire piece, especially if you used a wooden ring, as the wood could warp or stain the yarn.
Over time, the weight of the hats might cause the loops to stretch slightly. To fix this, you can “reinforce” the loops of your Crochet Hat Holder – Pattern by adding a row of slip stitches around the inner edge of each opening. This adds a second layer of yarn that resists further stretching. This maintenance tip is a great way to extend the life of your Crochet Hat Holder and keep it looking as good as the day you finished the Pattern.
Customization is the most fun part of the Crochet Hat Holder – Pattern journey. You can add wooden beads to the fringe or thread them onto the yarn before you start your stitches so they sit along the main strap. This adds a tactile, earthy quality to the Crochet Hat Holder that pairs beautifully with straw hats. Following a basic Pattern and then adding these personal touches is what makes handmade items so special and unique.
If your home decor changes, you can even “re-dye” a cotton Crochet Hat Holder. Because cotton takes dye very well, you can give your old Crochet Hat Holder – Pattern a completely new look with a bottle of fabric dye. This is a sustainable way to update your storage solutions without having to crochet a new piece from scratch, ensuring that your hard work in following the original Pattern continues to serve you for years.
For a more modern look, you can swap the traditional yarn fringe for macramé feathers or a simple clean hem. Some modern Crochet Hat Holder – Pattern variations even use “t-shirt yarn” for a chunky, contemporary feel. The thickness of the t-shirt yarn makes the project work up very quickly, and the slightly elastic nature of the fabric can be beneficial for holding hats with very thick brims securely in place.
Ultimately, the Crochet Hat Holder – Pattern is a project that grows with you. As your hat collection expands, you can create more holders in coordinating colors to create a full “hat wall.” By mastering this Pattern, you have gained a valuable skill in home organization and decor, proving that crochet is not just for blankets and sweaters, but also for smart, stylish, and functional modern living.
Frequently Asked Questions (FAQ)
Is a Crochet Hat Holder – Pattern suitable for beginners?
Yes, most Crochet Hat Holder – Pattern designs use basic stitches like the single crochet and chain stitch, making them very beginner-friendly. The most “difficult” part is maintaining even tension, but the repetitive nature of the strap is great practice for those new to the craft.
How many hats can one holder safely carry?
Usually, a Crochet Hat Holder made with sturdy cotton cord can safely hold between 3 and 6 hats. If you want to hold more, it is better to make two separate holders rather than making one extremely long one, as the weight can become too much for the top ring.
Can I use acrylic yarn for this pattern?
While you can use it, acrylic yarn tends to stretch significantly more than cotton. If you choose to use acrylic for your Crochet Hat Holder – Pattern, you should expect the holder to become longer over time and might need to start with a shorter length to account for that stretch.
Will the clips or loops damage my hats?
If you follow the Crochet Hat Holder – Pattern and use smooth wooden clips or soft crochet loops, your hats should remain in perfect condition. Avoid using metal clips with “teeth” that could bite into the straw or felt, as these can leave permanent marks.
How do I hang the Crochet Hat Holder on the wall?
You can hang your finished Crochet Hat Holder on a simple nail, a decorative wall hook, or even a Command hook if you are in a rental. Ensure the hook is rated for at least a few pounds to safely support the weight of the holder plus the hats.
Can this holder be used for other items?
Absolutely! The same Crochet Hat Holder – Pattern can be used to organize light scarves, dried flower bouquets, or even lightweight handbags. Its vertical design makes it a versatile storage solution for many different accessories around the home.
Conclusion
Creating a Crochet Hat Holder – Pattern is a rewarding project that combines the best of organization and artistry. Throughout this article, we have discussed the importance of choosing non-stretch materials like cotton, the technical stitches needed to build a strong foundation, and the balancing act of sizing your loops for a perfect fit. We also looked at how to maintain your holder and customize it with beads and fringe to match your personal style.
By following a well-structured Pattern, you have transformed a simple ball of yarn into a functional masterpiece that protects your hats and beautifies your space. We hope this guide has inspired you to start your own project! Please leave your sincere opinion and suggestions in the comments below—we would love to hear how your hat holder turned out!