Looking for a Crochet Heart – Pattern is one of the most rewarding journeys for any fiber artist, whether you are a beginner or a seasoned pro. These charming little creations are more than just yarn and stitches; they represent handmade love and can be used in countless projects, from Valentine’s Day decor to personalized garment embellishments. In this guide, we will explore everything you need to know to create a stunning Crochet Heart – Pattern that looks professional and polished every single time.
Mastering the Crochet Heart – Pattern allows you to expand your creative horizons significantly. Because these shapes are so versatile, they serve as the perfect introduction to working in the round and understanding how increases and decreases shape a 3D or 2D object. Many crafters find that once they nail the basic Crochet Heart – Pattern, they feel much more confident tackling complex amigurumi or intricate lace designs.
In the following sections, we will break down the essential steps, materials, and techniques required to master this craft. We have structured this article to be highly informative and easy to follow, ensuring your finished work meets the highest standards of quality. Let’s dive into the world of yarn and hooks to bring your very own Crochet Heart – Pattern to life with ease and precision.
1. Essential Materials for Your Crochet Heart – Pattern
Before you begin your journey with a Crochet Heart – Pattern, selecting the right yarn is the most critical decision you will make. For beginners, a medium-weight worsted cotton or acrylic yarn is highly recommended because it provides excellent stitch definition. This makes it much easier to see where your hook needs to go, ensuring your Crochet Heart – Pattern remains symmetrical and neat.
The crochet hook size is equally important when working on a Crochet Heart – Pattern. Generally, you should check the yarn label for the recommended size, but if you want a tighter, sturdier heart, consider dropping down half a millimeter. A 4.0mm (G) hook is often the “sweet spot” for standard patterns, providing a balance between flexibility and structure.
Don’t forget the small but vital tools like stitch markers and a yarn needle. Using a stitch marker is essential when working in continuous rounds to keep track of the beginning of your Crochet Heart – Pattern. Meanwhile, a sharp yarn needle ensures that your ends are woven in securely, preventing your hard work from unraveling over time.
For those making 3D versions, high-quality polyester fiberfill is the best choice for stuffing. When filling your Crochet Heart – Pattern, the goal is to create a firm shape without overstretching the stitches, which can cause the stuffing to peek through. A well-stuffed heart maintains its “plump” romantic look for years to come.
Scissors are a basic necessity, but a sharp pair of embroidery scissors will give you the cleanest cuts. Clean cuts prevent fraying at the end of your Crochet Heart – Pattern, making the final fastening off process much smoother. Having a dedicated craft kit ready before you start will keep your creative flow uninterrupted.
Lastly, consider your workspace lighting. Working with dark yarns like red or burgundy for a Crochet Heart – Pattern can be tough on the eyes. Ensure you have a bright, clear light source so you can maintain consistent tension, which is the secret ingredient to a professional-looking handmade item.
2. Understanding the Magic Ring Technique
The Magic Ring, also known as a magic circle, is the gold standard for starting a Crochet Heart – Pattern. Unlike the traditional “chain 2” method, the Magic Ring allows you to pull the center tight, leaving absolutely no hole in the middle of your work. This creates a seamless, professional finish that is highly sought after in the handicraft market.
To start your Magic Ring for the Crochet Heart – Pattern, loop the yarn around your fingers and cross it to form an “X”. Insert your hook under the first strand and pull the second strand through, twisting it slightly. This creates a foundation loop that you can work your initial single crochet or double crochet stitches into with ease.
Once you have worked the required number of stitches into the ring for your Crochet Heart – Pattern, simply pull the tail end of the yarn. You will see the circle close up perfectly, which is particularly important for small items like hearts where a gap would be very noticeable. This technique is a “game changer” for any DIY enthusiast.
If you find the Magic Ring tricky at first, don’t worry—it takes practice. Many people find that holding the “X” firmly with their thumb helps stabilize the loop while they make the first chain stitch. Mastering this is the first step toward a high-quality Crochet Heart – Pattern that looks like it came from a high-end boutique.
Within the context of a Crochet Heart – Pattern, the magic ring usually holds the first 6 to 8 stitches of the round. Because you are creating a heart shape, these initial stitches form the very bottom point or the centers of the two top “bumps.” Consistent stitch height at this stage ensures the heart doesn’t lean to one side.
As you move forward, remember that the Magic Ring must be secured properly. After pulling it tight at the start of your Crochet Heart – Pattern, it is a pro-tip to knot the tail or weave it through the first round of stitches. This ensures the center never loosens up, keeping your crochet project durable and beautiful.
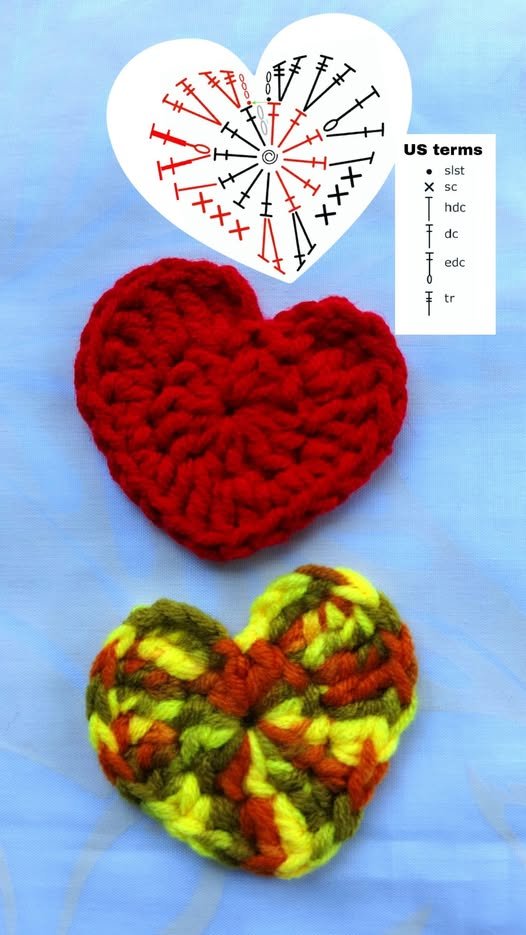
3. Step-by-Step Stitch Guide for Success
The foundation of a great Crochet Heart – Pattern often involves a combination of basic stitches. You will typically start with chain stitches to create height, followed by double crochet or treble crochet to form the rounded tops of the heart. Understanding the anatomy of these stitches is key to following any complex tutorial.
To achieve the iconic dip at the top of the Crochet Heart – Pattern, you will often use a slip stitch. This shorter stitch pulls the edge down toward the center, creating that beautiful “V” shape. Balancing these tall and short stitches is what gives the Crochet Heart – Pattern its unmistakable silhouette.
Maintaining consistent tension is the most important habit to develop. If your stitches are too tight, the Crochet Heart – Pattern may curl or pucker; if they are too loose, the heart will lose its structure. Try to keep a relaxed but firm grip on your yarn to ensure every loop is the same size as the one before it.
Increasing and decreasing are the “architectural” elements of your Crochet Heart – Pattern. An increase (working two stitches into one) expands the fabric to create the curves. Conversely, a decrease (joining two stitches into one) tapers the shape toward the bottom point, giving the heart its sharp, clean finish.
For a textured look, some artists use the front post double crochet technique within their Crochet Heart – Pattern. This adds a 3D “ribbed” effect that catches the light and adds a layer of sophistication to the design. Experimenting with different stitch patterns is a great way to make a generic pattern uniquely yours.
Finally, always count your stitches at the end of every row or round. It is very easy to accidentally skip a stitch when working on the curves of a Crochet Heart – Pattern. Keeping an accurate stitch count ensures that both sides of your heart are perfectly symmetrical, which is the hallmark of expert craftsmanship.
4. Creative Ways to Use Your Finished Hearts
Once you have mastered the Crochet Heart – Pattern, the possibilities for using them are endless. One popular trend is creating a crochet garland. By stringing several hearts together with a simple chain, you can create beautiful home decor that adds a touch of warmth and personality to any room or nursery.
You can also turn your Crochet Heart – Pattern into a functional keychain or bag charm. Simply attach a metal lobster clasp or a key ring to the top of the heart. These make for wonderful, low-cost gifts for friends and family that show you took the time to make something special by hand.
For those into fashion, small hearts made from a Crochet Heart – Pattern make excellent applique patches. You can sew them onto denim jackets, hats, or even baby blankets. It’s a fantastic way to “upcycle” old clothing and give it a fresh, trendy look using your fiber art skills.
Another wonderful idea is to incorporate the Crochet Heart – Pattern into greeting cards. A small, flat crochet heart glued to the front of a card adds a tactile, 3D element that store-bought cards simply can’t match. It’s a perfect way to send a little piece of your heart to someone far away.
If you enjoy making jewelry, try using fine lace yarn or embroidery floss with a tiny hook to execute the Crochet Heart – Pattern. These miniature hearts can be hardened with fabric stiffener and turned into delicate earrings or pendant necklaces. The level of detail you can achieve with a small scale is truly impressive.
Lastly, consider using your Crochet Heart – Pattern for “random acts of crochet kindness.” Many crafters leave small hearts in public places with a little note for strangers to find. It’s a beautiful way to use your crocheting hobby to spread joy and positivity in your local community.
FAQ – Frequently Asked Questions
1. What is the best yarn for a Crochet Heart – Pattern?
For most projects, a 100% cotton yarn is best because it holds its shape and doesn’t pill. However, if you want a soft, cuddly feel, a premium acrylic or a wool blend also works perfectly.
2. How long does it take to finish one Crochet Heart – Pattern?
A basic flat heart can take as little as 5 to 10 minutes once you know the steps. A 3D amigurumi-style heart might take 30 to 45 minutes, depending on your crochet speed.
3. Can a beginner tackle this Crochet Heart – Pattern?
Absolutely! This is one of the best projects for beginners because it uses all the fundamental stitches (slip stitch, single, double, and treble crochet) in a single, small project.
4. Why is my crochet heart curling at the edges?
Curling usually happens if your tension is too tight or if you haven’t used enough stitches in the increase rounds. Try using a slightly larger hook to loosen the stitches.
5. How do I make my heart bigger or smaller?
The easiest way is to change your yarn weight and hook size. Use bulky yarn for a large plush heart, or embroidery thread for a tiny micro-crochet version.
6. Do I need to block my crochet hearts?
For flat hearts used as appliques or garlands, steam blocking is highly recommended. it helps the heart lay perfectly flat and accentuates the “V” shape at the top.
Conclusion
In this article, we have covered the essential techniques to master the Crochet Heart – Pattern, from choosing the right ergonomic hook and natural fiber yarn to mastering the Magic Ring and symmetry.
We explored how tension and stitch choice play a vital role in the final look of your handmade craft. Whether you are making these for yourself, as gifts, or to sell in your online shop, the Crochet Heart – Pattern remains a timeless classic in the world of fiber arts.