The Crochet Heart Scarf- Tutorial is a wonderful way to express your creativity while crafting a garment that is both functional and deeply symbolic of love and care. Whether you are looking to create a heartfelt gift for Valentine’s Day, a birthday, or simply want to add a touch of whimsy to your winter wardrobe, this specific design offers a unique texture that stands out from standard ribbed or plain scarves. By following this Crochet Heart Scarf- Tutorial, you will discover how to manipulate standard stitches into beautiful, repeating heart motifs that look complex but are surprisingly rhythmic to execute once you find your flow.
Working on a project like this Crochet Heart Scarf- Tutorial allows fiber artists to experiment with color stories that range from traditional romantic reds and pinks to modern neutrals or even “scrappy” multicolored versions. The beauty of the heart pattern is that it provides a built-in decorative edge, often resulting in a scalloped look that frames the face beautifully when worn. In this comprehensive Crochet Heart Scarf- Tutorial, we will guide you through every stage of the process, ensuring that your final accessory is soft, drapeable, and professionally finished, making it a staple piece for years to come.
As we embark on this Crochet Heart Scarf- Tutorial, it is important to remember that the secret to a successful scarf lies in the combination of the right yarn weight and the correct hook size to prevent the fabric from becoming too stiff. We have optimized this guide to be SEO-friendly and easy to digest, providing clear instructions for both the “v-stitch” foundations and the “popcorn” or “shell” techniques often used to form the rounded lobes of the hearts. Let’s prepare our softest acrylic or wool blend yarns, grab our favorite ergonomic crochet hooks, and dive into the heartwarming world of this detailed Crochet Heart Scarf- Tutorial.
1. Choosing the Perfect Materials for a Soft Heart Scarf
The first essential step in our Crochet Heart Scarf- Tutorial is selecting a yarn that feels comfortable against the sensitive skin of the neck. We highly recommend using a worsted weight (Category 4) yarn or a DK weight (Category 3) yarn that has a high percentage of natural fibers like merino wool or a high-quality “anti-pilling” acrylic. Since the heart motifs in this Crochet Heart Scarf- Tutorial create a bit of extra thickness, choosing a yarn with a nice “drape” ensures the scarf isn’t overly bulky and sits elegantly over a coat or sweater.
For this Crochet Heart Scarf- Tutorial, your hook size is a critical factor in the final look of the hearts. If your tension is naturally tight, consider moving up half a millimeter from the size recommended on the yarn label to keep the hearts “squishy” and defined. A 5.0mm (H) or 5.5mm (I) hook is generally the sweet spot for worsted yarn, allowing the stitches to breathe and making the Crochet Heart Scarf- Tutorial progress much faster. A metal hook is often preferred for speed, while wooden hooks offer more grip for slippery fibers.
Color selection can make or break the visual impact of the Crochet Heart Scarf- Tutorial. While a solid color allows the texture of the stitches to speak for itself, using a self-striping yarn can create a beautiful gradient where each heart appears in a slightly different shade. If you are feeling adventurous, you can change colors every few rows to make the hearts pop against a contrasting background. Regardless of your choice, ensure you have at least 200 to 300 grams of yarn to complete a standard adult-length scarf.
In addition to yarn and hooks, this Crochet Heart Scarf- Tutorial requires a few basic notions to ensure a high-quality finish. You will need a tapestry needle with a blunt tip to weave in your ends securely so they don’t poke out through the heart motifs during wear. Stitch markers are also incredibly helpful for marking the beginning of the heart repeats, especially if you are working on the scarf while distracted by a movie or a conversation. Keeping a small measuring tape nearby will help you track the scarf’s length as you go.
Before starting the main body of the Crochet Heart Scarf- Tutorial, it is always a good idea to create a gauge swatch. This involves crocheting a small square with your chosen yarn and hook to see if the heart motif looks the way you want it to. If the hearts look distorted or too tight, you can adjust your hook size before committing to the full length of the scarf. This simple preparation step is what separates an amateur project from a professional-looking hand-crocheted accessory.
Lastly, consider the “fuzziness” of your yarn when starting the Crochet Heart Scarf- Tutorial. Very “hairy” or mohair-style yarns might hide the stitch definition of the hearts, making your hard work less visible. A smooth, plied yarn will provide the best stitch clarity, ensuring that everyone who sees your scarf can clearly identify the beautiful heart pattern. Once you have your materials organized, you are ready to begin the foundational chains of your Crochet Heart Scarf- Tutorial.
2. Foundations and the Magic of the Heart Stitch
The construction of the Crochet Heart Scarf- Tutorial usually begins with a foundation chain that is a multiple of the heart pattern repeat. Most heart stitches work on a multiple of 10 or 12 plus a few turning chains, so it is vital to count carefully at the very beginning. If you find foundation chains too tight or difficult to work into, you might want to try a foundation single crochet (fsc) start, which provides more stretch and a neater edge for your scarf.
In this Crochet Heart Scarf- Tutorial, the heart is often formed over two or three rows. The first row typically sets up the “V” or the base of the heart using double crochet stitches separated by a chain. This creates the pointed bottom of the heart shape. The second row is where the magic happens, as you work multiple stitches into that “V” to create the rounded lobes. This combination of increases and decreases is what gives the Crochet Heart Scarf- Tutorial its iconic romantic silhouette.
Understanding the stitch anatomy is crucial for success in this Crochet Heart Scarf- Tutorial. You will likely encounter the shell stitch or the puff stitch to create the volume needed for the heart lobes. When working these stitches, keep your loops consistent in height to ensure each heart looks identical to the last. Consistency in height prevents the scarf from having “wavy” edges and ensures a straight, professional-looking garment that doesn’t pull to one side.
As you progress through the rows of the Crochet Heart Scarf- Tutorial, you will notice a repeating pattern of “filling” and “spacing.” The spaces around the hearts act as a frame, allowing the 3D texture of the motif to stand out. It is helpful to visualize the heart as you work; if a row looks like it’s losing its shape, you might have missed a chain space or added an extra triple crochet by mistake. Early detection of errors is key to an enjoyable crafting experience.
Tension management is a recurring theme in any Crochet Heart Scarf- Tutorial. Because the heart motifs involve working many stitches into one space, there is a tendency for that area to become tighter than the rest of the row. Try to relax your grip on the hook and let the yarn flow freely. A relaxed tension results in a “squishy” scarf that feels like a hug around the neck, which is exactly what a heart-themed scarf should feel like.
During this stage of the Crochet Heart Scarf- Tutorial, don’t be afraid to use life-lines. A life-line is a scrap piece of yarn in a contrasting color that you thread through a row of stitches. If you make a mistake several rows later, you can easily “frog” (rip out) your work back to the life-line without losing your entire project. This technique is especially useful for beginners who are tackling the Crochet Heart Scarf- Tutorial for the first time.
3. Shaping the Length and Managing Color Changes
The most meditative part of the Crochet Heart Scarf- Tutorial is growing the length of the scarf. A standard adult scarf is typically between 60 and 70 inches long, but the beauty of a handmade item is that you can customize it to your preference. If you like a “double wrap” style, you might want to extend your Crochet Heart Scarf- Tutorial to 80 inches. Just keep in mind that the longer the scarf, the more yarn you will consume.
If you decide to use multiple colors for your Crochet Heart Scarf- Tutorial, the best place to change yarn is at the end of a row. This allows you to hide the color transition within the turning chain or the side border. To make a seamless change, pull the new color through the final two loops of the last stitch of the old color. This creates a clean line and makes the color transitions in your Crochet Heart Scarf- Tutorial look intentional and polished.
Managing yarn ends is a task that many crafters dread, but in this Crochet Heart Scarf- Tutorial, weaving them in as you go can save you hours of work at the end. Every time you finish a skein or change a color, take a moment to weave the tail through the thickest part of the heart stitches. Because the hearts have a lot of “meat” to them, it is very easy to hide yarn tails securely so they never come loose, even after multiple washes.
As the scarf grows, the weight of the fabric might start to stretch the upper rows. To prevent this during the Crochet Heart Scarf- Tutorial, try to keep the finished portion of the scarf resting on a table or your lap rather than letting it hang off the edge of your workspace. This protects the stitch definition and prevents the hearts from becoming elongated or distorted by the pull of gravity while the stitches are still “setting.”
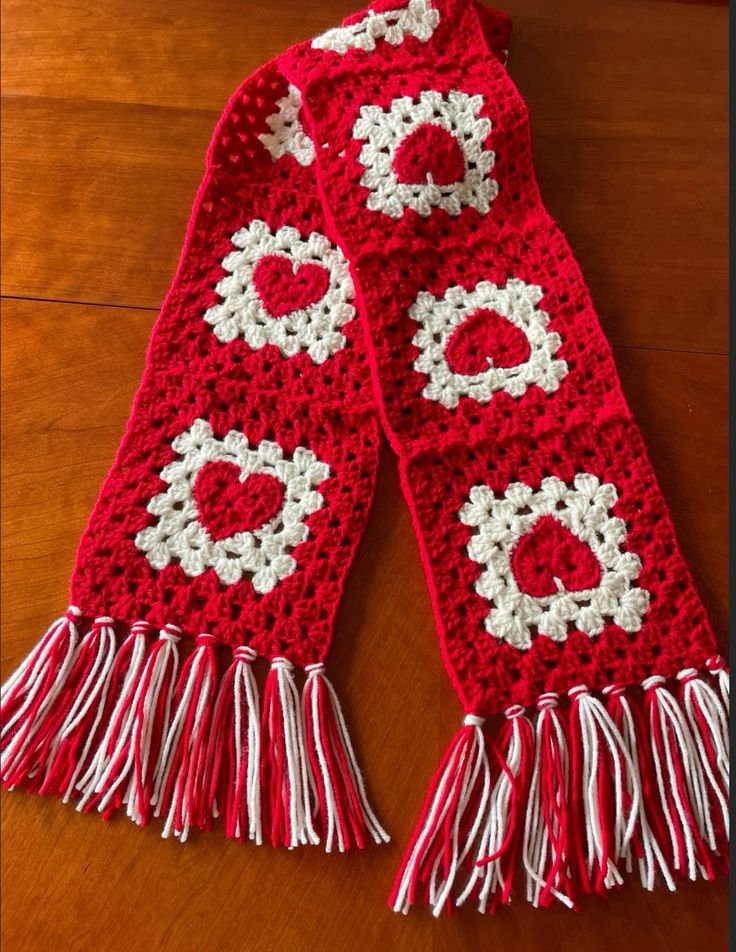
In this Crochet Heart Scarf- Tutorial, you might want to consider adding a border once the main length is reached. A simple single crochet or crab stitch (reverse single crochet) border can help stabilize the edges and provide a frame for the hearts. A border also gives you a consistent place to attach tassels or fringe, which are popular additions to heart-themed scarves. The fringe adds movement and a touch of bohemian flair to the finished piece.
Throughout the Crochet Heart Scarf- Tutorial, periodically check the width of your scarf. It is common for beginners to accidentally drop or add a stitch at the ends of the rows, causing the scarf to grow wider or narrower. By measuring every 10 inches or so, you ensure that your Crochet Heart Scarf- Tutorial remains a perfect rectangle. If you do notice a mistake, it’s better to fix it early than to finish a scarf that looks like a triangle!
4. Final Finishing, Blocking, and Styling
The final stage of the Crochet Heart Scarf- Tutorial is the finishing process, which is what truly makes the project shine. Once you have reached your desired length and woven in all your ends, you may find that the edges of the hearts are curling slightly. This is perfectly normal! Blocking is the solution to this problem. By pinning your scarf to a flat surface and lightly steaming it or misting it with water, you “train” the fibers to lay flat and reveal the full glory of the hearts.
When blocking your work from the Crochet Heart Scarf- Tutorial, be careful not to “kill” the acrylic yarn if that is what you used. Over-steaming acrylic can cause it to lose its bounce and become too limp. A gentle touch is all that’s needed to relax the stitches. For wool blends, wet blocking is highly effective and can even make the yarn feel much softer against the skin. This step ensures that the Crochet Heart Scarf- Tutorial results in a high-end boutique-quality accessory.
Adding fringe or tassels to your Crochet Heart Scarf- Tutorial can add a dramatic and fun element. For a heart scarf, consider making “puffy” tassels that mirror the rounded shapes of the heart motifs. To do this, wrap yarn around a piece of cardboard, tie one end, and cut the other. Attach these to the ends of the scarf using a crochet hook to pull the yarn through the spaces in the final row. This adds weight and helps the scarf hang beautifully.
Styling your finished piece from the Crochet Heart Scarf- Tutorial is the best part! This scarf looks wonderful draped once around the neck with the ends hanging evenly, or wrapped snugly for extra warmth. Because the hearts are double-sided in many patterns, you don’t have to worry about a “wrong side” showing as much as you would with other textures. The Crochet Heart Scarf- Tutorial creates a versatile piece that works with both casual denim and dressier outfits.
If you are making this for a gift, consider adding a handmade tag that includes washing instructions. Since most items from a Crochet Heart Scarf- Tutorial are made with delicate stitches, recommending a “hand wash cold” and “lay flat to dry” approach will ensure the recipient can enjoy the scarf for many winters. Packaging it with a small heart-themed card completes the presentation of your thoughtful, handmade gesture.
We hope this Crochet Heart Scarf- Tutorial has provided you with the confidence and inspiration to start your own romantic crochet project. Remember that every stitch is a labor of love, and the time you spend on this Crochet Heart Scarf- Tutorial results in a unique treasure that cannot be found in any store. Keep practicing your tension and stitch placement, and soon you will be able to create these beautiful heart motifs on hats, blankets, and more!
FAQ – Frequently Asked Questions
1. Is the Crochet Heart Scarf- Tutorial suitable for absolute beginners?
If you know the basic stitches like chain, single crochet, and double crochet, you can certainly tackle this. However, it is slightly more advanced than a basic ribbed scarf. We recommend practicing a single heart motif first before starting the full Crochet Heart Scarf- Tutorial.
2. How many skeins of yarn do I need?
For a standard adult scarf using worsted weight yarn, you will typically need 2 to 3 skeins (100g each). If you are using a thinner yarn or making an extra-long scarf, plan for 4 skeins to be safe.
3. Can I use cotton yarn for this project?
Yes, you can! However, cotton has very little “give” and is heavier than wool or acrylic. A cotton Crochet Heart Scarf- Tutorial will result in a scarf with great stitch definition but less warmth and a heavier drape, making it better for spring or autumn.
4. How do I make the hearts stand out more?
The best way to make the motifs pop in this Crochet Heart Scarf- Tutorial is to use a solid, light-colored yarn. Dark colors like navy or black tend to hide the shadows that define the heart shape. Using a yarn with a slight sheen also helps highlight the texture.
5. Why is my scarf curving into a “C” shape?
This usually happens if your foundation chain was much tighter than your subsequent rows. To fix this in your next Crochet Heart Scarf- Tutorial, use a hook one size larger specifically for the foundation chain, then switch back to your regular hook for the rest of the project.
6. Can this pattern be turned into an infinity scarf?
Absolutely! Once you reach your desired length in the Crochet Heart Scarf- Tutorial, simply slip stitch the two ends together. Just make sure the scarf isn’t twisted before you join the ends to create a seamless loop.
Conclusion
In this Crochet Heart Scarf- Tutorial, we have journeyed through the essential steps of creating a beautiful, textured accessory that is as warm as it is stylish. We covered the importance of yarn selection, the technicalities of building heart motifs, and the professional finishing touches like blocking and adding fringe. This scarf is a testament to the versatility of crochet, turning simple strings of yarn into a sophisticated pattern that carries a message of love in every stitch.
Whether you followed this Crochet Heart Scarf- Tutorial to create a personal wardrobe staple or a special gift for a loved one, you have successfully mastered a complex-looking texture that will undoubtedly draw compliments. Crochet is a skill that grows with every project, and the patience you applied here is the foundation for even more ambitious designs in the future. We are so proud of your progress and can’t wait to see what you create next!