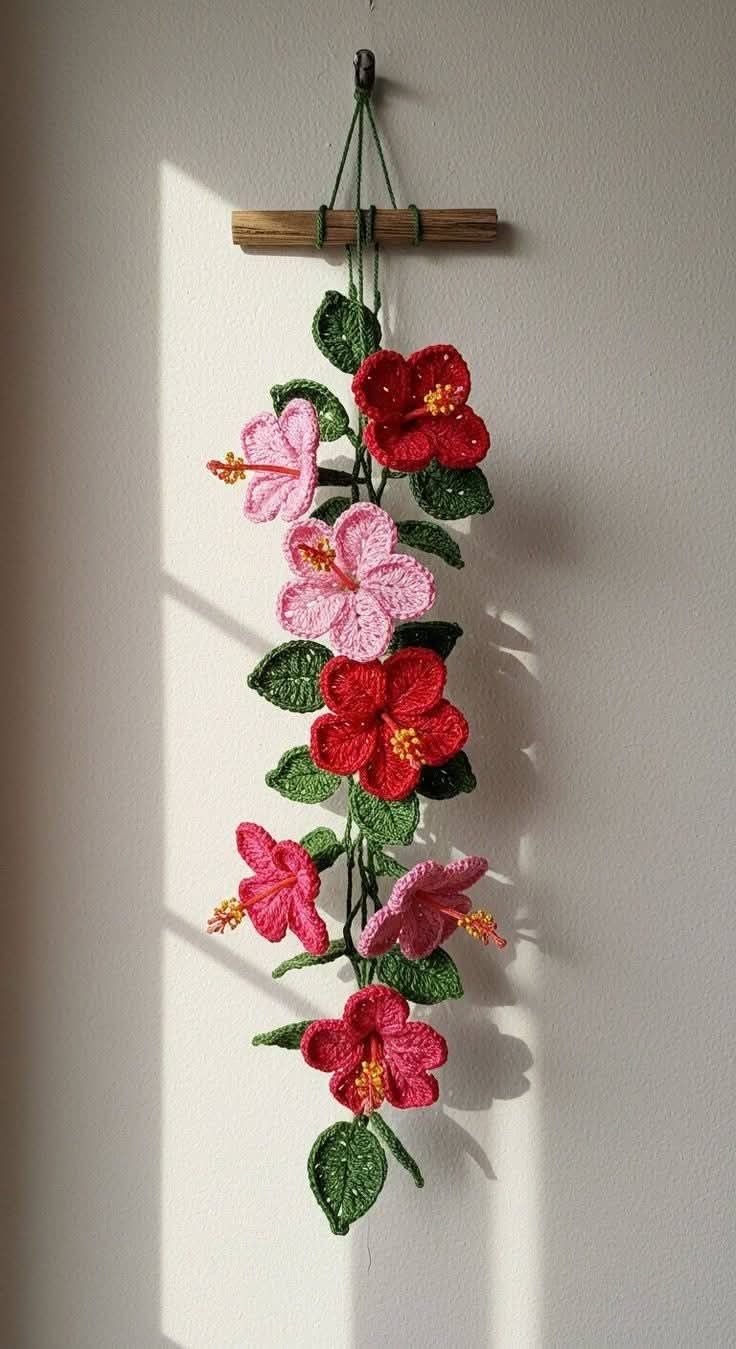
Crochet Hibiscus Flower – Pattern is one of the most vibrant and rewarding projects you can undertake to bring a touch of tropical elegance into your home. This stunning floral design captures the delicate beauty of nature using only a hook and yarn, making it a favorite for crafters who want to add a splash of color to their accessories. Whether you are looking to embellish a summer hat, create a lasting bouquet, or design unique hair clips, the Crochet Hibiscus Flower – Pattern offers the perfect balance of intricate detail and rhythmic stitching.
In the world of handmade decor, the Crochet Hibiscus Flower – Pattern stands out because of its iconic trumpet shape and long, prominent stamen. Unlike flatter flower patterns, this specific crochet pattern utilizes clever increases and decreases to mimic the organic ruffles found in real petals. By choosing the right materials and following a step-by-step tutorial, you can transform a simple skein of cotton yarn into a botanical masterpiece that never fades or wilts.
Mastering the Crochet Hibiscus Flower – Pattern requires an understanding of basic crochet stitches like the double crochet, treble crochet, and the slip stitch. Because this project is highly customizable, you can experiment with different yarn weights and hook sizes to produce flowers ranging from tiny delicate charms to large, bold statement pieces. This article will guide you through the essential techniques, materials, and creative ways to utilize your finished hibiscus flower, ensuring your work is professional, beautiful, and ready for display.
1. Essential Materials for Your Crochet Hibiscus Flower – Pattern
When beginning your Crochet Hibiscus Flower – Pattern, selecting the right fiber is the most crucial step for a professional finish. Most experts recommend using a mercerized cotton yarn because it provides excellent stitch definition and a slight sheen that mimics the natural luster of a real flower. This type of yarn is also sturdy enough to hold the shape of the large hibiscus petals without requiring additional stiffeners or wires in most cases.
The hook size you choose will directly impact the scale and tension of your Crochet Hibiscus Flower – Pattern. For a standard medium-sized flower, a 3.0mm or 3.5mm crochet hook is generally the best fit for DK weight yarn. If you prefer a more delicate, lace-like appearance, you might opt for lace weight thread and a much smaller steel hook, which results in a tiny blossom perfect for jewelry or fine embellishments.
In addition to yarn and hooks, you will need a few basic notions to complete your Crochet Hibiscus Flower – Pattern successfully. A sharp pair of craft scissors is necessary for clean cuts, and a tapestry needle is essential for weaving in your ends securely so the petals don’t unravel. You might also want a few stitch markers to keep track of the beginning of your rounds, especially when working on the central stamen or the base of the flower.
Color selection plays a huge role in the realism of your Crochet Hibiscus Flower – Pattern. While classic red and bright yellow are traditional choices, consider using variegated yarn or gradient cakes to create a natural “sunset” effect within the petals. This adds depth to the handmade flower and makes the transitions between the center of the bloom and the outer edges look more organic and visually appealing to the eye.
Don’t forget about the center of the flower, which is the defining characteristic of the Crochet Hibiscus Flower – Pattern. Many crafters use a contrasting bright yellow or gold yarn for the stamen to make it pop against the darker petal colors. Some even choose to add small beads or floral stamens from a craft store to the tip of the crocheted center to give the piece a mixed-media look that is truly unique.
Lastly, having a clear printed pattern or a digital device to follow your Crochet Hibiscus Flower – Pattern instructions is vital. Keeping your workspace organized with all these materials within reach will make the crafting process much smoother and more enjoyable. Once you have your cotton yarn, ergonomic hook, and accessories ready, you are fully prepared to dive into the rhythmic and artistic process of floral crochet.
2. Understanding the Stitches in the Crochet Hibiscus Flower – Pattern
To successfully execute a Crochet Hibiscus Flower – Pattern, you must be comfortable with the foundation ring or the magic circle technique. Starting with a magic ring is often preferred because it allows you to pull the center tight, leaving no hole in the middle of your flower. This creates a neat, professional base from which all five petals of the hibiscus bloom will eventually grow and expand.
The texture of the petals in a Crochet Hibiscus Flower – Pattern is usually achieved through a combination of half-double crochet (hdc) and double crochet (dc) stitches. These stitches provide the necessary height to create the elongated shape of the petal. By placing multiple stitches into a single space, a technique known as increasing, you create the ruffled, wavy edge that is so characteristic of tropical flora in handmade crochet.
To create the pointed or rounded tips of the petals in your Crochet Hibiscus Flower – Pattern, you will likely use the picot stitch or specific chain spaces. These small details might seem minor, but they are what separate a generic flower from a true hibiscus design. Precision in your stitch count is very important here; if you miss a stitch, the symmetry of the flower will be off, affecting the overall balance of the finished piece.
The treble crochet (tr) is another vital component of the Crochet Hibiscus Flower – Pattern. Because hibiscus petals are quite large and wide, the treble stitch provides the extra height needed for the outer edges of the flower. This stitch is taller than a double crochet and creates a more flexible fabric, allowing the petals to drape naturally just like a real flower would in a warm tropical breeze.
Connecting the petals often involves using the slip stitch (sl st) to move your yarn across the base without adding bulk. In a high-quality Crochet Hibiscus Flower – Pattern, the transitions between petals should be seamless. Learning how to join your rounds invisibly will elevate your crochet skills and ensure that the back of your flower looks just as tidy and professional as the front, which is important for items like brooches.
Finally, the stamen of the Crochet Hibiscus Flower – Pattern is usually created using a simple chain stitch followed by a few slip stitches or French knots at the tip. This long, thin element is worked into the center of the flower after the petals are complete. Mastering these varied stitches ensures that your DIY crochet project is structurally sound and aesthetically beautiful, capturing the essence of the hibiscus perfectly.
3. Step-by-Step Guide to the Crochet Hibiscus Flower – Pattern
The first phase of the Crochet Hibiscus Flower – Pattern involves creating the central hub. You will typically start by crocheting a small circle of single crochet stitches into your magic ring. This circle acts as the anchor for all your petals. It is essential to keep your tension consistent during this stage so that the center of the flower remains flat and doesn’t buckle as you add more layers of yarn.
Once the center is ready, the Crochet Hibiscus Flower – Pattern moves into the petal construction. You will work on one petal at a time, usually starting with a series of chains that serve as the “spine” of the petal. By working up one side of the chain and down the other with varying stitch heights, you create a symmetrical leaf shape that forms the foundation of your tropical crochet flower.
As you progress through the Crochet Hibiscus Flower – Pattern, you will notice the petals starting to overlap slightly. This is intentional and mimics the way real hibiscus flowers bloom. To achieve this, you may be instructed to work into the front loops only or back loops only of the previous round. This technique adds a 3D effect to your crochet project, giving the flower a life-like volume and depth.
The border of each petal in the Crochet Hibiscus Flower – Pattern is where you can add personal flair. Some patterns suggest a final round of reverse single crochet (also known as the crab stitch) to give the edges a sturdy, finished look. Others might use a contrasting thread color to highlight the delicate veins of the petal, making the crochet hibiscus appear even more intricate and detailed to the observer.
After the five petals are finished, the Crochet Hibiscus Flower – Pattern focuses on the iconic stamen. You will attach your yellow yarn to the very center and chain upward, usually about 10 to 15 stitches. At the top, you will work a few small stitches to represent the pollen-covered tip. This vertical element is what truly defines the hibiscus and gives the flower its striking, exotic silhouette that crafters love.
The final step in your Crochet Hibiscus Flower – Pattern is the finishing work. You will need to carefully weave in all yarn tails using your yarn needle. If you plan to use the flower as an applique, leave a long tail of yarn for sewing it onto your target surface. If the petals are a bit floppy, you can lightly steam-block them to help them hold their shape, ensuring your handmade hibiscus looks perfect for its final purpose.
4. Creative Ways to Use Your Crochet Hibiscus Flower – Pattern
One of the most popular ways to utilize a finished Crochet Hibiscus Flower – Pattern is as a fashion accessory. These flowers make stunning crochet hair clips or fascinators for summer weddings and beach parties. By simply gluing or sewing a metal clip to the back of the flower, you create a vibrant piece of handmade jewelry that can brighten up any outfit and showcase your crafting talents to the world.
For those who love home decor, the Crochet Hibiscus Flower – Pattern can be used to create beautiful floral garlands. By making several flowers in different shades of pink, orange, and red, and stringing them together with a simple chain of green yarn, you can decorate a patio, a nursery, or a workspace. This brings a permanent summer vibe to your environment without the need for watering or sunlight.
The Crochet Hibiscus Flower – Pattern is also an excellent choice for garment embellishment. You can sew these flowers onto the corners of a plain shawl, the pockets of a denim jacket, or even onto a crocheted tote bag. Adding a 3D floral element gives your clothing a high-end, boutique feel, transforming a simple piece of apparel into a custom, one-of-a-kind designer item.
If you enjoy gift-giving, consider using the Crochet Hibiscus Flower – Pattern as a decorative gift topper. Instead of a standard plastic bow, a handmade flower adds a personal and sustainable touch to any package. The recipient can then reuse the flower as a brooch or a bookmark, making the packaging part of the gift itself. This is a wonderful way to share your love of crochet with friends and family.
Another creative application for the Crochet Hibiscus Flower – Pattern is creating a crochet bouquet. Unlike real flowers that last only a week, a bouquet of crocheted hibiscuses will stay vibrant forever. You can attach the flowers to floral wire stems wrapped in green yarn and place them in a decorative vase. This makes for a beautiful center-piece that serves as a constant reminder of your creative hobby and artistic skill.
Finally, the Crochet Hibiscus Flower – Pattern can be integrated into larger projects like crochet quilts or afghans. You can create “flower garden” squares where the hibiscus is the central focus of each block. Joining these blocks creates a heavy, warm, and visually stunning blanket that is sure to become a cherished family heirloom. The possibilities are truly endless when you master this versatile and beautiful tropical pattern.
FAQ – Frequently Asked Questions
What is the best yarn for a Crochet Hibiscus Flower – Pattern?
The best yarn is typically mercerized cotton. It provides the stiffness needed for the petals to hold their shape and offers a beautiful sheen that looks very natural for floral designs. Cotton also handles moisture well, making it great for accessories.
Can a beginner try the Crochet Hibiscus Flower – Pattern?
Yes! While it looks complex, it mostly uses basic stitches like single, double, and treble crochet. If you know how to work in the round and increase stitches, you can definitely complete this crochet tutorial with a little patience.
How do I make my crochet hibiscus look more realistic?
To add realism, use variegated yarns for the petals to mimic natural color shifts. Also, ensure your stamen is long and bright, as this is the most recognizable feature of the hibiscus. Steam blocking your finished flower also helps the petals lie correctly.
How long does it take to crochet one hibiscus flower?
An experienced crafter can usually complete a Crochet Hibiscus Flower – Pattern in about 30 to 45 minutes. Beginners might take an hour or more as they learn the specific placement of the stitches for the ruffles.
Is this pattern suitable for making jewelry?
Absolutely. If you use embroidery floss or size 10 crochet thread with a 1.5mm hook, you can create tiny versions of the hibiscus that are perfect for earrings, dainty necklaces, or delicate rings.
Do I need to stiffen the petals?
Usually, if you use cotton yarn and tight tension, the petals will stay up on their own. However, if you find them drooping, a light spray of fabric stiffener or a mixture of water and craft glue can help maintain the shape of your handmade bloom.
Conclusion
In this article, we have explored the vibrant and artistic world of the Crochet Hibiscus Flower – Pattern. We covered the essential materials needed to get started, the specific stitches that create those iconic ruffled petals, and a step-by-step approach to building the flower from the center to the stamen.
We also looked at the many creative ways you can use your finished flowers to enhance your home, your wardrobe, and your gift-giving. Crochet is a wonderful way to express creativity, and the hibiscus is a perfect subject for anyone looking to bring a bit of tropical joy into their crafting repertoire.