Finding a unique Crochet Jellyfish Hat – Pattern is the ultimate goal for crafters who want to combine whimsical marine life with cozy, wearable art. This specific design has taken the DIY fashion world by storm because it offers a playful silhouette that mimics the flowing movement of a sea creature while remaining a functional accessory. Whether you are preparing for a costume party, a themed festival, or simply want a standout winter cap, learning how to master this Crochet Jellyfish Hat is a rewarding journey into the world of creative textures and vibrant yarn choices.
The beauty of a high-quality Pattern lies in its versatility, allowing you to experiment with different yarn weights and hook sizes to achieve the perfect “floaty” effect. When you dive into a Crochet Jellyfish Hat, you aren’t just making a beanie; you are sculpting tentacles, ruffles, and a rounded bell shape that captures the ethereal essence of the ocean. For many enthusiasts, the search for a comprehensive Crochet Jellyfish Hat – Pattern ends with a design that balances simplicity for beginners with enough intricate detail to satisfy seasoned veterans of the craft.
In this guide, we will explore the essential elements of creating your own aquatic masterpiece, focusing on the core terminology and techniques required. Understanding the Crochet Jellyfish Hat structure is key to ensuring the “tentacles” have the right bounce and the “bell” sits comfortably on the head. By following a structured Pattern, you can customize your colors—from bioluminescent neons to soft pastel pinks—making each creation a one-of-a-kind reflection of your personal style and artistic vision.
1. Understanding the Crochet Jellyfish Hat Essentials
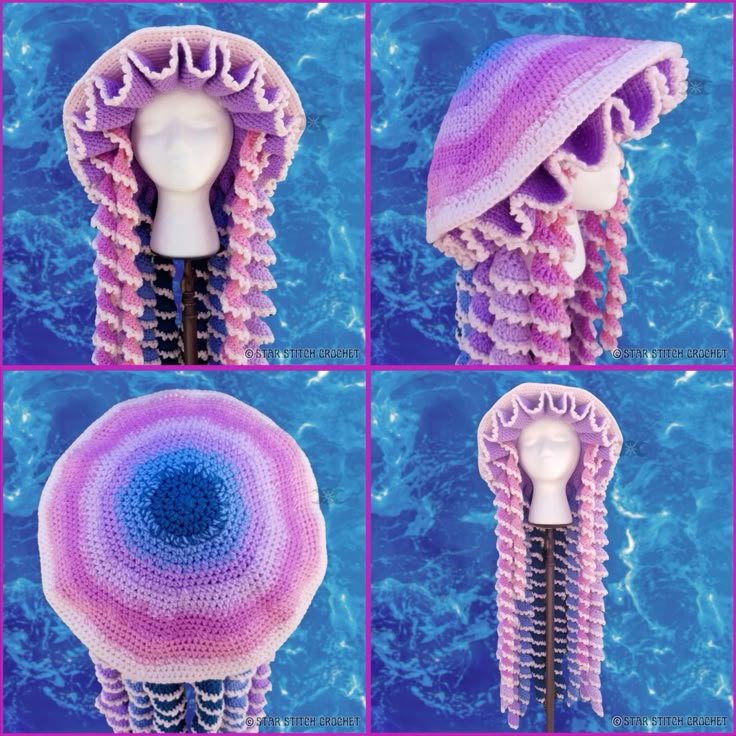
The Crochet Jellyfish Hat is a specialized type of headwear that utilizes circular crochet techniques to create a domed shape, often referred to as the “bell” of the jellyfish. Unlike a standard beanie, this design requires additional rows of ruffles and hanging elements to simulate the anatomy of the invertebrate. Using a Crochet Jellyfish Hat – Pattern ensures that the weight of the tentacles is distributed evenly so the hat doesn’t slip off during wear.
Selecting the right yarn is the first step in bringing your Crochet Jellyfish Hat to life, as the texture dictates the movement of the stinging cells’ representation. Cotton yarns provide great definition for the Pattern, while acrylic blends offer a softer, more lightweight feel that is ideal for long-duration wear. Many crafters prefer variegated yarns to mimic the shifting colors of deep-sea life without having to change balls of yarn constantly.
The “bell” section of the Crochet Jellyfish Hat usually starts with a magic ring, a foundational technique in amigurumi and hat-making alike. This allows for a seamless top that expands gradually into a wide, comfortable base. A well-written Pattern will guide you through the increase rounds, ensuring the crown is smooth and free of unwanted “pointy” peaks that can ruin the jellyfish aesthetic.
When we talk about the Pattern, we are referring to the systematic set of instructions—usually written in standard US or UK terms—that dictates every stitch. This blueprint is vital for maintaining symmetry in your Crochet Jellyfish Hat, especially when transitioning from the solid dome to the decorative frills. Without a reliable Pattern, achieving the iconic “undulating” edge of a jellyfish can be a matter of frustrating trial and error.
One of the most exciting parts of the Crochet Jellyfish Hat is the assembly of the tentacles, which can vary in length and thickness. Some versions of the Pattern call for simple chains, while others use “spiral” stitches—achieved by placing multiple double crochets in a single stitch—to create a curly, bouncy effect. These details are what transform a basic hat into a recognizable Crochet Jellyfish Hat that catches everyone’s eye.
Finally, safety and comfort are paramount when following a Crochet Jellyfish Hat – Pattern, especially if the item is intended for children. It is important to ensure that all dangling parts are securely fastened to the brim and that the yarn used is non-irritating to the skin. A professional Pattern will often include a gauge swatch section, helping you adjust your tension so the final Crochet Jellyfish Hat fits perfectly every time.
2. Deep Dive Into the Crochet Jellyfish Hat Mechanics
To successfully execute a Crochet Jellyfish Hat, one must understand the relationship between hook size and stitch density. Using a smaller hook than recommended by the yarn label can create a stiffer “bell,” which helps the Crochet Jellyfish Hat maintain its iconic shape. Conversely, the Pattern might suggest a larger hook for the tentacles to give them a more fluid, watery drape that moves as the wearer walks.
The term Crochet Jellyfish Hat essentially describes a fusion of traditional millinery and sculptural crochet. It challenges the maker to think about 3D space, as the ruffles must flare out significantly at the bottom of the dome. A high-quality Pattern will detail exactly how many increases are needed in the final rows of the bell to create that distinctive “wavy” look associated with sea jellies.
The core of any Pattern for this project involves basic stitches like the single crochet (sc), half-double crochet (hdc), and double crochet (dc). However, the magic happens in the “post stitches” or “back loop only” (BLO) techniques often specified in a Crochet Jellyfish Hat – Pattern. These methods create ridges on the surface of the hat, adding a realistic biological texture to your Crochet Jellyfish Hat.
Customization is a major draw for those seeking a Crochet Jellyfish Hat – Pattern, as it allows for the addition of “eyes” or even internal LED lights. While the base Pattern provides the structural integrity, the “jellyfish” personality comes from how you arrange the oral arms and marginal tentacles. A dense Crochet Jellyfish Hat might feature thirty or more individual strands, creating a lush, full-bodied appearance.
Mastering the Pattern also means learning how to manage yarn tension during the long rows of repetitive tentacle work. Since a Crochet Jellyfish Hat requires several hanging components, consistency is key to making sure one side doesn’t look longer than the other. Many experts recommend marking your Pattern as you go, ensuring that the placement of the tentacles is mathematically centered around the brim.
In the world of online crafting, the Crochet Jellyfish Hat has become a viral sensation, leading to many variations of the original Pattern. Some designers focus on a “cartoon” style with big eyes, while others aim for a “realistic” bioluminescent look using metallic threads. Whichever style you choose, the fundamental Crochet Jellyfish Hat remains a testament to the creativity possible with just a hook and a bit of string.
3. Explaining the Pattern Structure and Workflow
A comprehensive Pattern acts as a roadmap, breaking down the complex construction of the Crochet Jellyfish Hat into manageable steps. Usually, the document begins with a “Materials List,” noting the yardage required for both the main body and the decorative elements. Following a Crochet Jellyfish Hat – Pattern precisely prevents the common issue of running out of yarn halfway through the voluminous ruffles.
The first phase of the Pattern is almost always the “Crown,” where you establish the diameter of the Crochet Jellyfish Hat. For an adult size, this typically measures between 6.5 and 7 inches across before you stop increasing. Understanding this measurement within the Crochet Jellyfish Hat – Pattern is crucial for ensuring the hat doesn’t end up being too small for the intended wearer.
As you move into the “Body” of the Crochet Jellyfish Hat, the instructions shift to “even rounds,” where no more increases are made. This builds the height of the hat, sitting snugly against the head until it reaches just above the ears. It is at this stage of the Pattern that you can really see the Crochet Jellyfish Hat taking form, moving from a flat circle to a functional cap.
The “Brim and Ruffle” section is where the Crochet Jellyfish Hat truly distinguishes itself from other crochet projects. The Pattern will likely instruct you to work multiple stitches into a single stitch—sometimes as many as four or five—to create an extreme flare. This creates the “ruffled” edge of the jellyfish bell, providing a base from which the tentacles will eventually hang.
When it comes to the “Tentacle Attachment,” a good Crochet Jellyfish Hat – Pattern will provide a diagram or specific stitch counts for placement. You might attach the tentacles directly to the brim using slip stitches, or crochet them separately and sew them on later. This flexibility in the Pattern allows you to adjust the “fullness” of your Crochet Jellyfish Hat based on the amount of yarn you have left.
The final touches in your Crochet Jellyfish Hat journey involve weaving in ends and perhaps “blocking” the hat to set the shape. While some might find the finishing work tedious, the Pattern usually emphasizes its importance for a professional look. A well-blocked Crochet Jellyfish Hat will have crisp ruffles and tentacles that hang straight, perfectly capturing the beauty of the design.
4. Tips for Success with Your Crochet Jellyfish Hat
To ensure your Crochet Jellyfish Hat looks as good as the photos in the Pattern, consider using a “Stitch Marker” at the beginning of every round. Because the hat is worked in a continuous spiral, it is very easy to lose track of where you are. A reliable Pattern will always remind you to count your stitches at the end of each round to avoid a lopsided Crochet Jellyfish Hat.
Another tip for an amazing Crochet Jellyfish Hat is to play with “Texture Mixing.” You can use a fuzzy “eyelash” yarn for some of the tentacles while keeping the main bell smooth. When you follow a Crochet Jellyfish Hat – Pattern, you aren’t limited to one type of yarn; you can mix and match to create a multidimensional sea creature that looks incredibly realistic.
If you find that your Crochet Jellyfish Hat is too heavy and pulling backward, the Pattern might need a slight adjustment. You can try making the tentacles slightly shorter or using a lighter weight of yarn for the hanging parts. The goal is a Crochet Jellyfish Hat that stays in place while you move, allowing the tentacles to “dance” without compromising the fit.
For those who want to sell their creations, having a consistent Pattern is essential for quality control. Customers love the unique look of the Crochet Jellyfish Hat, and being able to replicate the exact dimensions time and again adds value to your work. Always credit the designer of the Crochet Jellyfish Hat – Pattern if you are using someone else’s intellectual property for your commercial projects.
Don’t be afraid to experiment with the “Face” of your Crochet Jellyfish Hat. While some designs are minimalist, adding safety eyes or embroidered smiles can turn the Crochet Jellyfish Hat into a cute character. The Pattern usually provides a blank canvas, so your creativity is the only limit when it comes to decorating the top of the jellyfish bell.
Lastly, remember that patience is key when working on a Crochet Jellyfish Hat – Pattern. The ruffles and numerous tentacles can take several hours to complete, but the result is a stunning piece of wearable art. Once you finish your first Crochet Jellyfish Hat, you will likely find yourself wanting to make a whole “smack” (a group of jellyfish) in every color of the rainbow.
Frequently Asked Questions (FAQ)
1. What is the best yarn for a Crochet Jellyfish Hat?
Most crafters recommend a medium-weight (worsted) acrylic or cotton blend. Acrylic is great because it is lightweight, which prevents the tentacles from making the hat too heavy. Cotton offers better stitch definition for the Pattern details.
2. How long does it take to complete a Crochet Jellyfish Hat – Pattern?
Depending on your skill level and the number of tentacles you add, it typically takes between 4 to 8 hours. The “bell” goes quickly, but the ruffles and individual tentacles require a significant amount of repetitive stitching.
3. Is this Crochet Jellyfish Hat project suitable for beginners?
Yes, if you know the basic stitches (single, double, and half-double crochet), you can follow a standard Pattern. The most challenging part is usually the ruffle increases, but a well-explained guide makes it very manageable.
4. How do I wash my finished Crochet Jellyfish Hat?
It is best to hand wash the hat in cool water with mild detergent and lay it flat to dry. This protects the delicate tentacles and ensures the Crochet Jellyfish Hat retains its shape without the yarn pilling or stretching.
5. Can I adjust the size of the Pattern for children or toddlers?
Absolutely. You can adjust the size by stopping the increase rounds earlier (for a smaller diameter) or by using a smaller hook and thinner yarn. Most Pattern guides include a sizing chart for different head circumferences.
6. How many tentacles should I add to my Crochet Jellyfish Hat?
There is no set rule, but most designs suggest between 10 and 20 strands. You can mix long “curly” tentacles with straight “ribbon” strands to give the Crochet Jellyfish Hat a more natural and dynamic look.
Conclusion
Creating a Crochet Jellyfish Hat is a delightful way to explore the intersection of fashion and marine biology. Throughout this article, we have discussed the importance of choosing a solid Pattern, selecting the right materials, and mastering the specific techniques that give this hat its unique, flowing appearance.
From the initial magic ring to the final curly tentacle, the process of making a Crochet Jellyfish Hat allows for endless customization and artistic expression. We hope this guide has inspired you to pick up your hook and start your own aquatic adventure!