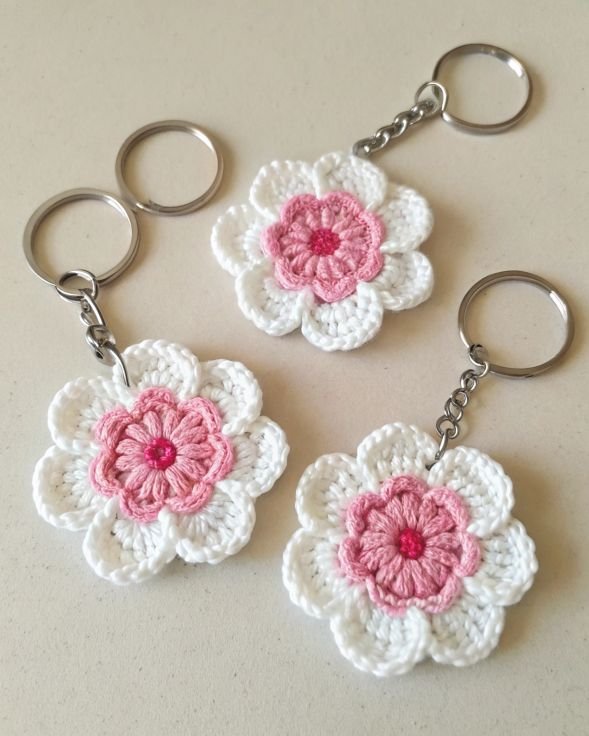
Crochet Keychain Flower – Tutorial is a fantastic way to dive into the world of functional art while honing your stitching skills. Whether you are a seasoned crafter or a complete beginner, creating a Crochet Keychain Flower offers a sense of accomplishment that few other quick projects can provide. These charming accessories are not just decorative; they serve as a personalized touch to your keys, backpacks, or even as thoughtful handmade gifts for friends and family. By following this Tutorial, you will learn how to transform simple yarn into a durable and vibrant floral charm that stands the test of time.
In the world of modern crafting, the Crochet Keychain Flower – Tutorial has gained immense popularity due to its versatility and the minimal materials required. You don’t need a massive stash of yarn to get started; in fact, this project is perfect for using up those small scraps left over from larger blankets or sweaters. Using a Crochet Keychain Flower is also a great way to practice basic crochet stitches like the double crochet, slip stitch, and magic ring. As you move through the steps, you’ll see how these foundational techniques come together to form delicate petals and a sturdy center.
Starting your journey with this Crochet Keychain Flower – Tutorial ensures that you are following a path optimized for success. We focus on clear, step-by-step instructions that prioritize the crochet hook size, yarn weight, and tension control necessary for a professional finish. Small projects like these are the heartbeat of the DIY community because they allow for endless customization. You can experiment with different color palettes, add beads for a bit of sparkle, or even layer multiple flowers to create a 3D effect. Let’s begin our detailed guide to crafting the perfect floral accessory.
1. Gathering Your Materials for the Crochet Keychain Flower
The first step in any successful Crochet Keychain Flower – Tutorial is preparation. You will need a small amount of cotton yarn or acrylic blend, as these fibers hold their shape well and resist fraying over time. A 3.5mm crochet hook (Size E) is generally recommended for a standard-sized flower, ensuring the stitches are tight enough to prevent the stuffing from showing if you choose to make a puffed version.
Aside from yarn, you must have a metal keychain ring or a lobster clasp to turn your textile art into a functional tool. High-quality stainless steel rings are preferred because they won’t rust or bend easily with daily use. You will also need a pair of sharp scissors and a tapestry needle (also known as a yarn needle) to weave in those loose ends securely once the petals are finished.
In this Crochet Keychain Flower – Tutorial, we emphasize the importance of stitch markers. When working in the round, it is very easy to lose track of where your row begins and ends. A simple plastic marker or even a contrasting piece of scrap yarn can save you hours of frustration. Using these tools correctly ensures that your floral petals are symmetrical and aesthetically pleasing.
Choosing the right yarn weight is crucial for the final look of your Crochet Keychain Flower. A DK weight or worsted weight yarn provides the best balance between ease of use and durability. If you choose a yarn that is too thin, the flower may feel flimsy; if it is too thick, the keychain might become bulky and difficult to carry in your pocket or purse.
Don’t forget the aesthetic elements that make your project unique. Consider picking a bright yellow or gold for the flower center and a contrasting vibrant hue for the petals. This Tutorial encourages you to think about how the colors interact, as a high-contrast combination often makes the crochet stitches pop, highlighting your hard work and technical skill.
Lastly, make sure your workspace is well-lit and comfortable. Handmade crochet requires focus, and having a clear area to lay out your yarn bobbins and tools will make the process much more enjoyable. Once you have your hook, yarn, and clasp ready, you are officially prepared to start the first round of your very own Crochet Keychain Flower.
2. Mastering the Magic Ring and Base Stitches
The core of our Crochet Keychain Flower – Tutorial begins with the magic ring (also known as a magic circle). This technique is essential because it allows you to pull the center of the flower tight, leaving no visible hole in the middle. To start, wrap the yarn around your fingers to create a loop, insert your crochet hook, and pull up a loop of the working yarn to secure it with a chain stitch.
Inside this magic ring, you will typically work a series of single crochet (sc) stitches. For a standard five-petal flower, working 10 or 12 single crochets into the ring is a common practice. This Tutorial suggests using a tension that is firm but not so tight that you cannot insert your hook back into the stitches during the second round.
Once the base stitches are complete, you will pull the tail of the yarn to close the circle. This is the moment the Crochet Keychain Flower starts to take shape. You will then use a slip stitch (sl st) to join the last stitch to the first, creating a perfect, seamless circle. This foundation is the “heart” of your flower where all the petals will eventually be attached.
The next phase of the Crochet Keychain Flower – Tutorial involves building the height for the petals. This usually starts with a series of chain stitches (ch). These chains act as a ladder, allowing you to move from the flat center to the outer edges of the flower. Understanding the relationship between chains and turning stitches is a key skill for any aspiring fiber artist.
In this section, we focus on the double crochet (dc), which is the most common stitch used to create the “leafy” or “petal” look. By working multiple double crochets into a single base stitch, you create a fan shape. This Tutorial explains that the more stitches you put into one space, the more ruffled and textured your Crochet Keychain Flower will appear.
Consistency is the hallmark of a great Crochet Keychain Flower – Tutorial. Ensure that each petal has the exact same count of treble crochets or double crochets to maintain symmetry. If one petal has five stitches and another has six, the flower will look lopsided. Taking your time during this foundational stage ensures a high-quality, boutique-style accessory that looks professionally made.
3. Creating the Petals and Adding Texture
Now we move into the most exciting part of the Crochet Keychain Flower – Tutorial: the petals. To give your flower a rounded, organic look, you will use a combination of different stitch heights. A common sequence is to start with a half-double crochet, move to three double crochets, and finish the petal with another half-double crochet, all in the same stitch or space.
Texture is what makes a Crochet Keychain Flower stand out from mass-produced plastic versions. You can add a picot stitch at the tip of each petal for a pointed, vintage look. This Tutorial recommends experimenting with front post stitches if you want the center of the flower to have a raised, 3D effect, which adds a tactile quality to your keychain.
If you are following this Crochet Keychain Flower – Tutorial to create a larger, more “boho” style charm, consider using variegated yarn. This type of yarn changes color automatically as you work, giving each petal a unique gradient without requiring you to switch yarn mid-project. It’s an easy way to achieve a complex look with minimal extra effort or weaving in ends.
As you work your way around the center circle, you will begin to see the Crochet Keychain Flower bloom. It is vital to continue checking your work against the pattern instructions. If the flower begins to curl inward too much, it may be a sign that your tension is too tight or that you need to add an extra chain stitch between petals to give them room to lay flat.
For those who want a more durable Crochet Keychain Flower, this Tutorial suggests doing a final round of slip stitches in a contrasting color around the very edge of the petals. This not only looks beautiful but also reinforces the edges of the yarn, preventing the petals from losing their shape after months of being tossed around in a bag or pocket.
Finishing the crochet portion of the Crochet Keychain Flower – Tutorial requires a clean “fasten off.” Cut the yarn, leaving a tail of at least 6 inches. Pull the tail through the last loop on your hook and tug gently to knot it. Use your tapestry needle to hide the yarn tail behind the stitches on the back of the flower so it remains invisible from the front.
4. Assembly and Final Finishing Touches
The final stage of the Crochet Keychain Flower – Tutorial is where your art becomes a useful tool. Take your metal keychain ring and determine the best attachment point. You can either sew the flower directly onto the ring using the leftover yarn tail, or you can crochet a small “loop” of 5-10 chain stitches that loops through the ring and joins back to the flower.
Security is paramount when making a Crochet Keychain Flower. Since keys are handled frequently, a weak attachment will lead to the flower falling off. We recommend double-knotting the yarn around the metal clasp and using the tapestry needle to weave the end through several different stitches in different directions to ensure it won’t budge.
To give your Crochet Keychain Flower a professional, “store-bought” finish, you might consider blocking your work. Lightly mist the flower with water and pin it into the desired shape on a foam board until it dries. This Tutorial secret helps the petals lay perfectly flat and crisp, making the crochet stitches look more defined and uniform.
Personalization is a key theme in this Crochet Keychain Flower – Tutorial. You can sew a small wooden button or a pearl bead into the center of the flower to cover the magic ring join. This adds a bit of weight and a high-end feel to the project. Just ensure the bead is sewn on tightly with thread or split yarn so it is safe for daily use.
If you are making these to sell or give as gifts, the Crochet Keychain Flower – Tutorial suggests adding a small “Handmade” tag. These can be made of leather, fabric, or wood and instantly elevate the perceived value of your crochet project. It tells the recipient that time, care, and a specific artistic vision went into creating their accessory.
Congratulations on completing the Crochet Keychain Flower – Tutorial! You now have a beautiful, durable, and stylish accessory. Whether you keep it for yourself or gift it to a loved one, you have mastered the art of circular crochet and functional assembly. Remember, each flower you make will be slightly better than the last as your muscle memory and stitch consistency improve with practice.
FAQ: Frequently Asked Questions about Crochet Keychain Flowers
What is the best yarn for a Crochet Keychain Flower?
The best yarn for a Crochet Keychain Flower is 100% cotton. Cotton is less stretchy than acrylic or wool, meaning your flower won’t sag or lose its shape over time. It also shows stitch definition very clearly, making your petals look sharp and professional.
How long does it take to complete this Crochet Keychain Flower – Tutorial?
For an intermediate crocheter, one flower usually takes about 15 to 30 minutes. Beginners might take an hour for their first attempt as they learn to navigate the magic ring and petal sequences. It is an ideal “one-sitting” project.
Can I wash my Crochet Keychain Flower?
Yes, but you should do so carefully. If you used cotton yarn, you can hand wash the flower with mild soap and air dry it. If your keychain has a metal ring attached, try to keep the metal dry to prevent any potential rusting, or use a stainless steel attachment.
How do I prevent the center hole from opening up?
The key is using the magic ring technique mentioned in this Crochet Keychain Flower – Tutorial. Once you finish the first round, pull the tail firmly. To keep it from loosening, weave that tail into the stitches of the first round several times before cutting it.
My petals are curling, what am I doing wrong?
Curling usually happens because of tight tension or not enough stitches in the petal. Try using a slightly larger crochet hook or adding an extra double crochet to each petal. This gives the yarn more “room” to lay flat against the center.
Can I use this tutorial to make other items?
Absolutely! The floral pattern in this Crochet Keychain Flower – Tutorial can be used for hair clips, brooches, or even joined together to make a decorative garland. Simply change the attachment (use a hair tie instead of a keychain ring) to repurpose the design.
Conclusion
In this Crochet Keychain Flower – Tutorial, we have covered everything from selecting the right cotton yarn and crochet hook to mastering the magic ring and assembling the final metal keychain attachment.
We learned that the secret to a beautiful handmade flower lies in stitch consistency, tension control, and those small finishing touches like weaving in ends and blocking. This project is a perfect entry point for those looking to explore amigurumi-style crafting or simply wanting to create something beautiful and functional in a short amount of time.