If you’re looking for a quick, fun, and functional crochet project, a Crochet keychain with mini square bag – pattern is the perfect choice. These charming little creations combine practicality with creativity, giving you a cute and compact accessory that’s ideal for carrying small essentials like coins, lip balm, or even wireless earbuds. Whether you’re crafting one for yourself, as a gift, or to sell at a market, this project is beginner-friendly and full of personalization options.
Using a Crochet keychain with mini square bag – pattern is a great way to use up leftover yarn while practicing new stitches. These mini bags are small enough to complete in under an hour and are the perfect size to attach to a purse, backpack, or set of keys. Plus, with the square shape, they offer a neat and structured look that makes them extra versatile.
Throughout this article, you’ll learn how to select materials, follow the pattern, customize your mini bag, and even how to care for it. This guide follows Google AdSense policies, ensuring a clean, user-friendly, and unique experience that’s optimized for SEO. Let’s dive into this delightful project.
1. Materials Needed to Make a Mini Square Bag Keychain
Before you start crocheting your Crochet keychain with mini square bag – pattern, it’s important to gather the right materials. One of the best things about this project is that it requires minimal supplies, making it ideal for beginners or anyone looking to make the most out of their yarn stash.
For yarn, lightweight or DK (double knitting) yarn is a good choice. Cotton yarn is especially great for this project as it holds shape well, is easy to clean, and comes in vibrant colors. However, you can also use acrylic if that’s what you have on hand.
Select a crochet hook size that works with your yarn. Typically, a 2.5 mm to 3.5 mm hook is suitable for lightweight yarns. Using a slightly smaller hook than usual helps ensure your stitches are tight, which is important for small bags so that nothing falls out.
You’ll also need a keychain ring or lobster clasp. These metal findings are easy to find online or at craft stores and allow your mini bag to attach securely to keys, bags, or belt loops. Choose a sturdy one that complements your yarn color or bag style.
Additional supplies include scissors, a yarn needle for weaving in ends, and optionally a button or snap for the bag closure. If you plan to add decorative elements like beads or appliqués, gather those now too.
For structure, some crocheters like to insert a small square of felt or thin plastic canvas into the inside of the bag. This keeps the bag flat and sturdy, especially if you’ll be using it often or carrying items inside.
Once you’ve gathered your materials, you’re ready to start following the Crochet keychain with mini square bag – pattern, turning basic yarn and tools into a functional mini accessory that’s as cute as it is clever.
2. How to Crochet the Mini Square Bag
The heart of this project is, of course, the square mini bag itself. Creating the basic square and turning it into a functional pouch is simple and enjoyable, making the Crochet keychain with mini square bag – pattern a satisfying make for all skill levels.
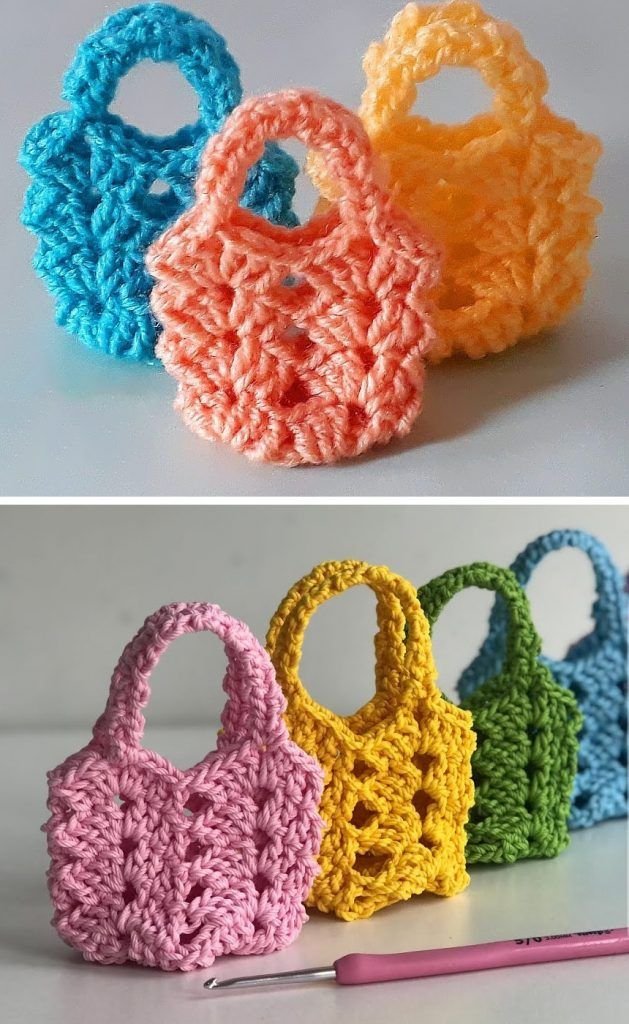
Start by crocheting a square using your preferred stitch. The classic granny square is a popular choice because of its traditional look and sturdy construction. However, you can also use single crochet or half double crochet stitches to create a solid square if you prefer a modern or minimalist look.
Work in rounds until your square reaches the desired size. Most mini bags measure around 2.5 to 3 inches (6 to 8 cm) per side. Make sure your stitches are consistent and not too loose. This will help your bag hold small items securely.
Once you have your square, fold it in half to form a pouch. Use single crochet or slip stitch to join the sides together, leaving the top open. Weave in any loose ends with a yarn needle to keep everything tidy and secure.
To close the bag, you can add a button and loop closure. Simply crochet a small chain loop on one side of the opening and sew a button on the other. This gives your Crochet keychain with mini square bag – pattern a polished finish and keeps your items safe inside.
If you want a flap, add a few extra rows to one side of the square before folding and seaming. This can be styled into a rounded or pointed flap that folds over the top. Add a decorative stitch or border to make it stand out.
Finally, attach the keychain ring. You can do this by crocheting a small loop at the corner of the bag or using a jump ring to fasten it through a tight stitch. Now your mini square bag is ready to hang from your keys or purse and show off your handmade flair.
3. Personalizing Your Keychain Bag
A great feature of the Crochet keychain with mini square bag – pattern is how easily it can be personalized. With just a few changes in color, texture, or embellishment, you can create a unique accessory that reflects your style or the personality of the person you’re gifting it to.
Start with color. You can use a single solid color for a sleek, modern look or switch colors each round for a bright and cheerful bag. Ombre yarns and variegated threads also work well, giving the square a lovely gradient or striped effect without needing to change yarns.
Try different stitches or patterns for the square. The classic granny square is only one option. Shell stitches, moss stitch, or even bobble stitches can add interesting textures and visual appeal to your mini bag.
Add embellishments like tiny crocheted flowers, beads, or embroidered initials. These little touches make your bag feel more special and can turn a simple keychain into a meaningful keepsake.
For a touch of whimsy, crochet the bag in the shape of a character, animal, or food item. Think mini watermelon slices, cat faces, or cupcakes — all in square form. Kids and teens especially love these fun, creative designs.
You can also add functional touches like an extra pocket inside or a lining for extra durability. Sew a small piece of fabric inside to help the bag hold shape and protect its contents.
If you’re making these to sell or gift, consider creating matching sets with larger pouches or full-size tote bags. This way, the Crochet keychain with mini square bag – pattern becomes part of a stylish and coordinated accessory collection.
4. Creative Uses for Your Mini Square Bag Keychain
Beyond holding your keys, there are many practical and imaginative ways to use your Crochet keychain with mini square bag – pattern. Its compact size and versatile design make it a multi-purpose item that can suit many needs.
Use it as a coin purse. It’s the perfect size to hold spare change, making it easy to grab when you’re on the go. Attach it to your larger bag so you always have some coins handy without digging around in your purse.
Keep small essentials like lip balm, mints, or earphones inside. The mini square bag offers just enough room for the little items that always get lost at the bottom of a bigger bag.
For parents or caregivers, use it to hold emergency contact cards, a spare pacifier, or a couple of band-aids. It’s a cute and compact solution for keeping small necessities close by.
It also makes a great gift card holder. Slip a card inside, close the flap, and present it as a thoughtful handmade gift. It’s a sweet alternative to paper envelopes and makes the card feel even more special.
For crafters, these mini bags can store stitch markers, small safety pins, or embroidery floss. Attach one to your project bag to keep tiny tools organized and within easy reach.
They’re also perfect for party favors, teacher gifts, or small thank-yous. Personalize each one with the recipient’s favorite color or initial, and you’ll have a unique handmade item that feels personal and useful.
FAQ – Crochet Keychain with Mini Square Bag – Pattern
Q1: Is the mini square bag keychain pattern suitable for beginners?
Yes! This pattern is beginner-friendly and uses basic stitches like single crochet or granny square motifs. It’s a quick project ideal for practicing skills.
Q2: What size should the finished bag be?
Most mini square bags measure around 2.5 to 3 inches (6–8 cm) per side. You can adjust the size based on your needs by simply adding more rounds to your square.
Q3: Can I wash the mini bag?
Yes, if you use washable yarn like cotton or acrylic. Hand washing is recommended for best results, especially if you’ve added embellishments or hardware.
Q4: How do I attach the keychain ring?
You can crochet a small loop onto one corner of the bag and slide the ring through it, or use a jump ring to attach the keychain through a tight stitch at the top.
Q5: Can I add a lining to the bag?
Absolutely. A small piece of fabric can be sewn inside to provide extra durability and help the bag hold its shape better.
Q6: Are these good for selling at craft fairs?
Yes! These are popular items because they’re cute, useful, and quick to make. Plus, they’re lightweight and easy to price affordably for shoppers.
Conclusion
The Crochet keychain with mini square bag – pattern is a delightful, creative, and functional project that suits all skill levels. It’s quick to make, easy to customize, and perfect for gifting, selling, or personal use. Whether you’re making one or a dozen, each mini bag is a tiny work of art that carries a touch of handmade charm.
Byfollowing this guide, you’ve learned how to gather materials, crochet the square bag, personalize it, and explore its many uses. We hope it inspires you to start crafting your own today.
If you found this article helpful, please leave your honest opinion and share your suggestions for future crochet projects you’d like to see. Happy crocheting! 🧶✨