If you’re a fan of crochet, then a Crochet Kitty Cup/Mug Coaster is a delightful and creative project that can brighten up your home or make a perfect handmade gift.
This crochet pattern combines the practicality of a coaster with the charm of a cute kitty design.
Whether you’re a beginner or an experienced crocheter, making this coaster can be a fun and rewarding project.
In this article, we will guide you step by step on how to create your own Crochet Kitty Cup/Mug Coaster, explore the materials you will need, and offer helpful tips for perfecting your crochet technique.
The beauty of this project lies in its simplicity and versatility. Not only does it protect your furniture from mug rings, but it also adds a whimsical touch to your kitchen or living room. With just a few basic crochet stitches, you can create a cute kitty coaster that will quickly become a favorite at tea time or coffee breaks. This crochet pattern is also a great way to practice your skills while creating something practical and fun at the same time.
Before diving into the pattern itself, it’s important to gather all the materials you’ll need for your Crochet Kitty Cup/Mug Coaster. Depending on your color preferences and the look you’re aiming for, you can customize the coaster to fit any style. We’ll cover everything from yarn selection to stitch instructions to help you achieve a perfect kitty coaster. So, let’s get started!
1. Materials You’ll Need for Your Crochet Kitty Cup/Mug Coaster
Before you begin crocheting your Crochet Kitty Cup/Mug Coaster, it’s essential to gather the right materials. Here’s what you’ll need:
- Yarn: The type of yarn you choose will influence the overall look and feel of your coaster. For a durable and easy-to-work-with coaster, medium-weight cotton yarn is highly recommended. You can choose a solid color for a classic look or mix and match colors to create a playful, multicolored kitty design.
- Crochet Hook: A 3.5mm to 4mm crochet hook should work well for most yarn types. Choose the hook size based on the thickness of your yarn to ensure your stitches are tight enough to prevent the coaster from becoming too floppy.
- Scissors: You’ll need scissors to trim the yarn when you finish each section of the coaster.
- Tapestry Needle: This tool will come in handy for weaving in the ends of the yarn once you complete your crochet project.
- Stitch Markers: These can be useful to help you track your rounds and ensure that your stitching stays on track throughout the process.
- Embroidery Thread: For the kitty’s facial features, such as the eyes, nose, and whiskers, you can use a contrasting color of embroidery thread. This adds extra detail and makes your kitty coaster truly stand out.
With these materials, you’ll be well on your way to creating your very own Crochet Kitty Cup/Mug Coaster.
2. Step-by-Step Guide to Crocheting the Kitty Coaster
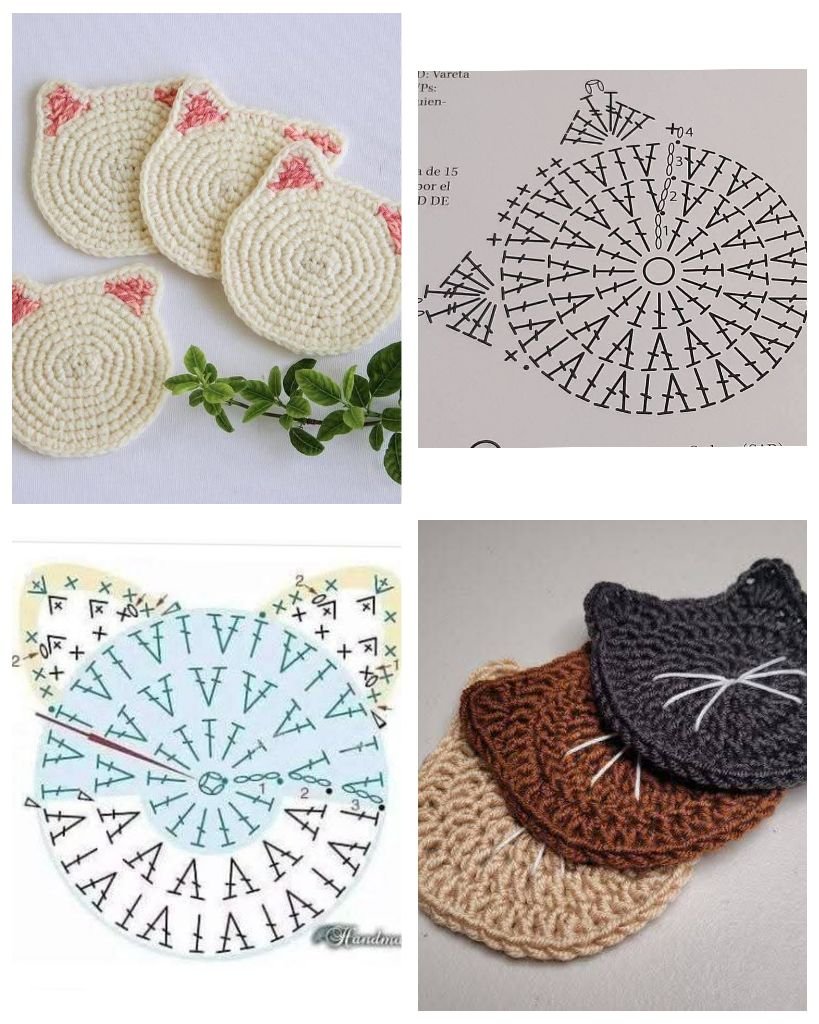
Now that you’ve gathered all the necessary materials, it’s time to start crocheting your Crochet Kitty Cup/Mug Coaster! Follow this step-by-step guide to create your coaster:
- Start with a Magic Ring: Begin by making a magic ring. This will form the center of the kitty’s head. If you’re not familiar with the magic ring, it’s a technique that allows you to crochet in the round, creating a tight and neat start for your project.
- Crochet the Base: Once you’ve completed the magic ring, crochet 6 single crochet (sc) stitches into the ring. Pull the ring tight and join the last stitch to the first with a slip stitch (sl st). You should now have a small circle.
- Increase Stitches: Work 2 single crochet stitches into each stitch around the circle, creating 12 stitches in total. This will make the base of the kitty’s head. Continue increasing by adding 2 single crochet stitches in each stitch until you reach the desired size for the coaster.
- Create the Kitty’s Ears: To form the cat’s ears, chain a few stitches and then crochet into them to create triangular shapes. Attach these pieces to the top of the round base, adjusting the positioning to achieve the desired look.
- Add the Details: Once the basic head shape is complete, you can start adding the kitty’s features. Use embroidery thread to stitch on the eyes, nose, and whiskers. For a more realistic look, you can add a small pink triangle for the nose and little curved lines for the whiskers.
- Finishing Touches: After the kitty’s face is complete, work around the entire edge of the coaster to give it a finished, clean look. You can add an additional row of single crochet or even use a decorative stitch to make the edges stand out. Finally, trim any excess yarn and weave in the loose ends with a tapestry needle.
By following these simple steps, you’ll be able to create a Crochet Kitty Cup/Mug Coaster that’s both functional and adorable.
3. Customizing Your Crochet Kitty Coaster Design
One of the best things about crochet is the ability to customize your projects. When it comes to your Crochet Kitty Cup/Mug Coaster, there are several ways to personalize the design to suit your preferences:
- Color Choices: The most obvious way to customize your coaster is by selecting different yarn colors. You can make your kitty coaster as colorful as you like by using vibrant yarns for the ears, face, and body, or you can stick with a more minimalist look with neutral tones like gray or beige.
- Size Variations: If you want to make a larger or smaller coaster, you can adjust the number of stitches in your base round. Simply add or subtract rounds to achieve the desired size for your cup or mug.
- Adding Accessories: If you’re feeling creative, you can add fun accessories to your kitty coaster. For example, crochet a small bow to attach to the kitty’s ear or a tiny collar with a bell to make your design even more charming.
- Different Cat Breeds: Why limit yourself to just one cat style? You can easily adapt this pattern to represent different cat breeds. For example, make a fluffy Persian cat with a rounder shape or create a sleek Siamese design with pointed ears and almond-shaped eyes.
- Embroidery Enhancements: The face of your kitty doesn’t have to be limited to simple eyes and a nose. You can add embroidered flowers, hearts, or even a tiny paw print to give your coaster extra personality.
- Gift Ideas: This Crochet Kitty Cup/Mug Coaster is also perfect for gifting. Customize the coaster with your friend’s favorite colors or add a personal touch with a custom message or monogrammed design.
The possibilities for customization are endless, allowing you to make each coaster unique and suited to any occasion.
4. Tips and Tricks for Perfecting Your Crochet Kitty Cup/Mug Coaster
While crocheting your Crochet Kitty Cup/Mug Coaster, there are a few tips and tricks to keep in mind that will make the process easier and more enjoyable:
- Use Stitches that Match the Yarn: If you’re using a bulky or thick yarn, be sure to adjust your stitch size accordingly. Larger yarns require bigger stitches, while finer yarns may need smaller stitches to maintain the coaster’s shape and durability.
- Tension is Key: Pay attention to your tension while crocheting. A consistent tension ensures your coaster has an even shape and looks professional. If you’re finding your stitches are too tight or too loose, adjust your technique as needed.
- Secure Your Embroidery: When stitching on the facial features or any other embroidery, make sure to secure the thread tightly to prevent it from coming undone. You can reinforce the stitches by going over them multiple times for added security.
- Keep Your Workspace Organized: Crochet projects are often small, and the materials can easily get tangled or misplaced. Keep your yarn and tools organized to avoid frustration during the process.
- Practice Makes Perfect: If you’re new to crochet or unfamiliar with certain techniques, don’t be discouraged if your first coaster isn’t perfect. Keep practicing, and with time, you’ll improve your skills and create even better designs.
- Block the Finished Coaster: After completing your Crochet Kitty Cup/Mug Coaster, you might want to block it to give it a more polished appearance. Wet-blocking the coaster helps it maintain its shape and removes any warping from the crochet process.
By following these tips and tricks, you’ll be able to perfect your coaster design and create beautiful, functional, and durable kitty coasters.
FAQ: Common Questions About Crochet Kitty Coasters
1. What is a crochet coaster? A crochet coaster is a small, decorative piece made with yarn that serves to protect surfaces from heat, moisture, or spills caused by cups or mugs.
2. Can I use this crochet pattern for other animals? Yes! You can easily adapt the crochet pattern to create other animal-themed coasters. Simply adjust the ears, face, and shape to represent different animals like dogs, rabbits, or even bears.
3. What yarn is best for a crochet coaster? Cotton yarn is often the best choice for coasters as it’s absorbent, durable, and easy to work with. You can also use acrylic yarn for a more budget-friendly option.
4. Is this crochet pattern suitable for beginners? Yes! This pattern is simple and beginner-friendly. It uses basic crochet stitches and is a great way to practice your skills while creating a cute and useful project.
5. How do I make my coaster more durable? To increase durability, make sure to crochet tightly and choose high-quality cotton yarn. You can also add an extra round or two for reinforcement.
6. Can I make the coaster larger or smaller? Yes! You can adjust the size of your coaster by increasing or decreasing the number of rounds you crochet, depending on the size of the cup or mug it’s meant to hold.
Conclusion
Creating a Crochet Kitty Cup/Mug Coaster is a delightful way to practice your crochet skills and add a fun, personal touch to your home. By following the steps outlined in this article and utilizing the tips provided, you can easily create your own cute kitty coaster that’s both functional and whimsical. Don’t forget to customize your design with different colors, patterns, and features to make it truly your own. We’d love to hear your thoughts on this project! Please leave a comment with your feedback, and feel free to share any suggestions or ideas for future crochet projects.