The Crochet Mini Tulip Keychain – pattern is a sweet and versatile project that’s perfect for crafters who love quick, rewarding creations.
Whether you’re making a thoughtful handmade gift, crafting for a market stall, or adding a personal touch to your own keys or bags, this tiny tulip pattern brings charm and color wherever it goes.
It’s a small project that packs a big punch in terms of cuteness and creativity.
What makes the Crochet Mini Tulip Keychain – pattern especially appealing is how accessible it is for all skill levels. Using just a few basic crochet techniques and a small amount of yarn, even beginners can create something beautiful and functional in under an hour. It’s a perfect way to use up scrap yarn while practicing your amigurumi and shaping skills.
In this article, we’ll dive into why this adorable pattern is a must-try, how to create your own step-by-step, ideas for customization, and expert tips to make the process smooth and fun. We’ll also answer some frequently asked questions and wrap up with a thoughtful conclusion to inspire your next mini crochet adventure.
1. Why Choose the Crochet Mini Tulip Keychain – Pattern
The Crochet Mini Tulip Keychain – pattern is more than just a cute project—it’s a meaningful creation that brings joy to both the maker and the recipient. With its simple construction and vibrant design, it’s a perfect project for spreading smiles in a small but impactful way.
One of the top reasons to try this pattern is how beginner-friendly it is. If you’re new to crochet or looking for a quick win, this project only requires a basic understanding of stitches like single crochet, increases, and decreases. It’s a manageable project that delivers impressive results.
Portability is another huge advantage. Since it’s such a small item, you can take it with you and work on it anywhere—on the bus, at the park, or while watching your favorite show. All you need is a small ball of yarn, a hook, and a keyring.
This pattern is ideal for gift-giving. Whether for birthdays, Mother’s Day, teachers, or party favors, a Crochet Mini Tulip Keychain is a heartfelt, handmade token that people truly appreciate. You can even attach a sweet note or message to the keychain loop for an extra personal touch.
For those who sell at craft fairs or online, this project is perfect for filling your table with color and charm. These tulip keychains are eye-catching, inexpensive to produce, and can be made in a wide variety of colors to attract different tastes.
Finally, creating something small and complete in a short amount of time is deeply satisfying. It keeps your creativity flowing, boosts your confidence, and reminds you that even tiny projects can bring big joy.
2. Step-by-Step Guide to Making the Crochet Mini Tulip Keychain – Pattern
To begin your Crochet Mini Tulip Keychain – pattern, you’ll need a few basic materials: worsted weight yarn or cotton yarn in green and tulip colors (like pink, red, yellow, or purple), a 2.5mm or 3mm crochet hook, stuffing (fiberfill), a yarn needle, scissors, and a metal keyring.
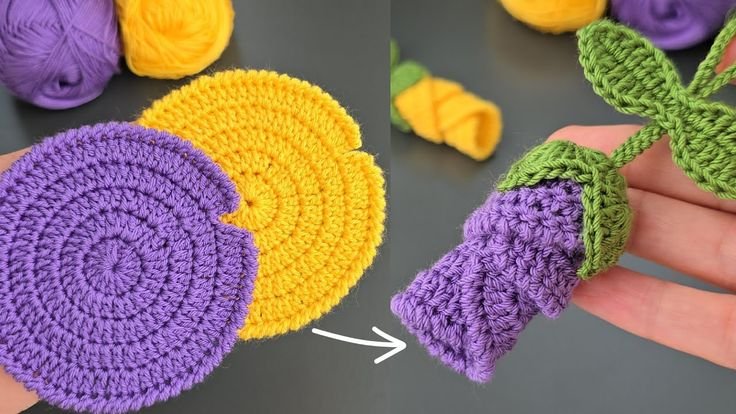
Start with the flower head, usually crocheted in the round using a magic ring. You’ll work several rounds of single crochet, increasing to create a round bulb shape. As you near the top, add decreases to shape the tulip’s natural curves. You can vary the petal height slightly by adjusting stitch counts for a more realistic look.
Once the tulip head is complete, lightly stuff it to give it shape but avoid overstuffing, which can distort the petals. Some patterns add a few final stitches at the top to simulate petal points or waves. Don’t fasten off just yet—you’ll use the same yarn tail to attach it later.
The stem and leaf are often made in one long chain or cylindrical piece, depending on the design. Use green yarn to create a tube or chain that will serve as the stem. You can also add a small leaf using a simple chain and slip stitch back to form a delicate shape.
Attach the stem to the tulip head securely, using a yarn needle to weave and stitch the parts together. Make sure it’s tight enough so it holds up to daily handling if used as a keychain.
Add the keyring by either stitching it directly to the top of the tulip or using a short loop of chain stitches as a connector. Metal lobster clasps or split rings work well and give the piece a polished finish.
Lastly, weave in all ends and trim the excess yarn. Give your tulip a gentle shaping with your hands, and it’s ready to brighten someone’s day—whether it’s yours or someone else’s!
3. Creative Ways to Customize the Crochet Mini Tulip Keychain – Pattern
One of the joys of working with the Crochet Mini Tulip Keychain – pattern is the opportunity to personalize every piece. With a few creative choices, you can turn a simple pattern into something totally unique and delightful.
The easiest way to customize is with color. Choose soft pastels for a spring vibe, bold reds for a romantic feel, or mix rainbow tones for a cheerful gift set. Using variegated yarn can also give your tulip an unexpected and beautiful blend of shades.
Experiment with petal textures. You can use surface crochet to add veins or lines to petals, or alternate between single and double crochet for a ruffled edge. These small changes add personality and make each keychain feel one of a kind.
Try adding embellishments like tiny beads or embroidery. A few stitched lines on the leaf or a bead at the center of the tulip can make your piece look more intricate. You could even add a tiny face to make a kawaii-style tulip with eyes and a smile.
Change up the shape of the leaf or stem. A curled leaf or spiral stem adds whimsy and motion to the piece. If you want a more structured design, use pipe cleaner inside the stem to give it poseable flexibility.
For special occasions, include a personalized tag. Attach a tiny wooden or leather tag engraved with names, dates, or messages to make the keychain even more meaningful. These are great for weddings, baby showers, or corporate gifts.
You can also repurpose the tulip design. Instead of a keychain, use it as a zipper pull, bag charm, or brooch. The same small tulip design can find many uses beyond keys, giving you endless crafting opportunities.
4. Pro Tips for Success with the Crochet Mini Tulip Keychain – Pattern
To get the most out of your Crochet Mini Tulip Keychain – pattern, a few helpful strategies will make your crafting experience smooth, enjoyable, and successful.
Choose the right yarn and hook size. Thinner yarns like mercerized cotton give a neat finish and tighter stitch definition, which works beautifully for small projects. A smaller hook size also helps create a firm fabric, which is important for keychains that need to hold shape.
Pay attention to stitch tension. Because the tulip is small and stuffed, loose stitches may let fiberfill peek through or make the shape look uneven. Practice maintaining even tension and adjust hook size if needed.
Use minimal stuffing. A tiny amount of fiberfill goes a long way. Overstuffing can stretch the stitches and distort the tulip’s shape. Instead, use just enough to support the structure while keeping the look soft and rounded.
Keep your rounds marked. Since most of the tulip is worked in the round, it’s easy to lose track of where one round ends and another begins. A simple stitch marker or contrasting yarn scrap can save you a lot of counting later.
Secure all parts tightly. Because this project is intended to be used frequently, you’ll want to make sure everything—especially the stem and keyring—is attached firmly. Double-stitch seams and knot securely when needed.
Lastly, make several! This pattern is addictive, and once you’ve made one, you’ll want to make more. Keep a basket of tulips ready for gifting, donating, or selling. They’re great conversation starters and a wonderful way to showcase your crochet talent.
FAQ: Crochet Mini Tulip Keychain – Pattern
Q1: Is the Crochet Mini Tulip Keychain – pattern good for beginners?
Yes! It’s an excellent beginner project. It uses basic stitches and works up quickly, making it a great confidence booster for new crocheters.
Q2: How much yarn do I need for one tulip keychain?
You’ll only need a few yards of each color. It’s a perfect stash-busting project for leftover yarn from larger makes.
Q3: What size hook should I use?
Typically, a 2.5mm or 3mm hook works best for a tight, neat finish that holds stuffing well.
Q4: Can I wash the keychain if it gets dirty?
Yes, especially if you use cotton yarn. Hand wash gently and let it air dry to maintain its shape and structure.
Q5: Can I sell the tulip keychains I make?
Absolutely! As long as the pattern allows it, handmade keychains are popular items at craft fairs, Etsy shops, and markets.
Q6: Can I turn this into something other than a keychain?
Yes! You can use the tulip as a charm, a brooch, a bag decoration, or even string several together for a garland.
Conclusion
The Crochet Mini Tulip Keychain – pattern is a wonderful way to bring creativity, color
, and charm into your crochet life. It’s easy to make, full of personality, and perfect for thoughtful gifts or fun market creations. With its simple structure and countless customization options, it’s no wonder crocheters everywhere are falling in love with these tiny tulips.
We’ve covered what makes this pattern special, how to crochet it step by step, creative ways to personalize it, and helpful tips to ensure your tulip turns out perfectly every time. The FAQ section also tackled common concerns to help you get started with confidence.
Have you tried the Crochet Mini Tulip Keychain – pattern? We’d love to hear about your experience! Leave a sincere comment below sharing your thoughts, results, or suggestions for other mini crochet projects. Your feedback helps build a warm and inspiring crochet community. Happy stitching! 🌷🧶💖