If you’re a fan of upcycling, Disney crafts, and handmade accessories, this Crochet Minnie keychain made with tin seals – Pattern is the perfect project for you. It combines creativity, sustainability, and a touch of childhood nostalgia in a unique, fun, and easy-to-make keychain that’s both cute and functional. Whether you’re an experienced crocheter or just starting out, this project is a delightful way to repurpose everyday materials into charming gifts or personal items.
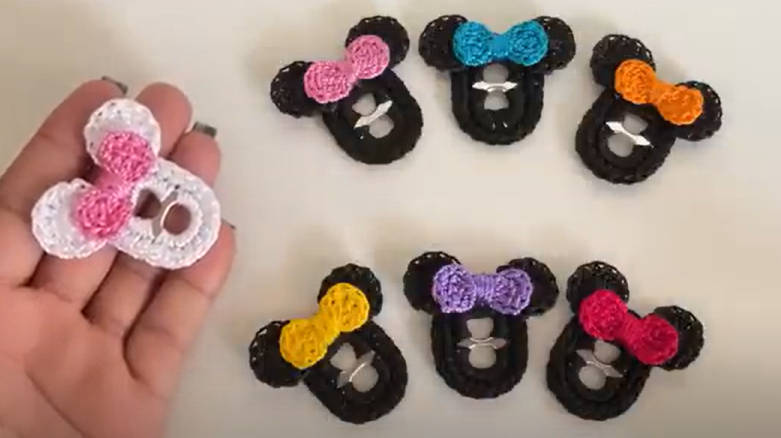
Using tin seals (also known as soda can pull tabs) as the base, this pattern shows how to create a structured and durable keychain shaped like Minnie Mouse. The addition of classic crochet stitches brings warmth and personality to the otherwise cold metal base. And because it’s Minnie, of course, the final touch is her iconic bow, which you’ll learn how to make in just a few steps.
In this article, you’ll get a complete breakdown of the Crochet Minnie keychain made with tin seals – Pattern, from the materials you’ll need to detailed instructions, customization ideas, and even tips on selling your creations. Plus, you’ll find answers to the most frequently asked questions at the end to help you succeed with your project.
1. Why Make a Crochet Minnie Keychain with Tin Seals?
Creating a Crochet Minnie keychain made with tin seals – Pattern is more than just a craft project—it’s a statement about sustainability and creativity. Tin seals are often discarded without a second thought, but they can become the perfect structure for small, functional crochet projects.
First, using tin seals adds a unique shape and durability that pure yarn crafts might not offer. The seals form a strong foundation, making your keychain long-lasting and giving it a professional look without the need for expensive materials.
Second, it’s a great way to repurpose materials that would otherwise go to waste. Incorporating recycling into your craft not only saves money but also helps reduce your environmental impact. And when your end product is a cute Minnie Mouse design, it’s hard not to love the outcome.
This pattern is perfect for gifting. Whether it’s a birthday, a baby shower, or a handmade holiday stocking stuffer, the Crochet Minnie keychain made with tin seals – Pattern is guaranteed to bring smiles. Its recognizable shape and joyful character make it a hit among all age groups.
Because it’s small and lightweight, this project is also ideal for craft fairs or online shops. The keychain can be sold at an affordable price with minimal cost to you, making it a great item for those looking to start a handmade business.
Finally, working on small, detailed projects like this one is excellent for improving your crochet precision. You’ll get to practice stitches in tight spaces, join materials, and work in the round—all essential skills for progressing in your crochet journey.
2. Materials Needed and Preparation
To begin your Crochet Minnie keychain made with tin seals – Pattern, gather all the required materials first. This will ensure a smooth crafting experience and save you time during the process.
You’ll need three soda can pull tabs, which will be used to shape Minnie’s iconic ears and face. Make sure the tabs are clean and not bent or damaged. You can collect these over time or ask friends and family to save them for you.
Choose a cotton or acrylic yarn in three main colors: black (for the head and ears), red or pink (for the bow), and white or beige (for optional facial detailing). Use a 2.5mm to 3.5mm crochet hook, which is ideal for small-scale projects like keychains.
A yarn needle will be necessary to weave in the ends, and scissors for trimming the yarn. You’ll also need a keychain ring or lobster clasp, which will be attached to the top of Minnie’s head so the piece can be easily used on bags, keys, or zippers.
Stitch markers can help if you’re working in continuous rounds. While not essential, they’re useful for keeping your place, especially when forming the circular parts around the tin seals.
Optional items include glue or a hot glue gun if you want to reinforce the keychain pieces or add decorative elements like rhinestones or tiny buttons to Minnie’s bow for a little sparkle.
3. How to Crochet the Minnie Keychain Step by Step
Starting your Crochet Minnie keychain made with tin seals – Pattern is easier than it looks. Once your materials are ready, the process is straightforward and satisfying.
Begin by crocheting around one tin seal to create Minnie’s face. Use your black yarn and make single crochet stitches evenly around the entire edge of the seal. This might take some patience as the metal is not flexible, but the result is a tight, professional base.
Next, crochet around two separate tin seals for the ears. These will be attached on either side of the first seal to form the classic Minnie Mouse head shape. Be sure to crochet tightly and evenly to keep the shape symmetrical.
Use your yarn needle to stitch the ears to the head securely. If you want extra reinforcement, a dab of hot glue can help hold everything in place while you stitch. Be careful to align the ears evenly so the final piece looks balanced.
Now it’s time to make the bow. Use red or pink yarn and chain a small base—usually 10 to 12 chains—then work back in single or half-double crochet rows to create a rectangle. Pinch the center and wrap it with yarn to form the bow shape.
Sew or glue the bow to the center top of Minnie’s head, right between the ears. This detail brings the keychain to life and gives it that signature Minnie look that fans adore.
Finally, attach the keychain ring at the top. You can either crochet a small loop at the top of Minnie’s head or stitch the ring directly through the yarn for a more seamless finish.
4. Customization Ideas and Tips for Selling
The Crochet Minnie keychain made with tin seals – Pattern is charming on its own, but it also serves as a fantastic base for creative customization. With just a few tweaks, you can turn this project into a whole collection.
Change the color of the bow to match the seasons or events. Red and green for Christmas, pastels for spring, or even sparkly yarn for party favors. Each color variation can give your Minnie keychain a new personality.
You can also experiment with facial features. Use small stitches to add eyes, a nose, or even eyelashes. For those who prefer minimalist designs, keeping the keychain featureless but iconic still works beautifully.
Consider making a matching Mickey version by simply removing the bow. This allows you to sell or gift them in pairs, which is especially appealing for couples or friends.
Packaging your keychains nicely can also boost their appeal. Use small kraft paper cards, clear bags, or themed labels to give your handmade piece a professional touch.
If you’re selling online or at craft fairs, be sure to photograph your products in natural light and provide clear descriptions. Mention that the keychains are handmade using recycled materials, which is a great selling point for eco-conscious buyers.
Lastly, think about bulk orders for parties or events. The pattern is quick enough that you can make several in a short time, and offering sets of 5 or 10 keychains can help you increase your revenue while keeping production manageable.
FAQ – Frequently Asked Questions
1. What are tin seals and where can I find them?
Tin seals are the pull tabs found on soda or beverage cans. You can collect them from your own drinks or ask friends and family to save them. Make sure they’re clean and not bent before using.
2. Is the Crochet Minnie keychain made with tin seals – Pattern beginner-friendly?
Yes! The pattern uses basic crochet stitches and techniques. The most challenging part is working around the metal tab, but with a bit of practice, even beginners can master it.
3. What type of yarn works best for this project?
Cotton yarn is preferred for its strength and clean finish, but you can also use acrylic. Choose a yarn that holds its shape well and isn’t too bulky, especially for small-scale work like this.
4. Can I wash the keychain if it gets dirty?
Spot cleaning is recommended. Use a damp cloth and mild soap if needed. Avoid soaking the piece in water, especially if you’ve used glue in assembly.
5. How can I attach the keychain to bags or zippers?
Using a lobster clasp or key ring allows for easy attachment. You can stitch or crochet a loop at the top of Minnie’s head to secure the ring or clasp in place.
6. Can I sell keychains made with this pattern?
Absolutely. Handmade crochet keychains using recycled materials are popular items at craft fairs and online marketplaces. Just be sure to credit the pattern if required and maintain good craftsmanship.
Conclusion
The Crochet Minnie keychain made with tin seals – Pattern is a wonderful combination of creativity, sustainability, and charm. It’s an easy yet rewarding project that brings joy to both the maker and the recipient. With a few basic materials and a bit of crochet know-how, you can turn discarded tin seals into adorable keychains that everyone will love.
Whether you’re making them for yourself, gifting them to friends, or selling them in your shop, this pattern is a fun way tomerge recycling with art. If you tried the pattern, we’d love to hear your feedback! Leave your honest opinion and suggestions below, and share your finished creations with fellow crafters. Happy crocheting!