Creating a CROCHET MOUSE SQUARE – Pattern is an exciting and fun project for both beginner and experienced crocheters. This pattern combines the charm of adorable mouse designs with the versatility of square motifs, perfect for blankets, cushions, or decorative pieces. A CROCHET MOUSE SQUARE – Pattern allows you to experiment with colors, textures, and techniques, giving you a finished piece that is both playful and creative.
The beauty of a CROCHET MOUSE SQUARE – Pattern is that it can be adapted to different sizes and skill levels. Whether you are looking to make a small square for an appliqué or a full blanket composed of multiple squares, this pattern is both practical and enjoyable. It encourages creativity while also reinforcing basic crochet skills like chain stitches, double crochet, and slip stitches.
In this guide, we will explain everything you need to know to successfully create a CROCHET MOUSE SQUARE – Pattern. From gathering the necessary materials to step-by-step instructions, creative uses, and tips for perfecting your technique, this article is designed to help you create a polished, professional-looking piece. By the end, you will have the knowledge and confidence to craft your own mouse-themed crochet squares with ease.
1. Materials Needed for a CROCHET MOUSE SQUARE – Pattern
Before starting your CROCHET MOUSE SQUARE – Pattern, gathering the right materials is essential. Proper tools and supplies ensure that your squares are even, neat, and easy to assemble into larger projects.
First, choose the right yarn. Cotton or acrylic yarn works best because it holds its shape well and is available in various colors. For a standard mouse square, consider using a neutral color for the mouse and a contrasting background color for the square.
Next, select the correct crochet hook. The size of your hook should match the yarn weight, usually indicated on the yarn label. A hook size of 4 mm to 5 mm is ideal for medium-weight yarn. This ensures that your stitches are uniform and your square maintains a neat shape.
You will also need scissors for cutting yarn and a tapestry needle for weaving in ends. These tools are essential for finishing your crochet pieces professionally.
Optional items include stitch markers, which help you keep track of rounds, especially if you’re creating multiple layers or complex mouse designs. Buttons, beads, or small embellishments can also add charm to your mouse square.
Finally, a comfortable workspace with good lighting is important. Working in a well-lit, comfortable area reduces strain on your hands and eyes, making the crochet process more enjoyable.
2. Step-by-Step Instructions for a CROCHET MOUSE SQUARE – Pattern
Making a CROCHET MOUSE SQUARE – Pattern can seem daunting at first, but by following step-by-step instructions, even beginners can create a beautiful result. The pattern begins with a basic square foundation and then adds the mouse details.
Start by creating a foundation chain according to the desired square size. For a medium-sized square, a chain of 20-25 stitches works well. Join the chain into a loop with a slip stitch to form the base of your square.
Next, crochet the first round around the chain using single crochet stitches. This establishes a solid base for your square. Ensure that your stitches are even, as this affects the overall symmetry of your square.
For the second round, add double crochet stitches and corners to maintain the square shape. Crochet evenly across the sides and use three stitches in each corner to allow your square to lay flat. Repeat this for 3-4 rounds until your square reaches the desired size.
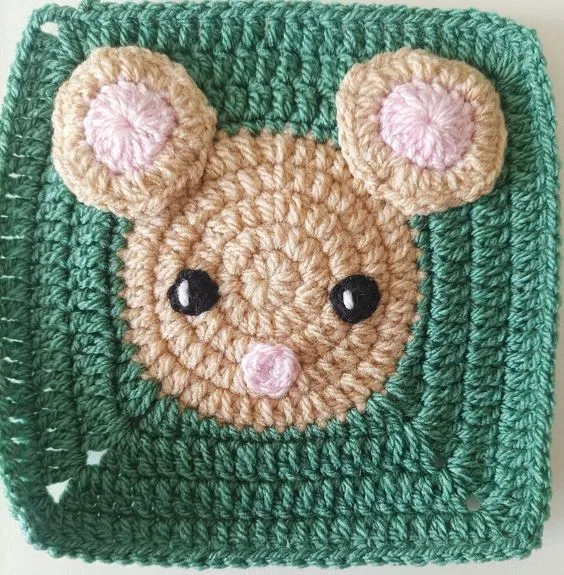
Once the base square is complete, it’s time to create the mouse features. Start with the ears, making two small circles using a magic ring and single crochet stitches. Attach the ears securely to the top corners of your square using a tapestry needle.
The face of the mouse can be embroidered with yarn or created using small buttons or beads for eyes. Add a small embroidered nose and whiskers for a cute, finished look.
Finally, weave in all loose ends and block your square if necessary. Blocking helps to flatten the square and ensure that the mouse details remain symmetrical and neat. Your CROCHET MOUSE SQUARE – Pattern is now ready to use or assemble into a larger project.
3. Creative Uses for Your CROCHET MOUSE SQUARE
Once you have completed your CROCHET MOUSE SQUARE – Pattern, there are countless ways to use it in creative projects. These squares are versatile, functional, and decorative, making them perfect for a variety of applications.
One of the most popular uses is creating blankets or afghans. Combine multiple mouse squares in different colors to form a cozy, charming blanket that is perfect for children or as a whimsical home décor item.
You can also use your crochet mouse squares as cushion covers. Sew a single square onto a pillow form or combine multiple squares for a larger, patchwork-style cushion. The playful mouse design adds a unique touch to any living space.
Another idea is to make appliqués for bags, hats, or scarves. A single mouse square can be attached to a bag flap or scarf end, creating a fun, personalized accessory that stands out.
Crochet mouse squares are also perfect for wall décor. Frame individual squares or stitch multiple squares together to form a tapestry that adds a whimsical element to a nursery or playroom.
They can be used in educational projects as well. Children love engaging with tactile items, and a mouse-themed square can be part of interactive games, learning mats, or story-based activities.
Finally, gift items are a fantastic option. Handmade crochet mouse squares make thoughtful, personalized gifts for birthdays, holidays, or baby showers, showcasing your creativity and skill.
4. Tips for Perfecting Your CROCHET MOUSE SQUARE Technique
Even an easy CROCHET MOUSE SQUARE – Pattern can benefit from a few expert tips to enhance its appearance and quality. Attention to detail and technique ensures your squares are consistent and professional-looking.
First, maintain consistent tension throughout your work. Uneven tension can cause your square to warp or the mouse features to look disproportionate. Practice helps you achieve even stitches.
Second, choose contrasting yarn colors wisely. The mouse should stand out against the square background, but avoid colors that clash. Soft, complementary shades often look best.
Third, practice your embroidery skills. Small facial details like eyes, nose, and whiskers require precision. Using a fine yarn or thread for embroidery ensures your mouse looks clean and detailed.
Fourth, use stitch markers to track corners and rounds. This is especially helpful when making multiple squares to ensure consistency in size and shape.
Fifth, experiment with square sizes. Larger squares work well for blankets, while smaller squares can be used for appliqués or ornaments. Adjust the base chain and number of rounds accordingly.
Finally, store your squares properly. Keep them flat and in a dry environment to prevent stretching or damage, especially if you plan to assemble them into larger projects later.
FAQ About CROCHET MOUSE SQUARE – Pattern
1. Is the CROCHET MOUSE SQUARE – Pattern suitable for beginners?
Yes! The pattern is beginner-friendly, using basic crochet stitches like chain, single crochet, and double crochet, with simple embroidery for mouse features.
2. What yarn is best for a crochet mouse square?
Cotton or acrylic yarn works best. They hold shape well, are easy to work with, and come in a variety of colors.
3. How long does it take to make one mouse square?
It typically takes 30-60 minutes, depending on skill level and square size. Beginners may take a little longer.
4. Can I use these squares to make blankets?
Absolutely! Multiple squares can be joined to create blankets, throws, or afghans with a playful mouse design.
5. How do I attach the mouse features securely?
Use a tapestry needle and matching yarn to sew ears and embroidered details securely onto the square.
6. Can I wash crochet mouse squares?
Yes, cotton and acrylic yarns are generally washable. Always follow the care instructions on your yarn label.
Conclusion
Creating a CROCHET MOUSE SQUARE – Pattern is a fun, creative, and rewarding project. You’ve learned the materials needed, step-by-step instructions, creative uses, and expert tips to perfect your technique. With practice, you can make multiple squares for blankets, cushions, appliqués, and gifts.
Now it’s your turn! Try making your own crochet mouse square, experiment with colors and designs, and share your results. Leave your honest opinion and suggestions below — your feedback inspires others and helps improve future guides. Happy crocheting!