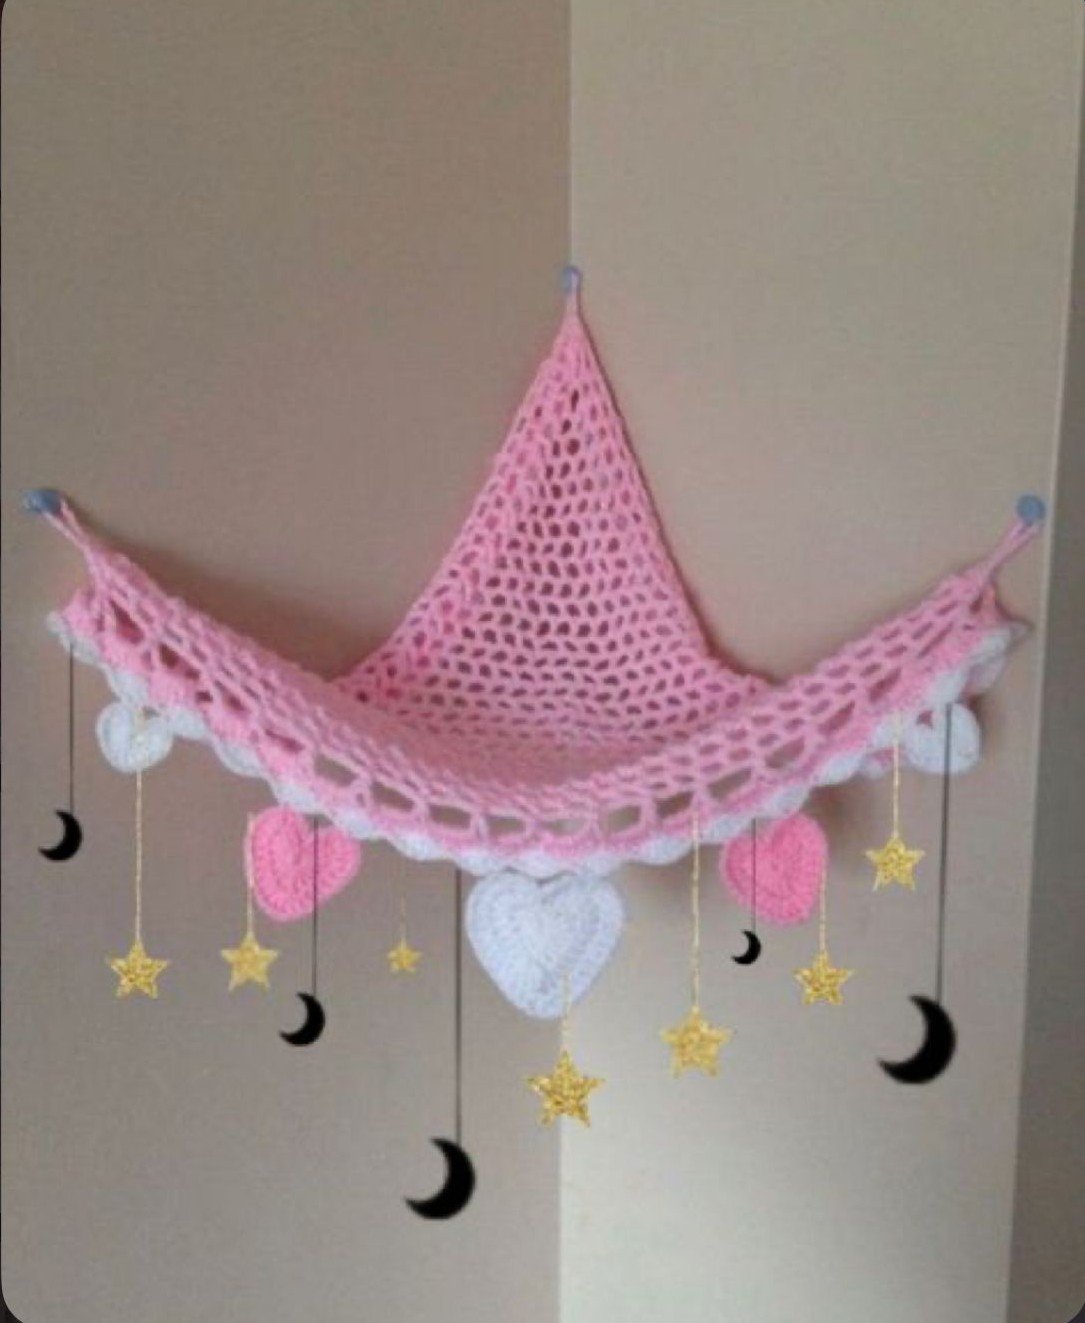
Crochet Net for Toys – Pattern is one of the most practical and charming projects you can undertake to organize a nursery or playroom while adding a touch of handmade warmth. If you are tired of tripping over plushies or seeing a mountain of stuffed animals taking over the bed, learning how to create a custom Crochet Net for Toys – Pattern is the ultimate solution for vertical storage. This project is not only functional but also incredibly beginner-friendly, allowing you to master basic stitches while producing something that serves a real purpose in your home.
Choosing to work on a Crochet Net for Toys – Pattern gives you the creative freedom to match the decor of any room by simply switching up your yarn colors or textures. Beyond the aesthetic appeal, a Crochet Net for Toys – Pattern is highly durable and flexible, stretching just enough to accommodate an ever-growing collection of toys without losing its structural integrity. It is an eco-friendly alternative to plastic bins, utilizing breathable mesh designs that keep toys visible and accessible for children.
In this comprehensive guide, we will dive deep into everything you need to know about crafting your own Crochet Net for Toys – Pattern. We will cover the essential materials, the step-by-step logic behind the mesh stitch, and how to properly mount your finished piece for maximum safety. Whether you are making this for your own family or as a thoughtful gift for a baby shower, this Crochet Net for Toys – Pattern will quickly become one of your favorite “quick-win” crochet projects.
1. Essential Materials for Your Crochet Net for Toys – Pattern
To begin your Crochet Net for Toys – Pattern, you first need to select the right yarn. Since this net will be holding weight, a cotton yarn or a sturdy acrylic blend is highly recommended to prevent excessive sagging over time.
The hook size is equally important when working on a Crochet Net for Toys – Pattern. Typically, a 5.0mm (H) or 6.0mm (J) hook works best, as it allows for a looser, more fluid tension that complements the open-work nature of a toy hammock.
You will also need a few basic notions to complete your Crochet Net for Toys – Pattern successfully. Ensure you have a tapestry needle for weaving in ends, a pair of sharp scissors, and stitch markers to keep track of your corner increases.
Hardware is the final piece of the puzzle for a functional Crochet Net for Toys – Pattern. You should look for wall hooks or suction cups (if mounting on glass) that can support the weight of the toys once the net is filled.
Measuring tape is vital for ensuring your Crochet Net for Toys – Pattern reaches the desired dimensions. A standard corner net usually measures about 30 to 40 inches across the front edge once it is fully stretched out.
Lastly, consider adding embellishments to your Crochet Net for Toys – Pattern. Using wooden beads or adding a scalloped border can elevate the design from a simple utility item to a beautiful piece of nursery decor.
2. Understanding the Mesh Stitch in a Crochet Net for Toys – Pattern
The core of any Crochet Net for Toys – Pattern is the mesh stitch, which is essentially a series of chains and double crochet (or single crochet) stitches. This creates the “holes” that allow the net to expand and contract.
To start the body of your Crochet Net for Toys – Pattern, you will usually begin at one corner and increase outwards. This creates a triangular shape that fits perfectly into the corner of a room, maximizing unused space.
The “v-stitch” or “space-stitch” technique is commonly used in a Crochet Net for Toys – Pattern. By working a chain-2 or chain-3 between your solid stitches, you create the grid-like pattern necessary for a stuffed animal net.
Tension control is a key factor when following a Crochet Net for Toys – Pattern. You want your stitches to be consistent so that the diamond mesh looks uniform, but you should avoid pulling the yarn too tight, as the net needs to be “bouncy.”
As you progress through the Crochet Net for Toys – Pattern, you will notice the rows getting longer. This is the beauty of the increase rows, where you add an extra mesh loop at the beginning and end of every row to grow the triangle.
The versatility of the Crochet Net for Toys – Pattern means you can stop whenever the net reaches your preferred size. Once the width is sufficient to hold your plushie collection, you can finish the edge with a stabilizing row of single crochet.
3. Step-by-Step Instructions for the Crochet Net for Toys – Pattern
Start your Crochet Net for Toys – Pattern by making a slip knot and chaining 6, then joining to form a small ring or working into the first chain. This will be the bottom point of your toy storage net.
In the first row of your Crochet Net for Toys – Pattern, you will work a series of double crochets and chain spaces into the ring. This establishes the foundation for the mesh that will eventually hold the toys.
Continuing the Crochet Net for Toys – Pattern, turn your work and chain 4 (which acts as your first DC and a space). Work the next stitch into the previous space to begin the expanding grid effect.
It is important to check your progress frequently while working on the Crochet Net for Toys – Pattern. Lay the triangle flat on a table to ensure it isn’t curling; if it is, you may need to increase your chain count between the stitches.
Once the Crochet Net for Toys – Pattern has reached about 3 feet in width, it is time to create the hanging loops. These are reinforced loops at the three corners of the triangle made of multiple tight chain stitches.
To finish the Crochet Net for Toys – Pattern, work a final decorative border if desired. A shell stitch or picot edge can add a professional look, ensuring your handmade toy net looks like a boutique find.
4. Mounting and Safety Tips for Your Crochet Net for Toys – Pattern
Proper installation is crucial for the longevity of your Crochet Net for Toys – Pattern. You must identify the studs in the wall or use heavy-duty wall anchors to ensure the net doesn’t fall when loaded with heavy toys.
Positioning the Crochet Net for Toys – Pattern at the correct height is a safety priority. It should be high enough to be out of reach of infants to prevent any entanglement hazards, yet accessible enough for older children.
When hanging the Crochet Net for Toys – Pattern, stretch it slightly before marking your hook placements. This “pre-tensioning” ensures that the toy hammock won’t sag too low once the weight of the stuffed animals is added.
Maintenance of your Crochet Net for Toys – Pattern is simple but necessary. Because it is made of yarn, it can collect dust; simply remove the toys and hand wash the net in cool water, then air dry to keep it fresh.
If you find that your Crochet Net for Toys – Pattern is stretching too much over time, you can “weave” a piece of non-stretch ribbon through the top edge. This provides an extra layer of support for very large toy collections.
Finally, always supervise young children around a Crochet Net for Toys – Pattern. While they are wonderful for organization, they are not intended for climbing or as a swing, so teaching kids how to safely remove toys from the crochet mesh is key.
FAQ: Common Questions About the Crochet Net for Toys – Pattern
How much yarn do I need for a standard Crochet Net for Toys – Pattern?
Most projects require approximately 150 to 200 yards of medium-weight yarn. However, if you want a jumbo-sized storage net, you might need two skeins of cotton yarn.
Can a beginner finish this Crochet Net for Toys – Pattern?
Absolutely! This is a perfect beginner crochet project because it uses basic stitches like the chain and double crochet. The repetitive nature of the mesh makes it great practice for maintaining even tension.
What is the best way to clean a Crochet Net for Toys – Pattern?
Since most are made from cotton or acrylic, you can usually machine wash them on a delicate cycle inside a lingerie bag. However, hand washing and laying flat to dry is the best way to preserve the shape of the crochet mesh.
How do I prevent the net from sagging too much?
To minimize sagging in your Crochet Net for Toys – Pattern, use a smaller hook than recommended for the yarn weight to create tighter stitches, or choose a yarn with zero elasticity, like 100% mercerized cotton.
Can I make this net in different shapes?
While the triangle is the most popular for corners, you can adapt the Crochet Net for Toys – Pattern into a rectangle to hang against a flat wall or even a circular “pod” style for a different look.
What are the best hooks to use for hanging the net?
For permanent installation, screw-in ceiling hooks are best. For renters, high-quality adhesive hooks can work, provided the weight of the toys does not exceed the hook’s weight limit.
Conclusion
In this article, we explored the complete process of creating a Crochet Net for Toys – Pattern, starting from the selection of durable cotton yarns to the technical execution of the mesh stitch.
We discussed how to grow the triangular shape through consistent increases and the importance of finishing the project with sturdy hanging loops for safety and durability. By following this Crochet Net for Toys – Pattern, you have learned not just a craft technique, but a practical way to organize a home with style and personal flair.